


You are using an out of date browser. It may not display this or other websites correctly.
You should upgrade or use an alternative browser.
You should upgrade or use an alternative browser.
LiFePO4 heating pad for cold temperatures
- Thread starter Will Prowse
- Start date
Wouldn't it be more efficient to have the heating pad on the bottom of the batteries so it would radiate up into the battery? It seems that having them on the side of the battery a significant amount of the heat is going away from the battery.
The heating pad on the bottom would be good for radiating heat up. No disagreement there. But the heating pad is not completely flat. Very close though. There would be a lump under the cell on the end. I don't know how the heating elements would stand up to having forty something pounds of battery on them.
Heating may be more even with a pad on each side. I will put insulation behind each pad to ensure that the heat stays at the battery. Insulation on top of the battery will also be included.
With 20/20 hindsight, after I built my compression frame, it is possible to create a gap under the batteries. However, since I already have the custom made pads for the sides, that is the path I'm taking.
Wouldn't it be more efficient to have the heating pad on the bottom of the batteries so it would radiate up into the battery? It seems that having them on the side of the battery a significant amount of the heat is going away from the battery.
It would only be useful if there was air convection between the pad and the cells. Here the pad will be in direct contact with the cells which is much better, putting it under instead of the side will make no difference.
Radiation happens in a straight line and in all directions (it's like light from a light bulb) and conduction happens by direct contact, so if there's no convection in addition to that then up/down, vertical/horizontal, etc... makes no difference
")
Last edited:
TGPB
New Member
- Joined
- Aug 16, 2020
- Messages
- 134
Has anyone tried the bee hive heaters? They only draw 1 amp and if used with something like a Honeywell T6031A1029 they would not use any power until it was needed. This should work especially good if your cells are in an enclosure.
TGPB
New Member
- Joined
- Aug 16, 2020
- Messages
- 134
Heat rises.It would only be useful if there was air convection between the pad and the cells. Here the pad will be in direct contact with the cells which is much better, putting it under instead of the side will make no difference.
Radiation happens in a straight line and in all directions (it's like light from a light bulb) and conduction happens by direct contact, so if there's no convection in addition to that then up/down, vertical/horizontal, etc... makes no difference
Heat rises.
Actually no. Heated air is less dense than colder air and less dense air rises in colder air because of buoyancy. If you don't have air as your interface (which you don't have when there's a direct contact obviously), and/or you don't have any gravity, then nothing rises.
Did u come up with anything ? I’ve looked on aliexpress —just not sure...I've had some cold temps for a couple of mornings to test my heat pad with external digital thermostat. The pad is like the one Will posted at the bottom of his original post. I used settings a bit lower than the ones the pad comes with. Both mornings of about freezing my batteries were at 50.3° F
I have some ideas about making my own that won't be limited to any predetermined shape or size. Waiting on some parts to show up from China. More to come.
somewhereinusa
Solar Enthusiast
Got side tracked. That project is on a back burner for now.Did u come up with anything ? I’ve looked on aliexpress —just not sure...
Gulam Solar
New Member
- Joined
- Sep 22, 2019
- Messages
- 71
If you are trying to use a lifepo4 battery in freezing cold temperatures, battle born just released a 12v heat pad for keeping the batteries warm without melting the case. This pad should work for any standard lifepo4 battery. Just slap it under your batteries and connect it to 12v and you are done.
I think it is over priced though. It can be found here: Click Here for battle born heater pad
If you cannot afford the battle born pad, you can use a septic tank heater pad. It works in the same way but may possibly melt your battery case if you are not careful. You can avoid this by adding some protection or a way to distribute the heat across your entire battery bank. I would personally put the batteries in a insulated container, then add a thin sheet of conductive material like sheet aluminum over the pad so that the heat it produces can warm up your entire battery bank.
Cheaper heater pad source: Click here for heater pa
I like that?. I’m using something similar its for a dog kennel. Supposed to keep heat at around 18deg c. Similar price. On the same site as Wills heat pad.If you are trying to use a lifepo4 battery in freezing cold temperatures, battle born just released a 12v heat pad for keeping the batteries warm without melting the case. This pad should work for any standard lifepo4 battery. Just slap it under your batteries and connect it to 12v and you are done.
I think it is over priced though. It can be found here: Click Here for battle born heater pad
If you cannot afford the battle born pad, you can use a septic tank heater pad. It works in the same way but may possibly melt your battery case if you are not careful. You can avoid this by adding some protection or a way to distribute the heat across your entire battery bank. I would personally put the batteries in a insulated container, then add a thin sheet of conductive material like sheet aluminum over the pad so that the heat it produces can warm up your entire battery bank.
Cheaper heater pad source: Click here for heater pad
8milimeter
New Member
- Joined
- May 25, 2020
- Messages
- 54
I have searched the net and can not find any real reviews for the battleborn heat pad. Does anyone have then yet !!
Love to see a video on installation and performance.
Love to see a video on installation and performance.
I just wanted to post an update to my self heating battery since it's miserably cold today here in Colorado. I'm in the process of moving in to a new home which has an uninsulated garage, so the battery box has been placed out there to free up room in my truck bed (for hauling crap during the move)
Battery box has been in garage for the last 2 months but it wasn't until yesterday/today that we got true winter weather which has resulted in the garage being 19*F this morning. Heating function had been disabled months ago because (pleasant temps) until I noticed today.
Setup: giant steel ammo can with a U-shaped 3/4" thick piece of wood on the bottom. On top of that is a 1/4" thick piece of aluminum sheet. Stuck to the bottom of the aluminum sheet, in the void of the U shape, is a 120x120mm "120w 12v Silicone heat pad with thermistor". It's like radiant floor heating, I guess.
The heat pad is controlled by a 3d printer heat controller which I originally set up to do PID heating, supplying just enough juice to maintain my set temperature. The complexity of that in my microcontroller code was more than it was worth, and I decided to supply it with a static value of "60". This significance of this value is that the pad will only draw a maximum of 15 watts. I didn't want to cook anything.
When the box is sealed up and ambient temps are say... 38*F, it's not uncommon for the value read at the heat pad/aluminum sheet floor to reach 90*F. That's when I shut it off. Even if the BMS and its probe, or the Victron BMV, show 38*F still, if the floor is 90 we call it quits and let it slowly heat the box without cooking the cells from the bottom. The floor temp will drop after a few seconds and heat will re-enable until 90ish again, cycle repeats.
------
10am: BMS onboard temp, its probe, the Victron BMV, and the floor all read ~31*F. Enabled heating.
10:30am: I honestly expected the floor to be bouncing off its 90*F cutoff, but it's got a lot of cold material working against it, and the cement floor of the garage that the ammo can is sitting directly on. I could easily make the plate be allowed to draw more than 15 watts, but in the real world maintaining a constant temp there's no need to give it a TON of juice.
11:45am: floor is at 50*F and the sum of the BMS, its probe, and BMV is 41*F. 3 degrees shy of when charging will be enabled. I'm running a 24v power supply as PV input to my victron MPPT, operating on a timer to simulate real world solar. I've had that charge source set up since I put the can in the garage, as the LTE router and microcontrollers are always ON.
I suspect in the next hour things will have warmed up sufficiently, charging will be enabled, and all the power consumed in the ~3 hour warm up will be replenished. I don't have the insulated lid on the box, just a piece of crummy styrofoam laid on top of it and weighted down with a socket wrench, poorly.
In short: the setup still works. The can is lined with very thin (less than 1/4") foam insulation with mylar backing/face. Like reflectix but not bubble wrap inside. Very minimal R value I'm sure. When the heat runs it consumes ~1.1 amps / 15w capped. I ran this battery all winter in my truck last season and its consumption was pretty much negligible. The only time I got in the hole was when I let a foot of snow sit on top of the truck's panels for days at a time. That's basically heating a box to keep it prepped for charging, knowing it won't be receiving charge until I cleared the snow. Even still, I was able to replenish the pack 3 days later when the 200w of solar panels were cleared off.
This has proven to be an extremely reliable way to keep my battery warm and if I didn't have the space limitations of the ammo can, I could have used 3/4" foam insulation or better and I'm sure it'd just sip power. Parts cost was like $20 for the 3d printer heat pad and the 3d printer controller. Add another couple bucks in for the arduino or microcontroller of your choice. Code for the heating stuff is dirt simple, the bulk of my code is reading values from the "smart bms". You could omit all of that code and just use an arduino, a few DS18B20 temperature sensors, and the 3d printer pad+controller.
Last edited:
I just wanted to post an update to my self heating battery since it's miserably cold today here in Colorado. I'm in the process of moving in to a new home which has an uninsulated garage, so the battery box has been placed out there to free up room in my truck bed (for hauling crap during the move)
Battery box has been in garage for the last 2 months but it wasn't until yesterday/today that we got true winter weather which has resulted in the garage being 19*F this morning. Heating function had been disabled months ago because (pleasant temps) until I noticed today.
Setup: giant steel ammo can with a U-shaped 3/4" thick piece of wood on the bottom. On top of that is a 1/4" thick piece of aluminum sheet. Stuck to the bottom of the aluminum sheet, in the void of the U shape, is a 120x120mm "120w 12v Silicone heat pad with thermistor". It's like radiant floor heating, I guess.
The heat pad is controlled by a 3d printer heat controller which I originally set up to do PID heating, supplying just enough juice to maintain my set temperature. The complexity of that in my microcontroller code was more than it was worth, and I decided to supply it with a static value of "60". This significance of this value is that the pad will only draw a maximum of 15 watts. I didn't want to cook anything.
When the box is sealed up and ambient temps are say... 38*F, it's not uncommon for the value read at the heat pad/aluminum sheet floor to reach 90*F. That's when I shut it off. Even if the BMS and its probe, or the Victron BMV, show 38*F still, if the floor is 90 we call it quits and let it slowly heat the box without cooking the cells from the bottom. The floor temp will drop after a few seconds and heat will re-enable until 90ish again, cycle repeats.
------
10am: BMS onboard temp, its probe, the Victron BMV, and the floor all read ~31*F. Enabled heating.
10:30am: I honestly expected the floor to be bouncing off its 90*F cutoff, but it's got a lot of cold material working against it, and the cement floor of the garage that the ammo can is sitting directly on. I could easily make the plate be allowed to draw more than 15 watts, but in the real world maintaining a constant temp there's no need to give it a TON of juice.
11:45am: floor is at 50*F and the sum of the BMS, its probe, and BMV is 41*F. 3 degrees shy of when charging will be enabled. I'm running a 24v power supply as PV input to my victron MPPT, operating on a timer to simulate real world solar. I've had that charge source set up since I put the can in the garage, as the LTE router and microcontrollers are always ON.
I suspect in the next hour things will have warmed up sufficiently, charging will be enabled, and all the power consumed in the ~3 hour warm up will be replenished. I don't have the insulated lid on the box, just a piece of crummy styrofoam laid on top of it and weighted down with a socket wrench, poorly.
In short: the setup still works. The can is lined with very thin (less than 1/4") foam insulation with mylar backing/face. Like reflectix but not bubble wrap inside. Very minimal R value I'm sure. When the heat runs it consumes ~1.1 amps / 15w capped. I ran this battery all winter in my truck last season and its consumption was pretty much negligible. The only time I got in the hole was when I let a foot of snow sit on top of the truck's panels for days at a time. That's basically heating a box to keep it prepped for charging, knowing it won't be receiving charge until I cleared the snow. Even still, I was able to replenish the pack 3 days later when the 200w of solar panels were cleared off.
This has proven to be an extremely reliable way to keep my battery warm and if I didn't have the space limitations of the ammo can, I could have used 3/4" foam insulation or better and I'm sure it'd just sip power. Parts cost was like $20 for the 3d printer heat pad and the 3d printer controller. Add another couple bucks in for the arduino or microcontroller of your choice. Code for the heating stuff is dirt simple, the bulk of my code is reading values from the "smart bms". You could omit all of that code and just use an arduino, a few DS18B20 temperature sensors, and the 3d printer pad+controller.
Impressive!
The Arduino is where I got lost. groogled it up, got a thousand uboob videos and said mmmmm, over my head.
Guess there are others in my boat, maybe not, got to keep it simple.
Impressive!
The Arduino is where I got lost. groogled it up, got a thousand uboob videos and said mmmmm, over my head.
Guess there are others in my boat, maybe not, got to keep it simple.
Certainly not for everyone. Pretty simple stuff though in the grand scheme of things. My first venture in to environment control was with a salt water aquarium and a full PC tower. I could do everything I did back then and much more with pocket change and an arduino in 2020, infinitely more reliable too. I'd wager some of the off the shelf heating solutions have similar hardware, just stripped down to be the size of a postage stamp versus a cigarette lighter, tailored to only do what they're intended to do.
Arduino+breadboard+10pk of ds18b20 temp sensors+10pk of resistors = $peanuts for 10 points of temperature measurement with about 10 minutes familiarization/setup time. Plenty of tutorials with full color diagrams and code snippets you can drop in and quickly compile. Expanding it to get the average of all sensor values and do/do not do something (heater) is a line or two of copy/paste away. The complexity comes in to doing things like remote management, or interfacing with victron components or the BMS itself. If you know you want the box to always be 45* it's dirt simple, 2 minutes to plug in and re-flash if you change your mind to 47*.
I wouldnt recommend using a back burner, that sounds way too hot!!Got side tracked. That project is on a back burner for now.
Well if you build one and it woiks, build another one and I'll buy.Certainly not for everyone. Pretty simple stuff though in the grand scheme of things. My first venture in to environment control was with a salt water aquarium and a full PC tower. I could do everything I did back then and much more with pocket change and an arduino in 2020, infinitely more reliable too. I'd wager some of the off the shelf heating solutions have similar hardware, just stripped down to be the size of a postage stamp versus a cigarette lighter, tailored to only do what they're intended to do.
Arduino+breadboard+10pk of ds18b20 temp sensors+10pk of resistors = $peanuts for 10 points of temperature measurement with about 10 minutes familiarization/setup time. Plenty of tutorials with full color diagrams and code snippets you can drop in and quickly compile. Expanding it to get the average of all sensor values and do/do not do something (heater) is a line or two of copy/paste away. The complexity comes in to doing things like remote management, or interfacing with victron components or the BMS itself. If you know you want the box to always be 45* it's dirt simple, 2 minutes to plug in and re-flash if you change your mind to 47*.
As long as it gets a tail light guarantee.
Tail light guarantee means it lasts until the delivery trucks lights are out of view. ; )
8milimeter
New Member
- Joined
- May 25, 2020
- Messages
- 54
Battleborn Heat pads !
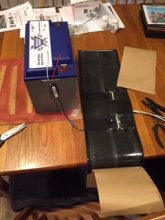
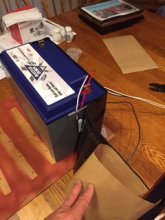
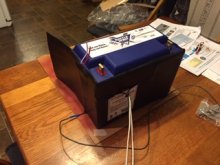
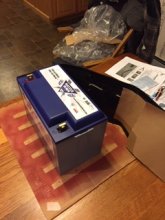
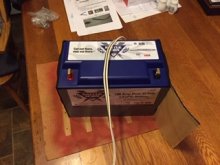
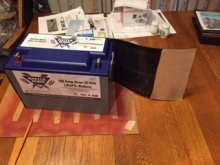
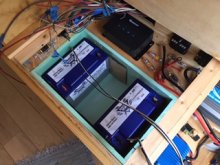
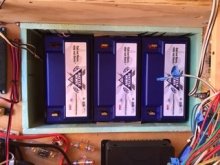
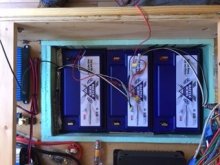
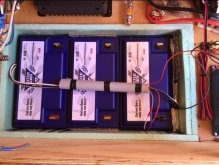
I went ahead and ordered 3 BB 100AH and two heat pads.
I only ordered two pad because I wanted to surround the battery bank rather then each battery.
It went well. Will post results when system is complete and it gets colder.
I went ahead and ordered 3 BB 100AH and two heat pads.
I only ordered two pad because I wanted to surround the battery bank rather then each battery.
It went well. Will post results when system is complete and it gets colder.
Attachments
-
 IMG_3339.JPG36.8 KB · Views: 30
 -
 IMG_3341.JPG52.3 KB · Views: 29
 -
 IMG_3342.JPG55 KB · Views: 30
 -
 IMG_3343.JPG40.8 KB · Views: 29
 -
 IMG_3344.JPG54.4 KB · Views: 28
 -
 IMG_3345.JPG54.8 KB · Views: 27
 -
 IMG_3347.JPG37.9 KB · Views: 28
 -
 IMG_3346.JPG39.7 KB · Views: 37
 -
 IMG_3348.JPG48.2 KB · Views: 37
 -
 IMG_3350.JPG17.7 KB · Views: 37
8milimeter
New Member
- Joined
- May 25, 2020
- Messages
- 54
Battleborn Heat pads !
I went ahead and ordered 3 BB 100AH and two heat pads.
I only ordered two pad because I wanted to surround the battery bank rather then each battery.
It went well. Will post results when system is complete and it gets colder
Wiring these up is a challenge. I wanted the ability to remove the batteries without cutting wires. Ended up using 4 disconnects.
Glad I only used two pads. Wiring three would have been a bigger pain.
Attachments
Last edited:
Similar threads
- Replies
- 26
- Views
- 876
- Replies
- 8
- Views
- 399
- Replies
- 14
- Views
- 889