dozynsleepy
New Member
- Joined
- Oct 21, 2020
- Messages
- 12
Inspired by some of the LiFePO4 battery warmer installs posted on here I thought I would do a version for my motorhome battery box.
Purpose is to maintain a minimum temperature in the battery box to prevent triggering of the BMS low temperature cut off.
Not heating the batteries themselves. Keeping the area where they are stored above a certain temperature.
Cost was £ 74.14 GBP or about $100 USD at todays exchange rate
Components
Renogy 100ah Smart Lithium batteries located in a battery box under the floor of our motorhome.
The Battery Management System protection is triggered under the following conditions
Battery Low Temperature (Charging)
Triggering condition : Charging Temperatue ≤ 0 °C (32 °F)
Recovery condition: Charging Temperatue ≤ 5 °C (41 °F)
Battery Low Temperature (Discharging)
Triggering condition : Discharging Temperatue ≤ -20 °C ( -4 °F)
Recovery condition : Discharging Temperatue ≤ -17 °C ( 1.4 °F)
For purposes of this proof of concept set a minimum temperature of 10 °C (50 °F)
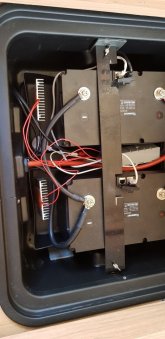
All the components sitting loose in the battery box.
The temperature sensor is sitting in the space next to the heater, it is plugged into the usb 5v power adapter.
https://shelly.cloud/products/shelly-humidity-temperature-smart-home-automation-sensor/
(Optional) wired Power for the Shelly H&T (order the USB POWER SUPPLY FOR SHELLY H&T), needs micro USB 5v adapter
https://shelly.cloud/products/shelly-1-smart-home-automation-relay/
NOTE:
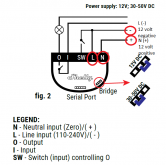
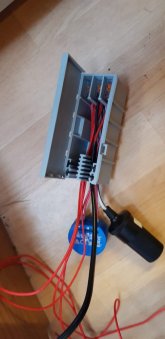
For 12 volt operation of the Shelly 1 you have to move the bridge jumper to the 12V DC position and notice that the 12 volt positive is attached to the terminal labeled N (+). Yes, you did read that correctly. Otherwise you will make the same mistake I did and end up with a destroyed relay.
or
If you don't have internet connectivity near the battery box then a traditional temperature controller which allows you to set the high and low temperature trigger points can be used.
Search for "Digital LED Temperature Controller Thermostat Control Switch 12V"
NOTE you need one that is 12 volts switching 12 volts as some are 12 volts switching AC.
Connect the Shelly 1 relay and the Shelly H&T (heat and temperature) sensor to power and follow the instructions supplied by Shelly for connection to your wifi.
Using the Shelly app on your mobile phone or tablet to create a temperature schedule (heat) with the temperature you want to maintain.
Use this to trigger the Shelly relay to power on.
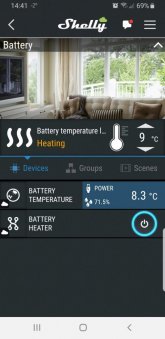
Screenshot showing temperature trigger set to 9 °C with actual temperature at 8.3 °C so the relay is powered on and the heaters are working.
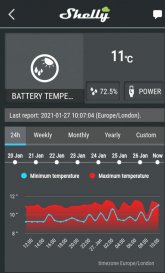
Reviewing the temperature measurements using the Shelly app.
Wago 221 series splicing connectors
3 x 221-415 COMPACT splicing connector; 5-conductor; with operating levers; 12 AWG; transparent housing
https://www.wago.com/gb/installatio...nnectors/compact-splicing-connector/p/221-415
Wagobox
https://www.wago.com/gb/electrical-...ion-terminal-blocks-and-connectors/enclosures
Optional Power for the Shelly H&T (order the USB POWER SUPPLY FOR SHELLY H&T in addition to the temperature sensor itself).
The Shelly H&T normal operation is with it's internal battery but if you prefer it hardwired add these components to provide 5v usb power.
Female 12 Volt DC Cigarette Lighter Power Plug Socket Connector Adapter
USB cigarette lighter adapter
2 x Aluminium heatsink
1 x RTV silicone sealant
Considerations
Physical size of heater - what space have you near the batteries.
What wattage of heater can you safely use in the space and need to maintain your target temperature.
Power consumption - there is no point in heating the batteries if you end up draining them in the process.
For us there was space for a small heater next to each battery so we chose a small 12 volt 15 watt silicone heater pad.
Voltage: 12 volts DC
Power: 15 Watts
Dimensions: 10 cm x 5 cm x 0.3 cm
Model: Silicone Heater Pad
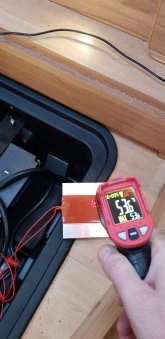
These things get very hot, I measured 100 °C ( 212 °F).
To maintain a more reasonable temperature and to aid transfer of heat I attached the silicone heater pad to an aluminium heatsink using RTV silicone sealant (temperature resistant to 250 °C).
Attached to the aluminium heatsink the silicone heater pad measured 50 °C ( 122 °F) and the front of the heatsink measured about 25 °C ( 77 °F)
Purpose is to maintain a minimum temperature in the battery box to prevent triggering of the BMS low temperature cut off.
Not heating the batteries themselves. Keeping the area where they are stored above a certain temperature.
Cost was £ 74.14 GBP or about $100 USD at todays exchange rate
Components
| Shelly H&T | 21.18 |
| usb power supply for shelly H&T | 4.41 |
| Shelly 1 | 9.62 |
| 12 volt 15 watt silicone heater pad | 6.82 |
| Aluminium heatsink | 8.08 |
| RTV Silicone sealant | 3.95 |
| Wago 221-415 COMPACT splicing connector; 5-conductor; with operating levers; 12 AWG; transparent housing | 5.6 |
| Wagobox | 1.99 |
| 3mm² 12v 24v 33a Thinwall Flat Automotive Cable 2 core twin Cut to length metre | 6.8 |
| Female 12 Volt DC Cigarette Lighter Power Plug Socket Connector Adapter | 3 |
| USB cigarette lighter adapter | 2.69 |
| Total GBP | 74.14 |
Background
Renogy 100ah Smart Lithium batteries located in a battery box under the floor of our motorhome.
The Battery Management System protection is triggered under the following conditions
Battery Low Temperature (Charging)
Triggering condition : Charging Temperatue ≤ 0 °C (32 °F)
Recovery condition: Charging Temperatue ≤ 5 °C (41 °F)
Battery Low Temperature (Discharging)
Triggering condition : Discharging Temperatue ≤ -20 °C ( -4 °F)
Recovery condition : Discharging Temperatue ≤ -17 °C ( 1.4 °F)
For purposes of this proof of concept set a minimum temperature of 10 °C (50 °F)

All the components sitting loose in the battery box.
The temperature sensor is sitting in the space next to the heater, it is plugged into the usb 5v power adapter.
Components for monitoring temperature and triggering heater
Temperature sensor
Shelly H&Thttps://shelly.cloud/products/shelly-humidity-temperature-smart-home-automation-sensor/
(Optional) wired Power for the Shelly H&T (order the USB POWER SUPPLY FOR SHELLY H&T), needs micro USB 5v adapter
12 volt relay
Shelly 1https://shelly.cloud/products/shelly-1-smart-home-automation-relay/
NOTE:
For 12 volt operation of the Shelly 1 you have to move the bridge jumper to the 12V DC position and notice that the 12 volt positive is attached to the terminal labeled N (+). Yes, you did read that correctly. Otherwise you will make the same mistake I did and end up with a destroyed relay.

Wifi internet connectivity near the battery box
Plan in the future is to use home automation such as home assistant running locally to control the Shelly devices so we don't need external connectivity.or
If you don't have internet connectivity near the battery box then a traditional temperature controller which allows you to set the high and low temperature trigger points can be used.
Search for "Digital LED Temperature Controller Thermostat Control Switch 12V"
NOTE you need one that is 12 volts switching 12 volts as some are 12 volts switching AC.
Programming the relay and temperature sensor
Connect the Shelly 1 relay and the Shelly H&T (heat and temperature) sensor to power and follow the instructions supplied by Shelly for connection to your wifi.Using the Shelly app on your mobile phone or tablet to create a temperature schedule (heat) with the temperature you want to maintain.
Use this to trigger the Shelly relay to power on.

Screenshot showing temperature trigger set to 9 °C with actual temperature at 8.3 °C so the relay is powered on and the heaters are working.

Reviewing the temperature measurements using the Shelly app.
Components for wiring
Wago 221 series splicing connectors3 x 221-415 COMPACT splicing connector; 5-conductor; with operating levers; 12 AWG; transparent housing
https://www.wago.com/gb/installatio...nnectors/compact-splicing-connector/p/221-415
Wagobox
https://www.wago.com/gb/electrical-...ion-terminal-blocks-and-connectors/enclosures
Optional Power for the Shelly H&T (order the USB POWER SUPPLY FOR SHELLY H&T in addition to the temperature sensor itself).
The Shelly H&T normal operation is with it's internal battery but if you prefer it hardwired add these components to provide 5v usb power.
Female 12 Volt DC Cigarette Lighter Power Plug Socket Connector Adapter
USB cigarette lighter adapter

Heater
2 x 12 volt 15 watt silicone heater pad2 x Aluminium heatsink
1 x RTV silicone sealant
Considerations
Physical size of heater - what space have you near the batteries.
What wattage of heater can you safely use in the space and need to maintain your target temperature.
Power consumption - there is no point in heating the batteries if you end up draining them in the process.
For us there was space for a small heater next to each battery so we chose a small 12 volt 15 watt silicone heater pad.
Voltage: 12 volts DC
Power: 15 Watts
Dimensions: 10 cm x 5 cm x 0.3 cm
Model: Silicone Heater Pad
These things get very hot, I measured 100 °C ( 212 °F).
To maintain a more reasonable temperature and to aid transfer of heat I attached the silicone heater pad to an aluminium heatsink using RTV silicone sealant (temperature resistant to 250 °C).
Attached to the aluminium heatsink the silicone heater pad measured 50 °C ( 122 °F) and the front of the heatsink measured about 25 °C ( 77 °F)


