diy solar

diy solar

Safe Enclosure recommendations?

Fire protection was another reason I went with a trailer mounted system. Everything is outside, on a gravel driveway, separate from the house.
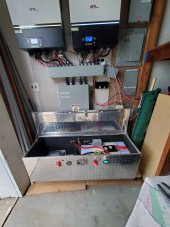
same, installing my system in my RV to power the house... going to be a freaking huge battery for an RV, but hey - so I get double purpose out of it.
When I'm camping I don't need power at home :p
 
Possibly the best location in a home is in the garage. The reason is they are more protected for fire which is why garages require thicker drywall, and steel door to the house. I certainly would never locate a lithium system anywhere in the interior of a home.

Stay Safe - Mike
 
Hello - Many lithium companies are like Lithionics build their batteries in 6061 T6 aluminum case to help contain smoke or fire. If the lithium is anywhere in a home or motor home I would recommend only using batteries in meatl cases to be safe.

Thanks Mike
 
I've been thinking about an easy/convenient way to add ballast to my solar trailer, as 4x 410w panels is a BIG sail area on a relatively small trailer, and I don't know how much I can anchor it to the ground without running into code issues.

A solid steel battery box may be a good option.
Get a couple concrete K rails and some heavy steel wire. Tip the k rail on it's side and anchor front and back. That is my plan for my solar trailer.
 
I like that. Neatly sidesteps the "anchored to ground" side of things. It's not anchored to the ground, you can move it if you want! Have a fork lift I can borrow from work to move them too, that's a really good idea and bears further research.

Current plan is to build a 4x4x8 enclosed trailer, put the panels on the top, and batteries/components inside. That'll still leave plenty of room inside to stack sand bags or whatever else. I can also hitch the trailer to my truck, which I very seldom drive. That's a 7k lb anchor too.
 
This is why there is such a need for a battery kit like the Seplos Mason, but without the cells. If they made a kit like that which fit 16 280ah cells, they would make a killing selling them to folks like myself who have the cells, but want a sturdy way to mount and stack the banks.
I bought 4 135ah kits with the cells, but would love a 16s 280ah setup the same way without cells. Its kinda dangerous with all of us coming up with ways to hold the packs we build, especially if inside a house. The toolbox method is nice, (mine are also in a toolbox) but a built for purpose solution is needed in the market.
How did you fit the inside of the truck box and photos. I have bought a box recently. looking for ideas for the placement of the BMS.IMG_1803.JPG
 
How did you fit the inside of the truck box and photos. I have bought a box recently. looking for ideas for the placement of the BMS.View attachment 90743
I configure them like the diagram shown, with the main positive and negatives of each 16 cell bank facing each other in the center. The positives go to the main switches, which also have a parallel resister and momentary switch for pre-charge. The negatives go through a shunt to display battery state of charge on the front of the box. One JK 200amp 2 amp active balance BMS for each bank of 16S.
Total 32 x 280ah cells in the toolbox. I use poly kitchen cutting boards on top to protect the terminals and a place to put the shunts and BMS's
28KW in a toolbox!
This box has been perfect for me, but its not expandable, and VERY heavy. (I put two harbor freight furniture dollies underneath the toolbox so I can roll it if needed). And since Seplos has actually developed the empty kit for 280ah cells, I ordered two of those kits to replace this setup. It was a GREAT platform to learn all this stuff though, and lots of fun building it. If I was to do it all over, I would have installed it on its side so the top drops down in front instead of opening on top. That way you can stack toolboxes for expansion( harder to work on the terminals though).
 

Attachments

  • 20210721_171655.jpg
    20210721_171655.jpg
    145.5 KB · Views: 78
  • 20210721_171650.jpg
    20210721_171650.jpg
    190 KB · Views: 73
  • 20210721_171708.jpg
    20210721_171708.jpg
    155.4 KB · Views: 70
  • 20210721_171646.jpg
    20210721_171646.jpg
    136.3 KB · Views: 73
  • 16496803361842995239310218517287.jpg
    16496803361842995239310218517287.jpg
    117.9 KB · Views: 78
How about a flammable liquids cabinet filled with sand?
aside of those being expensive?
Pretty brilliant idea. Those are made to contain a fire. We got those at work and store lots of burning stuff in them.
 
I have a question that this thread's topic triggered...

I keep seeing a lot of installation pics in RVs with components mounted on both carpet-covered and uncovered plywood and keep wondering if they missed this in the manual, or if I just take things to literally/seriously?

"Mount the solar charger vertically on a non-flammable substrate, with the electrical terminals facing downwards."

After having lost almost everything I owned when my parent's house burned while I was in college, I admit I take fire prevention very seriously...

I am planning on using Hardi Board between the pass-through wall and my components since is is rated fire resistant and the wall can use some reinforcement.

Any pros or cons in doing so?
Cement board is always a plus over wood or flamable material.
 
If you need any insulation in addition to the cement board use mineral wool "boards" (survives 2000F+ temps). I see way too many people use highly flammable foam boards for insulation. FYI, I also placed my charge controllers on cement board.
 
I bought a 36x24 steel service cart from harbor freight $80 to hold my 10k of ameretime batteries and keep it portable on wheels, my intention was to add fireproofing sides to it like out of hardy board or drywall but haven't gotten around to it yet. Maybe I should stop putting off that project.
Any tips to make this easy welcome.
 

Attachments

  • cart62587_I.jpg
    cart62587_I.jpg
    78.8 KB · Views: 3
Thats a nice water resistant setup for just the batteries also, if the inverter can be mounted outdoors. Thats what I like about rack mount LiFePo4 enclosures, no fans in the rear to worry about. They would rather be warm than cold.
 
This is an old control cabinet I sourced from my work. 1/8 steel. Cement board behind the Inverters. I have 1/8 sheet wood inside to help with insulation when I have work on the batteries. View attachment 94648
Very nice setup! That would most likely pass inspection. Similar work to Dan Fitzpatrick on Youtube.
 
Back
Top