


You are using an out of date browser. It may not display this or other websites correctly.
You should upgrade or use an alternative browser.
You should upgrade or use an alternative browser.
123 Smart BMS
- Thread starter Henk
- Start date
iuri
New Member
- Joined
- Nov 20, 2020
- Messages
- 6
Hi @123Sebastiaan ,Gen3 will get a hardware update so soldering is not needed anymore. We are adding a connector on the minus pad to just plug in the minus cable. This will be available within several months.
I'm considering buying the 123Smart BMS and I was wondering if there's an estimate on when the Gen3 hardware review will be launched, to see if it's worth waiting for or not.
123Sebastiaan
New Member
- Joined
- Jun 9, 2020
- Messages
- 16
Hi Iuri,
The hardware was launched several months ago, most dealers have the new revision in stock. If you want to be sure, you can ask them if they have the ones with a push-in connector.
Maybe also worth mentioning: we have developed a 123\SmartBMS to USB cable and made different projects with it. For example, we made a project for the Victron Cerbo/Venus. Just plug one end of the cable into BMS OUT/End Board (gen2 & gen3 both supported) and the USB into the Cerbo/Venus, install our software via a USB stick/SD card and you are able to view BMS information like SoC, lowest and highest voltage, lowest and highest temperatures etc on the device.
Of course you can also plug the cable into a Raspberry Pi and install our "BMS to Thingspeak" code to upload BMS data to Thingspeak, or change the code (written in Python) to make something yourself. You can find more info about the product and the projects on our EU website.
This product will be available soon at our dealers.
iuri
New Member
- Joined
- Nov 20, 2020
- Messages
- 6
Great. Thanks for your quick reply.Hi Iuri,
The hardware was launched several months ago, most dealers have the new revision in stock. If you want to be sure, you can ask them if they have the ones with a push-in connector.
Maybe also worth mentioning: we have developed a 123\SmartBMS to USB cable and made different projects with it. For example, we made a project for the Victron Cerbo/Venus. Just plug one end of the cable into BMS OUT/End Board (gen2 & gen3 both supported) and the USB into the Cerbo/Venus, install our software via a USB stick/SD card and you are able to view BMS information like SoC, lowest and highest voltage, lowest and highest temperatures etc on the device.
Of course you can also plug the cable into a Raspberry Pi and install our "BMS to Thingspeak" code to upload BMS data to Thingspeak, or change the code (written in Python) to make something yourself. You can find more info about the product and the projects on our EU website.
This product will be available soon at our dealers.
I'll check with GWL whether they have the new hardware revision or not, as I see in their website that the pictures still show the soldering pad.
@123Sebastiaan do you know when the manual for the USB cable will be available, almost tempted to buy one but the cost of delivery is almost the same as the cable to the UK!Maybe also worth mentioning: we have developed a 123\SmartBMS to USB cable and made different projects with it. For example, we made a project for the Victron Cerbo/Venus. Just plug one end of the cable into BMS OUT/End Board (gen2 & gen3 both supported) and the USB into the Cerbo/Venus, install our software via a USB stick/SD card and you are able to view BMS information like SoC, lowest and highest voltage, lowest and highest temperatures etc on the device.
Of course you can also plug the cable into a Raspberry Pi and install our "BMS to Thingspeak" code to upload BMS data to Thingspeak, or change the code (written in Python) to make something yourself. You can find more info about the product and the projects on our EU website.
This product will be available soon at our dealers.
iuri
New Member
- Joined
- Nov 20, 2020
- Messages
- 6
I'll check with GWL whether they have the new hardware revision or not, as I see in their website that the pictures still show the soldering pad.
I got a reply from GWL and apparently the person who messaged me doesn't have a clue which hardware revision they are selling... @123Sebastiaan do you know if GWL is selling the new hardware revision with the push-in connector?
123Sebastiaan
New Member
- Joined
- Jun 9, 2020
- Messages
- 16
Still working on the manual, but it is all quite straight forward. Plug the USB cable into the End Board/OUT Board data ext (2 pin connector) and the other side in the Venus/Cerbo. Download the venus-data.tar.gz file on our website, put this file (do not extract) on a usb stick or sd card and plug that also in the Venus/Cerbo. Reboot. The venus-data.tar.gz, which contains the installation files, are now installed on the Victron. If you do not see the BMS data on the CCGX, reboot again.@123Sebastiaan do you know when the manual for the USB cable will be available, almost tempted to buy one but the cost of delivery is almost the same as the cable to the UK!
With the cable, you will be able to view BMS data on the CCGX like SoC, current, alarms, lowest and highest cell voltage + cell number, lowest and highest cell temperature + cell number and the status of the two signal relays (allowed to charge or not and allowed to discharge or not).
123Sebastiaan
New Member
- Joined
- Jun 9, 2020
- Messages
- 16
Not sure, I cannot see if their old stock is already sold out. A different way is ordering at 123electric.de, I am sure they have the new one (they even state 2021 version in the title).I got a reply from GWL and apparently the person who messaged me doesn't have a clue which hardware revision they are selling... @123Sebastiaan do you know if GWL is selling the new hardware revision with the push-in connector?
Thanks for the reply.Still working on the manual, but it is all quite straight forward. Plug the USB cable into the End Board/OUT Board data ext (2 pin connector) and the other side in the Venus/Cerbo. Download the venus-data.tar.gz file on our website, put this file (do not extract) on a usb stick or sd card and plug that also in the Venus/Cerbo. Reboot. The venus-data.tar.gz, which contains the installation files, are now installed on the Victron. If you do not see the BMS data on the CCGX, reboot again.
With the cable, you will be able to view BMS data on the CCGX like SoC, current, alarms, lowest and highest cell voltage + cell number, lowest and highest cell temperature + cell number and the status of the two signal relays (allowed to charge or not and allowed to discharge or not).
How long can the cable be extended and can either end be extended, 2 wire extention lead or USB extension cable and does 'Venus/Cerbo' mean it will work on the Raspberry Pi.
As long as it can be extended to around 3 meters then i will be off to 123electric's store!
123Sebastiaan
New Member
- Joined
- Jun 9, 2020
- Messages
- 16
Good question. The product consists of two parts: a BMS (2 wire) to mini usb connector (female) and a separate mini usb to usb cable (male to male). The BMS to mini usb is 1 meter and the supplied mini usb to usb cable is 1 meter. If you want to extend it, please use a longer mini usb to usb cable. For example, order a 3 meter mini usb (male) to usb (male) cable.Thanks for the reply.
How long can the cable be extended and can either end be extended, 2 wire extention lead or USB extension cable and does 'Venus/Cerbo' mean it will work on the Raspberry Pi.
As long as it can be extended to around 3 meters then i will be off to 123electric's store!
Yes, it also works on the Raspberry Pi. We even made a project on the Raspberry Pi which runs as a background service. It receives the data and sends it to Thingspeak. Project is open source, you can find it at Github.
123\SmartBMS to USB cable now ordered from 123electric.de and 3M USB from Amazon.Good question. The product consists of two parts: a BMS (2 wire) to mini usb connector (female) and a separate mini usb to usb cable (male to male). The BMS to mini usb is 1 meter and the supplied mini usb to usb cable is 1 meter. If you want to extend it, please use a longer mini usb to usb cable. For example, order a 3 meter mini usb (male) to usb (male) cable.
Yes, it also works on the Raspberry Pi. We even made a project on the Raspberry Pi which runs as a background service. It receives the data and sends it to Thingspeak. Project is open source, you can find it at Github.
As the Thingspeak project will not work on the Pi running Venus what is the lowest powered Pi that can be used and could I split the USB and feed both Pi's from the same cable, not sure I would need to but just curious ?
123Sebastiaan
New Member
- Joined
- Jun 9, 2020
- Messages
- 16
Hi,123\SmartBMS to USB cable now ordered from 123electric.de and 3M USB from Amazon.
As the Thingspeak project will not work on the Pi running Venus what is the lowest powered Pi that can be used and could I split the USB and feed both Pi's from the same cable, not sure I would need to but just curious ?
I understand your question now, you have Venus installed on Raspberry Pi. We have a special VenusOS project for that. You can find the venus-data.tar.gz file on our website. You can probably do the same as with the Cerbo: download the file to a USB drive or SD card, plug it into the Raspberry Pi and reboot. The files in the .tar.gz will be extracted to /data - if not, you can extract the files yourself and put the files (rc.local etc) in the /data partition.
For operation however, you need at least VenusOS 2.80 which is now a release candidate. I am not sure if this release candidate works on the Raspberry Pi yet, you have to test this.
robert_moga
New Member
- Joined
- Jan 15, 2022
- Messages
- 2
I've recently installed the 123 Smart BMS into a new Winston LiFePO4 battery pack for my campervan.
I'm based in Ireland and purchased the whole kit from GWL in the Czech Republic.
Either I've been very unlucky or the 123 Smart BMS system is not that stable/not that well tested before leaving the manufacturer.
I had a problem with one of the "Between boards" not working when I first went to install the system and I landed up actually just ordering a new replacement Between board and paying for it outright because that turned out cheaper than sending the faulty product back to GWL (shipping at my expense) and for them to repair it/replace it and send it back to me (again, shipping would have been at my expense).
I just got the replacement Between board yesterday and put it all together. The BMS now "works", HOWEVER I also bought the Smart Relay from GWL and this now seems to be faulty as well! I cannot get it to work at all. I am able to run a load through the Load relay, but cannot get the Charge relay to work at all. I also suspect that the End board on the 123 Smart BMS might be faulty as well as it's meant to have outputs for the relay/chargers/inverters, but the output for the Charge relay is only outputting 8v (on a 12v system, it's meant to put out same as your battery voltage). I thought this might be the problem, but when I was doing some tests, even putting the signal cable from the Charge relay onto the battery's positive terminal, which should turn the Charge relay on and allow the charger to charge the battery, it does not turn the Charge relay on. None of the LEDs on the Charge relay work either, which would indicate to me that there is a fault.
I contacted GWL yesterday about these issues, but as yet have not received a response (one full working day since I emailed them).
At this point in time, I've spent more than $500 in total for the products I've bought, replacements & shipping and I have a BMS that JUST tells me what the batteries are doing with no extras like having a working relay to stop load/charge when those limit thresholds are met, etc. I liked the idea of having a "smarter" system with these relays, but my "smarter" system doesn't work so I have an expensive system that does the very basics.
If I go through the motions of sending the faulty products back to GWL and by what I read of their returns policies, etc.. it'll probably cost me close to about $100 for the shipping back and forth IF they replace/fix the faulty products for free.
P.S. Right now I would not recommend these products to anyone and I feel there are much better, cheaper options out there. If my experience changes, I'll let you know in this thread.")
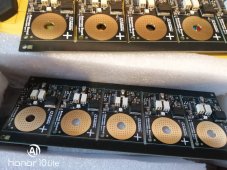
I also bought two 123 Smart BMS gen3 together with two Winston LiFeYPo4 (4.8Kw on 16cells each bank) to install them on my home solar system, all from GWL.
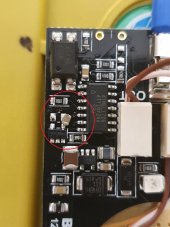
Unfortunately, all the additional "between boards" were delivered on the same PCB and most probably were never tested /quality controlled. One of them was visible damaged.
I was written to GWL for replacing the faulty board but I don’t have yet a replay from them.
Now I’m wondering if they will send a new board (20USD) or they will start with the “returning the faulty board on my expense”.
All those sets were costing me around 7000USD.
In generally the boards are well made, I hope that I will not be disappointed with this purchase/seller.
Attachments
robert_moga
New Member
- Joined
- Jan 15, 2022
- Messages
- 2
Hi Sebastiaan, you are very helpful. This USB cable will work with the new Victron EasySolar-II_GX?Hi Iuri,
The hardware was launched several months ago, most dealers have the new revision in stock. If you want to be sure, you can ask them if they have the ones with a push-in connector.
Maybe also worth mentioning: we have developed a 123\SmartBMS to USB cable and made different projects with it. For example, we made a project for the Victron Cerbo/Venus. Just plug one end of the cable into BMS OUT/End Board (gen2 & gen3 both supported) and the USB into the Cerbo/Venus, install our software via a USB stick/SD card and you are able to view BMS information like SoC, lowest and highest voltage, lowest and highest temperatures etc on the device.
Of course you can also plug the cable into a Raspberry Pi and install our "BMS to Thingspeak" code to upload BMS data to Thingspeak, or change the code (written in Python) to make something yourself. You can find more info about the product and the projects on our EU website.
This product will be available soon at our dealers.
123Sebastiaan
New Member
- Joined
- Jun 9, 2020
- Messages
- 16
Hi Robert,I also bought two 123 Smart BMS gen3 together with two Winston LiFeYPo4 (4.8Kw on 16cells each bank) to install them on my home solar system, all from GWL.
Unfortunately, all the additional "between boards" were delivered on the same PCB and most probably were never tested /quality controlled. One of them was visible damaged.
I was written to GWL for replacing the faulty board but I don’t have yet a replay from them.
Now I’m wondering if they will send a new board (20USD) or they will start with the “returning the faulty board on my expense”.
All those sets were costing me around 7000USD.
In generally the boards are well made, I hope that I will not be disappointed with this purchase/seller.
This is the way how we program, calibrate and test them: on a panel. We ship this to the dealers. I think the component got a mechanical stress during repacking to ship it to you. Most dealers break out the boards for the customers. It is quite easy to do: take a plier and break off one edge (PCB strip) of the panel. Now, you can just break out the boards.
About the USB cable: I will copy my email answer here, may be useful for other customers:
The venus-data.tar.gz is for the Victron Cerbo. If you have a Victron Cerbo or Victron Venus, their main computer, you can install that software to see the 123\SmartBMS data and control several of their devices. You cannot connect the USB cable directly to a Victron end device like a charger or inverter.
Edit: for the new Victron Easysolar GX/Multiplus GX, it may be possible to directly interface but it is not tested yet. If those devices run on the same VenusOS software and upload their data to Victron VRM, then you may be able to do the same installation procedure. However, we have not tested this yet.
Last edited:
123Smart BMS vs Victron SmartShunt. When Victron shunt was 40% SOC 123 Smart BMS was 2%. Week ago i charged batteryes 100% full, 6 hours. Today i turn on critical mode on BMS. I do not knot what to do. Charger is 3x Multiplus 2 48/5000. Absorption voltage is 54.88, float 54V. I use venus os on Raspberry Pi and all these 4 BMS connected to powered usb hub and hub to raspberry pi. BMS cost was +2000€. Not cheap but working i do not know how.


Last edited:
Similar threads
- Replies
- 0
- Views
- 290
- Replies
- 7
- Views
- 480
- Replies
- 13
- Views
- 448
- Replies
- 13
- Views
- 302