diy solar

diy solar

12v 560AH Build For Overland Van

Luthj

Solar Addict
Joined
Jul 1, 2020
Messages
984
Afternoon folks. Thought I would post up a pack I am building for our van to replace a 510AH lead pack that's about done. Its nominal 12V with 8x 280Ah cells.

Here is the battery box design. Its a section view for obvious reasons, not actually cut down the side. Design is intended to drop through a hole in the floor to minimize interior space loss. Compression plates on either end with 1/4" threaded rod to connect them. Not sure how I will tie the batteries down, but thinking about nylon straps, but a bolt and hook design may also work. The plan is to order some laser cut steel sheet (16 gauge?) and weld it up.

1593803628477.png

The cells are EVE 280AH type from the Xuba seller. Should be getting those next month.

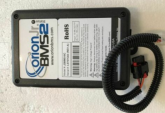
BMS is still in flux, but strongly considering a Orion Jr, and Gigivac or Blue Sea Latching relay for disconnect.

Our van is our home for years at a time when we travel various countries, so we are pretty serious about our comfort and power systems. This pack combined with a custom mini split will let us sleep in comfort when the heat index is triple digits F. A long thread on the van is over here.

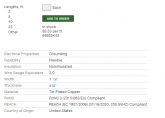
Looking at making custom bus bars from 2/0 copper braid. I would be soldering solid copper pads for each terminal connection.

https://www.mcmaster.com/69925K43/
1593803968323.png

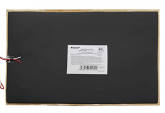
The box will be insulated with 0.5 or 0.75" XPS foam. Looking at a 65W 12v heating pad for the bottom.
1593803958335.png

I have an existing outback inverter, solar controller, and battery monitor. Looks like I can program them for current, time, and voltage charge controls which will meet the cell specs. I currently have 640W of PV on the roof, which is the max that fits sadly. I have plans for 100A direct charging from the alternator, which I have had good success with.
 
Last edited:
Okay, just ordered material for bus bars. Plan is to sandwich the copper braid between two pieces of 1" square copper 1/16" thick. Clamp it down, then solder the edges. Its going to be a challenge to keep the wicking down I think. After that I can drill them for bolts.

1593806789771.png

I am pretty close to ordering steel, I just need to figure out where my main fuse will go. I would like to put it in the battery box, but its pretty big. I have a height limit of around 11", any lower will hang below my hitch, and I don't want to catch it on departing some crappy road or ditch.
 
Getting closer. Box has been enlarged to house the class T main fuse and BMS. For ease of assembly the BMS module mounts to the side of the pack. Its tight, but I should be able to route the 4/0 cables to the fuse block and negative terminal. I am using high strand count marine wire which helps, but I may need to bend some long lugs to the appropriate angle. I am not sure how I want to run the external BMS wiring. The shunt, programming, and relay wiring will need to exit the box. Probably the best option is to run is with the main cables, which will be about 7ft of run from the box to the electrical cabinet midship.

1593912324014.png
 
BMS is still in flux, but strongly considering a Orion Jr, and Gigivac or Blue Sea Latching relay for disconnect.
I have been using an Orion Jr for five years on two different packs with a GigaVac contactor which has an economizer circuit. I have a stationary pack powering an Outback Skybox. The Orion is expensive compared to the less expensive options but has the features I want.
 
Submitted an order for battery box parts. $175 cut and delivered in clean 16 gauge steel. Should have them in 2 weeks. I am going to cut through a floor support beam. I am not particularly worried about floor integrity. Given my load and how the box attaches. If necessary I will rivet or weld a section of tubing for additional support.
 
Decided on Orion Jr 2 with canbus. I will install a CAN to bluetooth adapter for monitoring. I think i will also use a Hall effect current sensor instead of tapping into my existing 500A shunt. The wire run to the shunt is ~6ft, and there is interference risk.

1594065288822.png

I also ordered a heating pad. This model. Its a bit big, but should fit on the bottom of the box. It has a built in thermostat that is 45F on and 68F off, which should do a good job.

1594065333938.png
 
Last edited:
I may have missed this in the thread on Sprinter Source, but what are the lowest temps you plan to see with this setup? You have me interested in the heating pad + dropped battery tray. It would save a nice amount of space.
 
With 65W, I should be good to -10F. Though that's with 1/2" insulation. If I went to 3/4", I should be good to -35F. Of course since it rarely gets that cold for more than a few hours, Its probably not an issue. Worst case I can add additional heating power to the box. Running 5A continuous would eat quite a few watt-hrs. I may go with 3/4" where It fits, to keep the heating load down.

This tool make for decent estimations.
 
Excellent LuthJ. Just upped my order from 280ah to 560ah. Does Xuba always send a test result cause thats pretty nice. I like the box design. What is the weight of the box itself? I asked you this on another thread but my solar charge controller has a load option. As I would not be charging batteries at night can I use the leads and use power from the charge controller on the heating pads and not use battery power? Also, and sorry for being a pain, but do you have the battery specs in inches? I want to start my design but will not receive batteries til next month myself.
 
Last edited:
You can find the battery spec sheets in the general forum area. 1 inch is 25.4mm. ;)

There are several types of load terminals. Many are current limited. Some are active only when the sun is down, etc. If it meets you needs, I don't see why you couldn't use one. I would add a manual switch, that way you have a method to disable the heater during warm weather. Just as a failsafe. Regardless your power will come from the batteries, and it takes hours to heat up a pack. Your best option is to leave the pad on 24/7. This particular unit has a thermostat (not sure how reliable though). So it has a standby power consumption.

I am showing the box as 17lbs. That doesn't include weld weight, insulation, cells, etc.


I got my 2/0 braided copper ground straps today. They are very nice. In the flat plane they will bend to 1" radius. In the wide plane they will bend to 3" radius. Most excellent.
 
With 65W, I should be good to -10F. Though that's with 1/2" insulation. If I went to 3/4", I should be good to -35F. Of course since it rarely gets that cold for more than a few hours, Its probably not an issue. Worst case I can add additional heating power to the box. Running 5A continuous would eat quite a few watt-hrs. I may go with 3/4" where It fits, to keep the heating load down.

This tool make for decent estimations.

Thanks! Had some fun picking around that site. That is awesome.

There are several types of load terminals. Many are current limited. Some are active only when the sun is down, etc. If it meets you needs, I don't see why you couldn't use one. I would add a manual switch, that way you have a method to disable the heater during warm weather. Just as a failsafe. Regardless your power will come from the batteries, and it takes hours to heat up a pack. Your best option is to leave the pad on 24/7. This particular unit has a thermostat (not sure how reliable though). So it has a standby power consumption.

Will you have any sort of thermometer monitoring in place, to make sure the heating pad is doing its job in cold weather? Or just the low temp cutoff?
 
Decided on Orion Jr 2 with canbus. I will install a CAN to bluetooth adapter for monitoring. I think i will also use a Hall effect current sensor instead of tapping into my existing 500A shunt. The wire run to the shunt is ~6ft, and there is interference risk.

View attachment 16926

I also ordered a heating pad. This model. Its a bit big, but should fit on the bottom of the box. It has a built in thermostat that is 45F on and 68F off, which should do a good job.

View attachment 16927
Are doing 1 BMS or 2? If only doing 1 are you finding a benefit of running your system at 12V/560AH vs 2 x 12V/280ah systems? I was thinking of going the 2 BMS direction in case of some sort of failure I could more easily convert to a smaller battery or is this crazy logic?
 
2 bms provides some redundancy, but also adds additional cost, wiring, and fusing. There are some reasons to do so. Mission critical applications, currently limits from a single BMS, etc.

In my case I prefer to use reliable components, and build a single battery. Easier to monitor, easier to build.
 
Decided on Orion Jr 2 with canbus. I will install a CAN to bluetooth adapter for monitoring.
I have been running an Orion Jr for 5 years on two different packs. Mine is the older version that just needed a USB to serial adapter. I also use the KiloVac contactor.
I recently purchased the CANBUS to WiFi add on and now I can see graphs of pack vitals from my phone or laptop from anywhere in the world. It is a good value

I saw that they offered a remote monitoring solution. Not much use for our van, as we don't have an internet uplink most of time. I am hoping the bluetooth link is sufficient for our needs. I have an existing coulomb counting meter which can be configured to accurately track lithium (hopefully accurately). I am going to wire up a error/status LED from the BMS, and maybe an audible alarm. Once its set up, I don't expect to be looking at the BMS stats often, maybe every week or so.

Dropped the old lead pack this morning. Anyone in Northern Arkansas want some batteries? They are at ~70% of new capacity, and work just fine.

 
Making progress on the box. Everything is fitting so far.


I cut a pretty big hole, and this is where the pack will be going.


I am working through the BMS specs, and making a wiring diagram. Since the Orion Jrs outputs are limited to 175mA, I need amplification/relay control. Something in the 5A range should work. Anybody got a solid state relay suggestion? I need low power consumption (<1mA is ideal) and 10-15V input.
 
Anybody got a solid state relay suggestion? I need low power consumption (<1mA is ideal) and 10-15V input.
On my Orion I use Elk relays that have an LED which makes it easy for testing. In addition SSRs sometimes fail closed and that could be disastrous for a system that is supposed to be the last defense.
 
Last edited:
Since the disconnects should be the final failsafe, I am not relying on them for charge/discharge control. But point taken. I am just trying to keep my standby current consumption under control.

I am starting to fill out a profile in the Orion software. I wasn't able to find detailed specs for the Eve 280AH cells. So I had to extropolate the temperature/performance data from the few points available, and some references from similar cells.

1595806481767.png

The BMS documentation on the charge/discharge inputs, safeties, and the various min/max voltage fields is a bit vague in places. I am figuring it out with the flow charts, but most of it will get turned off, as my chargers don't support current limiting via external input. Besides, I shouldn't ever exceed 0.5C worst case.
 
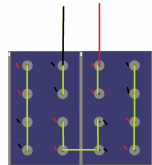
Here is the busbar layout I decided on.


1596999464338.png

I am making bubars from 2/0 flat braided and tinned ground strap. At each contact point I am soldering on a 1" square 1/16" copper tab (both sides).


After a bit of experimenting, I made a flat spiral out of rosin core solder, and put it under each tab. Then clamped them tight. I heated the tabs with a torch until the solder flowed. The bond looks good as far as I can tell, and the braid is compressed a bit for better contact.


This method is a bit labor intensive, so I am not sure if I would repeat or not.
 
Back
Top