diy solar

diy solar

48v 64 cell SAB 60280 Batrium K9 Rack Build

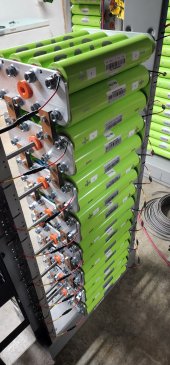
1/8" x 3/4" is 6 dollars cheaper at online metals for 6 feet. i should of used the smaller width in my system as the cells are capable of 110 max amps and 3/4" bus bars are capable of 200 plus amps.
 
Last edited:
That is an impressive setup. Did you consider using Noalox or any other type of antioxidant compound on the busbars? thanks
 
4 Batrium K9's monitoring 64 60280 cells on this 4P16S battery. First of Four batteries to build in 4 individual seismic racks. Progress pics attached.

Meanwell 12v Step down from 48v to run 4 Noctua fans relayed into batrium expansion board for heatsink cooling during bypass.

Im no expert on the batrium circuitry on the DIN Rail so if you see I need to make a modification I'd appreciate your opinions.

I also figured out how to cross reference a new 48v Shunt for a new Eaton Industrial Circuit breaker rather than doing the used ABB breaker.
View attachment 73635
View attachment 73636
View attachment 73637
View attachment 73638
View attachment 73639
View attachment 73640
View attachment 73641
Nice...setup looks really clean.
 
Here are my 20 cents.
If you really want to make sure to watch over parallel cells is to design terminals to implement EV style switches ( it will need to disconnect from parallel to single cells where only one is in 16S system and another one will be disconnected for measuring and checking or whatever your imagination is capable to do)
I have done this type of setup with EV switches interlocks harvested from junk yards . There are ways. Switches bring 1mOhm resistance multiply with numbers of switches you need for number of parallel cells. You will need quite complex analog setup or you can use software and hardware setup for this tasks. But I would advise that this idea is only cost effective if this is something you need and your time is more valuable than using manual ways and pre set maintenance intervals to remove benchtop test and install back to the system if all pass.
 
And if you wanna go even more extreme to bypass resistance with setup i have mentioned you can build bridge switch that will bypass EV switches for better efficiency. Let me know if you need some drawings how would look from engineering standpoint using engineering languages.
 
OMG! I just killed a cell today. I was working on my buggy power pack going to test the motor and controller out and one of the buss bars on the end fell and bang it was over. I forgot to tape the bottom row bus bars as a safety measure. I have 300 amp bus bars on a 16S pack of 60280's and the bus bar melted and the end cell nut is welded and the cell is leaking. I could just die right now as this is the first mishap i have had since i started a few years ago.??
IMG_20221006_163237.jpg

Anyone got a gun I can borrow LOL! At least the rest are fine so now i need a replacement with none in sight.
 
Last edited:
Ouch, good thing everyone is safe. We all make mistakes.

Are you brave enough to share images? We could learn from the mistake.
 
There was so much amperage flowing the 300 plus amp bus bar melted and the arcing stopped within seconds. I was blinded for hours opening the house to let the smoke out.
Sorry OP I just wanted to let people know these cells have way more power then you realize. The cell can push 100 amps but trust me they are monsters and can dump way more then that as the bus bars are 300 plus amps. Crazy thing is the cell after it cooled was sitting at 3.2 just like the rest lol!
Maybe I should move this to the mishap section.
 
Last edited:
Ouch, that's rough. Lithium cells can output huge current into a short. I've seen pictures of liquid wrenches after a tech shorted across a pack of CALB cells. I'm sure these have higher short circuit current.

I didn't realize you weren't the OP and was trying to figure out how it happened.

Plastic is a better insulator than tape.
Not touching a thing until I get my 3D printed holders then looking for another cell.
 
A lot of potential power. One of the best things I did was to design my 18650 packs with the + and - on opposite ends and recessed (they don't stick out past the 4 x 5 cell holders) and on opposite sides of the packs - very hard to short! When running wires from the battery to the buss (or buss to loads) I religiously use red and black - e.g. not OK for red to ever touch a black! Also I have these rubber 'caps' that I put over the ends of the wires/lugs and I only remove 1 cap at a time to screw it onto the battery or the buss or the load. This helps avoid wires flopping around / shorting to something as the only one with potential is the one in hand that I'm bolting on.

My point - its good to have a set of procedures that you follow when working with this stuff. You'res don't need to be the same as mine, but a thoughtful, safe approach really pays off in a drama free hookup.

Even so, sometimes the wrench will reflect a flash of light and that 'flash' makes me jump as it's a bit nerve wracking (for me) to be hooking wires with hundreds of amps of potential. :)
 
Last edited:
Yeah it was drama free until the last one so only two cells were involved yet the other is completely fine. It melted 385 amp bus bar so these cells are a beast. Even my eyes from the flash kinda felt burnt . Once i get my holders in place i will be working in a vertical not horizontal position which will be very much safer. I will be installing bus covers before the final assembly and large heat shrink tubing on the ends separately one at a time lol!
 
I've direct shorted these cells and overcharged them, their internal resistance varies by a ton, so you definitely need a very robust balancing BMS to handle them. They also vary between 46 and 64 ah from the suppliers Ive tested
 
 
Back
Top