Carson - Vanlife Rentals
Carson, I build and rent campervans
This is my first post here, but I wanted to share my DIY battery bank. This forum and Will's videos were so helpful that I wanted to share a few things I learned, as well as a few things I created that I haven't seen before (specifically the asthetics of the case). I'd also appreciate any critical feedback or suggestions, I've learned a lot in the last few months and would love to learn more!
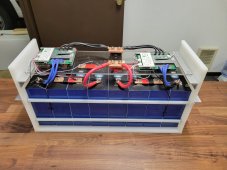
Here is my finished battery, total cost was ~$1,400 ($0.20 pWh vs Battleborn at $0.67 and SOK at $0.42):


I build custom campervans and rent them in Seattle, Washington. For one of my upcoming builds I will have an induction stove, hot water heater, a 12v Domestic RTX2000 AC, and 2 electric bikes. I needed a large, cost effective battery bank, in addition to A LOT of storage for the bikes.
I typically use Battleborn batteries (I need rock solid electrical systems), but they are just too big for this build, so I decided to build a custom battery bank - I'm glad I did. Look at the size comparison of my 560ah battery vs. 6 Battleborn batteries (I'm currently building 3 other vans which will have 3 Battleborn batteries each, so I had a few laying around ?):

This battery bank will allow me to have an electrical cabinet no wider than my wheel (560ah battery, 60 amp DC to DC charger, 3000w Victron Inverter, 150/60 Victron MPPT, Lynx distributor, Victron Cerbo gx, fuse block, AC breaker, solar switch, and a weBoost), which will allow for a much larger storage area.
How I built my case:
1. Frame. I used 1/2" cutting board from Amazon and cut it down to size for my batteries. These were then attached with screws and heavy duty epoxy (only compound I could find to glue hdpe together beyond extremely expensive products).
2. Compression: I drilled holes and used all thread plus polyethene tubing to protect the cells from the allthread.
3. Structure: I used aluminum angle iron for handles/to help with compression and the same on the inside to hold my BMSs.
4. BMSs: I mounted 1/4 acrylic to the angle iron above the batteries, velcroed 2 4S overkill solar BMSs to it, and drilled 2 terminals with 1/4"x1.5" busbars for the positive and negative connections.
5. Battery connections: I used 1/8" x 1" busbars for the batteries, heat wrapped to identify positive and negative sides of the batteries. I attached with M6 16mm studs, noalax, and serrated flange nuts.
Here are a few more photos of the build:


Now, onto my learnings:
1. Building your own battery is probably not worth your time unless you do this a lot, are just curious and want a challenge, or need a big battery bank for cheaper than you can buy (although I'd argue some alternatives are better and only marginally more expensive). I spent many hours researching, finding suppliers, deciding on options, selecting busbar/wire sizes, deciding on BMSs, and building a case. Not sure the ROI makes sense unless you do this a lot, which fortunately I will.
2. There is always a better way to build your battery, but it's not always worth it, nor is it a one-way door (you can update later on if you want). I was considering flexible bus bars to allow for expansion/contraction, so many ways to compress/not compress the batteries, etc. At one point, I just decided to make decisions and stop churning, knowing that if there are better ways to do this, someone else will post and I can always change my design.
3. These cells are extremely compact and save a ton of space. I love Battleborn, but these cells take up less than 50% of the space of equivalent Battleborn batteries.
I'll post updates as we install these into our latest build.
Here is my finished battery, total cost was ~$1,400 ($0.20 pWh vs Battleborn at $0.67 and SOK at $0.42):
I build custom campervans and rent them in Seattle, Washington. For one of my upcoming builds I will have an induction stove, hot water heater, a 12v Domestic RTX2000 AC, and 2 electric bikes. I needed a large, cost effective battery bank, in addition to A LOT of storage for the bikes.
I typically use Battleborn batteries (I need rock solid electrical systems), but they are just too big for this build, so I decided to build a custom battery bank - I'm glad I did. Look at the size comparison of my 560ah battery vs. 6 Battleborn batteries (I'm currently building 3 other vans which will have 3 Battleborn batteries each, so I had a few laying around ?):
This battery bank will allow me to have an electrical cabinet no wider than my wheel (560ah battery, 60 amp DC to DC charger, 3000w Victron Inverter, 150/60 Victron MPPT, Lynx distributor, Victron Cerbo gx, fuse block, AC breaker, solar switch, and a weBoost), which will allow for a much larger storage area.
How I built my case:
1. Frame. I used 1/2" cutting board from Amazon and cut it down to size for my batteries. These were then attached with screws and heavy duty epoxy (only compound I could find to glue hdpe together beyond extremely expensive products).
2. Compression: I drilled holes and used all thread plus polyethene tubing to protect the cells from the allthread.
3. Structure: I used aluminum angle iron for handles/to help with compression and the same on the inside to hold my BMSs.
4. BMSs: I mounted 1/4 acrylic to the angle iron above the batteries, velcroed 2 4S overkill solar BMSs to it, and drilled 2 terminals with 1/4"x1.5" busbars for the positive and negative connections.
5. Battery connections: I used 1/8" x 1" busbars for the batteries, heat wrapped to identify positive and negative sides of the batteries. I attached with M6 16mm studs, noalax, and serrated flange nuts.
Here are a few more photos of the build:
Now, onto my learnings:
1. Building your own battery is probably not worth your time unless you do this a lot, are just curious and want a challenge, or need a big battery bank for cheaper than you can buy (although I'd argue some alternatives are better and only marginally more expensive). I spent many hours researching, finding suppliers, deciding on options, selecting busbar/wire sizes, deciding on BMSs, and building a case. Not sure the ROI makes sense unless you do this a lot, which fortunately I will.
2. There is always a better way to build your battery, but it's not always worth it, nor is it a one-way door (you can update later on if you want). I was considering flexible bus bars to allow for expansion/contraction, so many ways to compress/not compress the batteries, etc. At one point, I just decided to make decisions and stop churning, knowing that if there are better ways to do this, someone else will post and I can always change my design.
3. These cells are extremely compact and save a ton of space. I love Battleborn, but these cells take up less than 50% of the space of equivalent Battleborn batteries.
I'll post updates as we install these into our latest build.