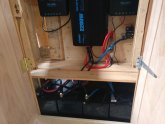
I think I see two black cables to negative terminal of battery #1 and a fat blue cable to positive terminal of battery #4, so that is diagonal and a decent balance. I had thought you had inverter connected to one battery (or pair) and then tapped off with wires to the additional pair, which would be a poorer balance due to IR drop.
For two batteries, diagonal corners gives perfect balance. For four I think it is less than perfect, can be improved with different connection: Wire two batteries in parallel, then another two in parallel, then connect the two pair in parallel by the diagonal corner of each. Connect diagonal corners of the set of four to inverter. Match each length to its mate on the opposite polarity terminal and to the other pair. (positive and negative to inverter don't need to be matched.)
Where you happen to have a skinny wire in the photo between two pairs, that is OK because it only carries half the current. If you build a perfectly balanced set of four, then all wires ought to be the same gauge as well as same length. With four batteries, looks to me like the four wires in the two pairs each carries 25% or one battery's worth, so match length/gauge. The two wires connecting pairs carries 50%, match those two for length/gauge. The two wires (or individual wire and two parallel in your case) carry 100%, no matching necessary except the two parallel.
Only problem arises is if one of the pair goes open circuit, other carries excessive current. Ideally each of that pair would be appropriately fused, rather than one on the fat wire. Same issue for the pair of red wires To be completely safe, either use single wires or a separate fuse on each of the four smaller wires.
As for cabinet making, you should see the hatchet job I usually do. Spent most of my formative years in the machine shop, never took wood shop. But later I did buy an old table saw and router/table, and used that to make a matching set of cabinets to change an existing kitchen into L-shape. I think it was one day for the first drawer, four more days for two drawer cabinets and two shelf/corner cabinets.
Most of what I'm assembling is rigid or flexible liquid-tight conduit and Square-D boxes. Just ordered another dozen 2" "T" conduit bodies and 20 1" liquid-tight fittings, to expand my inverter and protected/unprotected loads configuration. All of my stuff it outdoors (including Sunny Island, which I converted to 3R enclosure.) Under the deck was most convenient location. I've got 40 linear feet to work with, which is enough to fit 16 of SMA's "Opticool" enclosures with 12" between them. Or a couple less as I also hang breaker panels and balancing transformers.
[/Q


") This is my first foray but want tobdo it right
This is my first foray but want tobdo it right