diy solar

diy solar

600w solar, DIY 280ah 24v LIFEPO4 build thread for travel trailer.

Jusbechillin

New Member
Joined
Aug 5, 2020
Messages
86
Location
Mesa, AZ
Here we go!

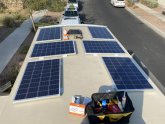
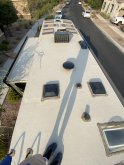
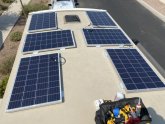
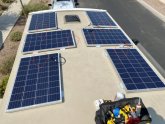
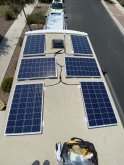
Today I’m going start mounting the panels. The battery cells are still in transit from China (via alibaba). This weekend we’ll see how far I get with the rest of the project.

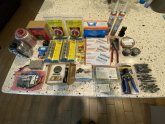
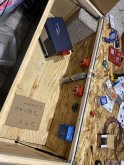
here’s the list of equipment:
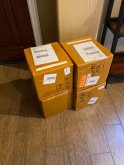
8 3.2v 280ah prismatic cells from Shenzhen Luyuan Technology Co.).

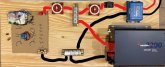
overkill solar BMS 100a 8s for LifePo4.

CellMeter 8 battery voltage capacitor checker/balance discharged/servo tester

samlex evo 2224 inverter/Charger with matching remote control. 40amp breaker.

Victron SmartSolar MPPT 100/30 charge controller.

victron battery sense.

Dc/dc 24v to 12v 30 a 450 watt converter. 30 amp fuse.

6 Rich Solar Poly 100w 12v solar panels with 10 gauge wire to the charge controller.

300 amp mrbf terminal main fuse.

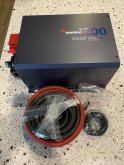
1awg wire for inverter and charge controller.

2 Blue Sea MRBF fuse block (300amp rated).

2 Blue Sea E-series battery switch (300a continuous rated).
 

Attachments

  • CEE4A200-4602-4D54-ABD9-2146153EAC70.jpeg
    CEE4A200-4602-4D54-ABD9-2146153EAC70.jpeg
    57.1 KB · Views: 208
  • A154D292-80E4-427B-B437-76F3335AB036.jpeg
    A154D292-80E4-427B-B437-76F3335AB036.jpeg
    97.1 KB · Views: 204
  • 6DBBC645-A9B9-42CE-975E-20BED75EE5AD.jpeg
    6DBBC645-A9B9-42CE-975E-20BED75EE5AD.jpeg
    171.9 KB · Views: 175
  • D354B6A2-6F28-4D07-8F59-5A45B8D14659.jpeg
    D354B6A2-6F28-4D07-8F59-5A45B8D14659.jpeg
    82 KB · Views: 168
  • F6F06C45-91D8-4C31-8A72-26895F7B261D.jpeg
    F6F06C45-91D8-4C31-8A72-26895F7B261D.jpeg
    95.5 KB · Views: 157
  • 7BE44353-331C-4BD7-97E4-DF64F8BD0714.jpeg
    7BE44353-331C-4BD7-97E4-DF64F8BD0714.jpeg
    135.3 KB · Views: 173
Looks good. Make sure you have the panels oriented so the connections are as simple as possible.
I am guessing with a Victron 100/30 your panels will be 2s3p or 3s2p. Finding the central point where the parallel combiner works will be key.
 
First I laid the panels out and decided how I wanted them arranged on the roof. Then I attached the brackets and cleaned the roof with alcohol and a rag. I put VHB tape underneath each bracket and then suck the panels in place.

I had seen a video online where someone screwed directly through another piece of VHB and the tip of the screw magically got enveloped in the VHB. Well,That didn’t work for me. Instead the little piece of tape just stretched and bunched up until it was wrapped around the screw. So I ended up removing the little squares of tape and screwed right into the bracket.

Next, I will use lap sealant over all of the screws and brackets.

Going to take a break from the heat and enjoy a nice glass of water. Then I’ll get back at it!
 

Attachments

  • 1DED7244-D8CB-47FB-BD33-7C724003BD83.jpeg
    1DED7244-D8CB-47FB-BD33-7C724003BD83.jpeg
    45.5 KB · Views: 43
  • B6FB5A03-7BB9-477C-84E8-A4EFE9CC59D5.jpeg
    B6FB5A03-7BB9-477C-84E8-A4EFE9CC59D5.jpeg
    97.3 KB · Views: 43
Looks good. Make sure you have the panels oriented so the connections are as simple as possible.
I am guessing with a Victron 100/30 your panels will be 2s3p or 3s2p. Finding the central point where the parallel combiner works will be key.
The red circles show where the connections come from the panels.
 

Attachments

  • 9843591B-40BE-4ADA-AB28-FE4D61E25835.jpeg
    9843591B-40BE-4ADA-AB28-FE4D61E25835.jpeg
    103.1 KB · Views: 59
I wired the panels 2s3p and then wrapped the Wired’s in 3M vinyl tape. Does anyone have any feedback if this was a good idea or not? Do people just leave there wire exposed to the sun, or do they protect them somehow?

Also, I drilled through the ceiling and ran the wires through a waterproof roof entry gland (connected to the roof with VHB tape).

Im going to end up routing the 10awg wire through cabinets, and then under the mattress and then into the storage under the bed where most of the components will be housed.
 

Attachments

  • 998ED282-9635-4253-80B4-812DEB6BC98B.jpeg
    998ED282-9635-4253-80B4-812DEB6BC98B.jpeg
    158.4 KB · Views: 45
  • D48A2228-CF46-40C5-B5C1-45E2324B3571.jpeg
    D48A2228-CF46-40C5-B5C1-45E2324B3571.jpeg
    65.2 KB · Views: 47
  • 0A475CF3-BC7D-4B43-8E14-3F0F601C3FB1.jpeg
    0A475CF3-BC7D-4B43-8E14-3F0F601C3FB1.jpeg
    68.8 KB · Views: 45
I just realized I didn’t put a wire grommet to protect the wires going through the roof. I’m going to add grommets everywhere I can still access to make sure the wires don’t chafe. But to fix the one on the roof I would have to pry the entry gland off the roof which is attached with VHB tape. I think I’m going to risk leaving that one as is...
 
Nice setup and great progress in a single day. I went out, looked at my 5th wheel then turned around and went back in the air conditioning LOL
 
Here's the updated diagram. I moved the placement of one of the on/off Switches. Also, the buck converter isn't in the picture because I'm going to locate it near the DC distribution panel instead of storing under the bed with the rest of this. So the empty banks on the MRBF fused bus bars will supply power to the Buck convertor.

Also, not noted in the picture:
The main fuse which is an MRBF terminal mount on the battery positive is 300 amps.

The MRBF fuse to the buck convertor will be 30 amps.
 

Attachments

  • solar diagram.jpg
    solar diagram.jpg
    217 KB · Views: 118
Made a little more progress:
  • Finished applying lap sealant.
  • Mounted some of the components in the box under the bed. It’s awkward to find a way to mount everything that allows me to access all the terminals/connections without being a contortionist.... I’m also going to install two A/C return vents in the box for ventilation.
 

Attachments

  • E497EB69-85AA-43A7-956C-8A7053C5D5F0.jpeg
    E497EB69-85AA-43A7-956C-8A7053C5D5F0.jpeg
    186.2 KB · Views: 67
  • 79259DAA-29EE-4175-8455-091496EF18F3.jpeg
    79259DAA-29EE-4175-8455-091496EF18F3.jpeg
    158.4 KB · Views: 65
Dude, you're my hero of gettn sh!t done! Are you anywhere by Idaho? If it wasn't 500 million Scoville and air quality that could kill a rhino I would be out there too! Keep up the great work!
 
If you used PV rated wire then there is no need to wrap it.

For under the mounting brackets, I use Butyl Tape. It's the same stuff that is used on all the exterior molding on your RV. If you really want to get into the overkill category, Eternabond makes a double-sided tape that is just about the right width for under the brackets. Unfortunately, you could run into the same problem of it wrapping around the screw like your VHB tape did.

If you're not familiar with Eternabond, it's the stuff you should always carry for emergency roof repairs. It's like VHB on steroids. My trailer is 14 years old. A few more years and I'll have the entire roof covered in Eternabond patches. :)

I took a similar picture of all the supplies I bought for the project. I'll be starting my install soon. I had to fix some issues with the roof first.

Our installs are very similar. I even have the same Dewalt tool bag.
Yeah that Eternabond is killer stuff!
 
I have seen those busbars someplace, but dang if I can find them again. Do you recall where you found them? I like the covers coming with them as protection from OOOPSIES.

Great job!
 
I have bus bars from Fastronix that have covers. Mine are black and red though, not clear. They look the same as the ones you can get at the Bay Marine Supply website.


Back
Top