diy solar

diy solar

AC side MPP LV6548 connections, critical load panel, wiring

1. I plan on grounding the solar panel frames and mounts. While this would violate #14 in the manual as stated above, this will be required by code so #11 (following code) would trump that. As I plan on using Iron Ridge roof mounting, that will be done using what you refer to as the traditional method.
2. I will use the breaker in grounding method you describe.

This is where things get wonky. I don't think the manual is trying to say not to ground the frames. I *think* it is saying don't ground the actual PV circuit. However, if you use the .5A breaker as the ground fault detection, it effectively grounds the PV circuit. Consequently, I don't know how anyone has added ground fault protection to the MPP inverters. (I have never done it.... but I never had to pass inspection)

I would advise asking MPP or Ian how it should be done.


3. I am confused by the diagram on page 3 of your linked document (it's not you, it's me). I'm thinking that you have a ganged breaker, one that is low current for the equipment ground (0.5A) with one that is high current (for the positive wires from the solar arrays). If I'm not mistaken, a trip in one will trip the other. It appears to me that the equipment ground from the solar panels is tied to the current carrying conductor (which will be the negative wire from the solar panels) in the low current breaker. I'm having a hard time understanding where the equipment ground from the solar panels ties into the equipment ground from the main. One thing is obvious is that it should NOT have it's own grounding electrode.
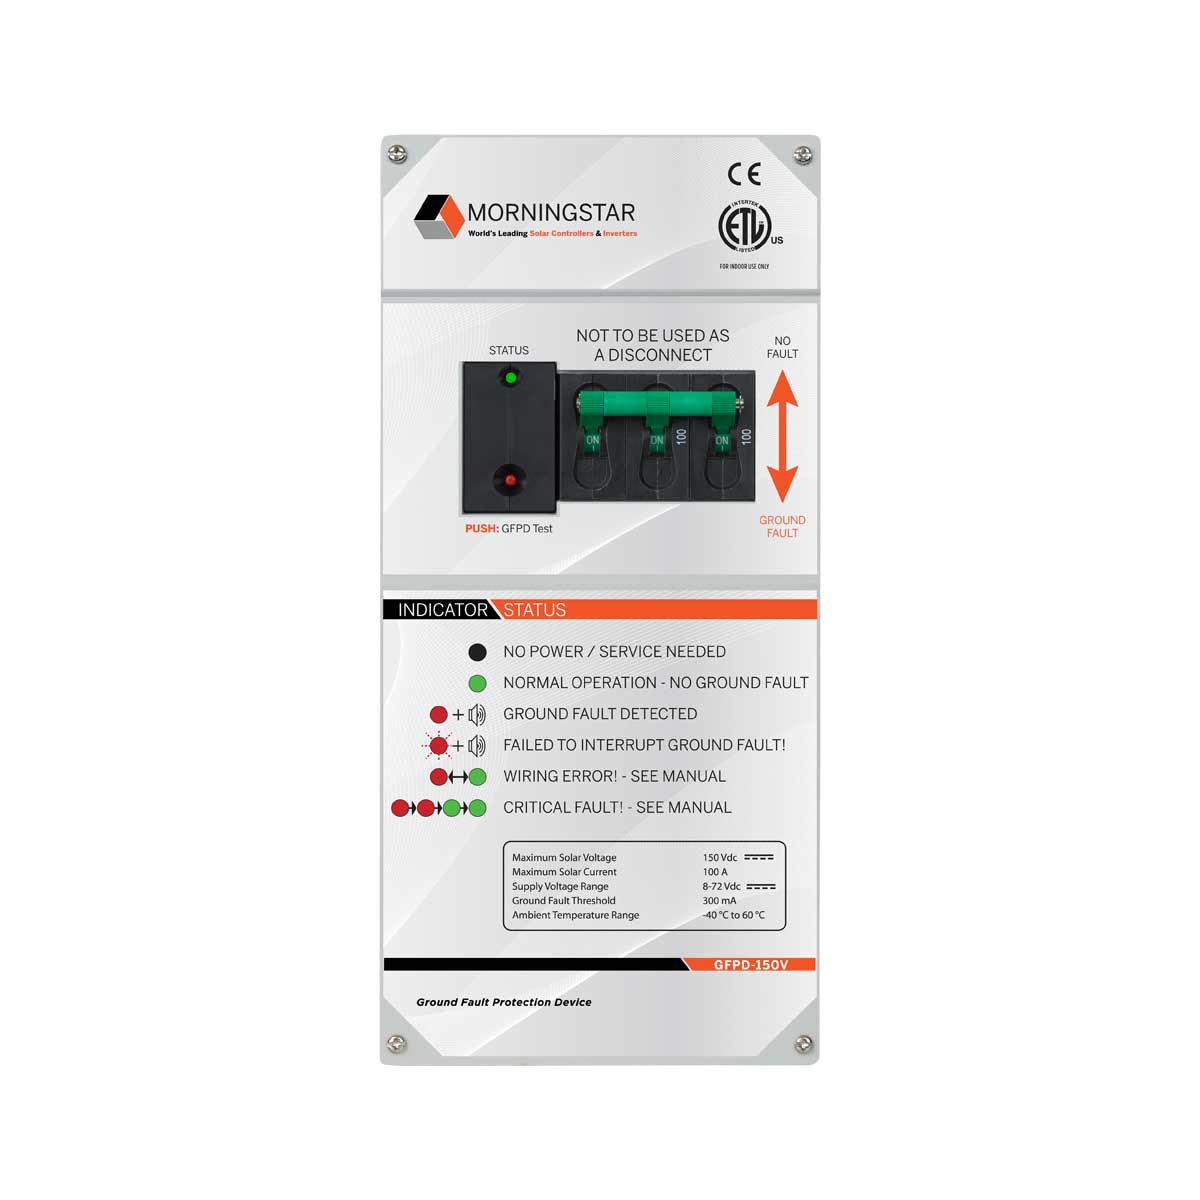
Correct, They are ganged breakers. The theory is that there should never be current going to ground so if there is 1/5 of an amp, something is wrong and the 1/5A breaker trips...... tripping all the other breakers.
 
This is where things get wonky. I don't think the manual is trying to say not to ground the frames. I *think* it is saying don't ground the actual PV circuit. However, if you use the .5A breaker as the ground fault detection, it effectively grounds the PV circuit. Consequently, I don't know how anyone has added ground fault protection to the MPP inverters. (I have never done it.... but I never had to pass inspection)

I would advise asking MPP or Ian how it should be done.
I asked Ian the following:
"I'm wondering Ian how do I add ground fault protection to the inverter, given #14 on Page 1 of the manual "To avoid any malfunction, do not connect any PV modules with possible current leakage to the inverter. For example, grounded PV modules will cause current leakage to the inverter. When using CIGS modules, please be sure NO grounding."

His response was:
"Some folks tie the + or - output from the pv to ground. They are warning you not to do this.
This is not good practice, they sound be floating. Only the panel frame must be grounded."

@FilterGuy - As I mentioned in a previous post, my understanding from your diagram was that the grounding conductor (neg PV wire) should be bonded with the equipment ground through the small amp breaker. It's sounding like Ian is saying no, unless I am misunderstanding (highly likely!).
 
It looks like it is only rated to 48V. Is that enough for the PV array?
Nope - I would need up to 250V right now. Any suggestions on a breaker that will trip at 0.5A and handle 250V?
BTW, this post has helped me with the permit package by making me think about the number of volts going into the inverter. I had indicated only one MPPT of the inverter would be used, as I indicated in a drawing that the two series of panels would be combined into parallel. Glad your post helped me realize that their diagram wasn't correct.
 
Ian is correct.... the manual says not to tie PV + or - to ground. However, the NEC requires circuits that operate over 60V to be grounded. It makes me wonder if it is possible to have an NEC code-compliant installation of this inverter.

Ian's response did not explain how to implement ground fault protection. You may want to ask him again.
 
I have to say, Ian is very quick with his responses. I do appreciate that!
I asked him about what he suggests and he indicated DC ground fault devices. He stated:

"If its using ground as only a reference, just to detect impalance between + and – then no polarity bonding to G would be required."

I believe this is your "method 2" for ground fault detection. Now I cannot figure out if this is true (ie no bond), and your diagram for this indicates "solidly grounded" between the equipment ground and the grounded conductor, so perhaps it is not.

Let's maybe look at an example that won't break the bank, although it's not as cheap as I was hoping to get this accomplished. The "MORNINGSTAR GROUND FAULT PROTECTION DEVICE 600V". Located here:

Would this require a bond between the equipment ground and the grounded conductor? if not, would it be a solid choice for my situation? Right now 250V and around 18A.

I can't say it enough how much I appreciate your help. Thank you!
Yes, that system uses a hall effect detector to detect differential current and therefore does not bond the PV circuit to ground...(See red circle below)

1648603208016.png
 
Thanks @FilterGuy! I appreciate it. I have been waiting for MPP to get back to me with their response to my question about ground fault in the inverter, and haven't heard this week. Once (if??) I hear back, if it jives with Ian's response, then I'll have to go ahead and get this.

After a bit more research, one thing I don't understand though is this from Ian's email:
"Some folks tie the + or - output from the pv to ground. They are warning you not to do this.
This is not good practice..."

The part I don't understand is the not being "good practice" part.

I was looking at the 2017 NEC and found this:
690.42 Point of System Grounding Connection. Systems with a ground-fault protective device
in accordance with 690.41(B) shall have any current-carrying conductor-to-ground connection
made by the ground-fault protective device. For solidly grounded PV systems, the dc circuit
grounding connection shall be made at any single point on the PV output circuit.

I know this is new to me so there's a good chance that I'm wrong, but this seems to say that the current-carrying conductor can be bonded to the ground and that bond should be made by the ground fault protective device (which is how you have it in your method 1 with the bond being done at the small amp breaker). If the NEC is saying what I think it's saying, then would it not be good practice?

Correct, or am I punching above my weight class?
No..... You are understanding it correctly. I have seen several posts about things that 'Ian said' that make me question his competence in giving out advice. (In fairness, everything I have heard is 2nd hand so maybe I am missing context, but there have been enough reports about questionable statements to make me wonder)
 
Example from earlier today:

 
It's alive! Has been for several weeks now, but I can finally call it finished (for now..). The city inspector came by, and thankfully did not seem to have any issues with my installation. The electrical inspector did not think he needed to inspect it, since it is not feeding back to the grid. I'm supposed to call him if the city or electric coop think otherwise. I'm happy letting sleeping dogs lie at this point, but I'd still like to get my electrician friend to look over my work (he's been swamped). I'm confident it's safe, and it's been working flawlessly, but I'd love his blessing at some point ;)

The final installation is slightly scaled back from my original plans. I have 8-250W panels 4S2P on the South Facing Wall going to PV1 on the LV6548, and 15-250 5S3P on the East Facing Roof going to PV2. So a total of 5,750 Watts. Decided not to risk life and limb trying to install two additional panels above the others on the South Facing Wall ;)

According to ShineMoniter, which is WAY more useful than WatchPower, I've generated 103.4kWH so far, and on track to do over 100kWH a month, even with a lot of cloudy rainy days, and underutilizing the potential. I'd love to have more sunny real estate, but also love the trees... During storm season I'm keeping the battery fully charged for possible power outages, which ramps back my generation to what I can actually use during production. My guess is I can double these numbers by better utilizing the potential.

The LV6548 is awesome! It fits my application perfectly, and I think the bang for the buck is very impressive! The only thing I don't love about this unit is the AC electrical connectors, and the documentation. Because I am using a single unit, the neutral/ground bond issue for my application was only a minor complication. I'd love to add another LV6548 at some point, ideally to set up EV charging, but sadly, I don't have the solar real estate available to justify it.

My heartfelt thanks to all of you for your help! I have found this project extremely challenging, and equally rewarding. I could not have done this without your help, friends, THANK YOU!

Attached are the final diagrams of the installation, and pics of how things look.

Diagrams:
Solar Installation Block Diagram (1).jpgAC Side Diagram, switched neutrals.jpg

South Facing Wall Array:

SouthWall-LateAfternoon.jpgSouthWall-LowerMount.jpgSouthWallUpperMount.jpgSouthWallHinge.jpg


East Facing Roof Array:
EastRoof-sun-messy-wiring.jpgEastFacingRoofArray-Tidy-but-shadded.jpg

Combiner Box:
OutsideCombinerBox.jpgCombinerBoxComplete.jpg

AC side and Solar closet in next post...
 
Here is how things look inside....

Main and Critical Loads Panels before and after moving the Critical Loads:
OriginalMainPanel.jpgStartCriticalLoadsPanel.jpgMainPanelAfter.jpgCriticalLoadsPanel After.jpg

Solar Closet:
TransferSwitch-JunctionBox.jpgTransferSwitch-JunctionBox-Fused-PV-Switch.jpgSolarCloset-boxes-covered.jpgLaptopShelfFolded.jpgLaptopShelfDeployed.jpg

Hoping to add another battery or two down the road, and I'd really like better software eventually. WatchPower on the laptop and the mobile app sucks for monitoring, although it's very helpful for configuring the unit. ShineMonitor is useful, but limited. I'm hoping MPP or a skilled user may come up with something better. I'm not frustrated enough to pay $200 for a Raspberry Pi and software. At least not yet...
 
It's alive! Has been for several weeks now, but I can finally call it finished (for now..). The city inspector came by, and thankfully did not seem to have any issues with my installation. The electrical inspector did not think he needed to inspect it, since it is not feeding back to the grid. I'm supposed to call him if the city or electric coop think otherwise. I'm happy letting sleeping dogs lie at this point, but I'd still like to get my electrician friend to look over my work (he's been swamped). I'm confident it's safe, and it's been working flawlessly, but I'd love his blessing at some point ;)

The final installation is slightly scaled back from my original plans. I have 8-250W panels 4S2P on the South Facing Wall going to PV1 on the LV6548, and 15-250 5S3P on the East Facing Roof going to PV2. So a total of 5,750 Watts. Decided not to risk life and limb trying to install two additional panels above the others on the South Facing Wall ;)

According to ShineMoniter, which is WAY more useful than WatchPower, I've generated 103.4kWH so far, and on track to do over 100kWH a month, even with a lot of cloudy rainy days, and underutilizing the potential. I'd love to have more sunny real estate, but also love the trees... During storm season I'm keeping the battery fully charged for possible power outages, which ramps back my generation to what I can actually use during production. My guess is I can double these numbers by better utilizing the potential.

The LV6548 is awesome! It fits my application perfectly, and I think the bang for the buck is very impressive! The only thing I don't love about this unit is the AC electrical connectors, and the documentation. Because I am using a single unit, the neutral/ground bond issue for my application was only a minor complication. I'd love to add another LV6548 at some point, ideally to set up EV charging, but sadly, I don't have the solar real estate available to justify it.

My heartfelt thanks to all of you for your help! I have found this project extremely challenging, and equally rewarding. I could not have done this without your help, friends, THANK YOU!

Attached are the final diagrams of the installation, and pics of how things look.

Diagrams:
View attachment 91764View attachment 91765

South Facing Wall Array:

View attachment 91753View attachment 91754View attachment 91755View attachment 91752


East Facing Roof Array:
View attachment 91758View attachment 91757

Combiner Box:
View attachment 91763View attachment 91762

AC side and Solar closet in next post...
This all looks awesome! I appreciate that you added more pictures for the attachment for the brick wall - that could prove useful for me later if I decide (and am allowed) to do that. My plan right now (and what is in the permit application) is using a company that has an outside wall attachment at 30 degrees, but it is pretty expensive. Will see what the planning department says. BTW, my permit application is still in review - they lost it for a week. Luckily I called to check on it and they then found it.

You mention the PI software. I have several raspberry pis including some not in use right now. Can you direct me to that software?

Was there any issue with having the battery directly on the floor?

I'll probably have more questions as I go through this once (and if) I get my application approved. Right now I'm working on other projects around the house until I can get going.

Again, it looks really good (not that my opinion in this is worth anything, lol).

Paul
 
Thanks, Paul!
You mention the PI software. I have several raspberry pis including some not in use right now. Can you direct me to that software?
Yes, it's Solar Assistant. here's a link: https://solar-assistant.io/

Was there any issue with having the battery directly on the floor?
Apparently not, but my situation here sounds like the polar opposite of yours. No one has even looked! I thought I might put it up on a cinder block and strap it to the wall against the hardibacker. I think I'll wait and do that after hopefully adding another battery or two.

The building department was mainly concerned about the house being able to hold the weight of the PV installation. They had also noted setbacks on my permit. I was concerned that with the angling of my panels I had technical encroached on the easement. The inspector didn't seem concerned. I volunteered that I can easily lower them against the wall if someone needs full access to the easement. She nodded.

I asked her if she wanted to see the electrical inside, she said, "no, but the electrical inspector may want to check that". I called him. Upon hearing I was not feeding back to the grid, and apparently satisfactorily answering a few questions about my installation, he said he did not think he needed to inspect it, but I can call him back if someone at the city or electric coop thinks he should. From what I can tell, the electrical side of my installation seems to have fallen into the crack of homeowner improvements not requiring permits or inspection.

I was born and raised in SoCal, where this all works much differently. I miss a lot about that area, but not all the red tape ;)
 
Thanks, Paul!

Yes, it's Solar Assistant. here's a link: https://solar-assistant.io/


Apparently not, but my situation here sounds like the polar opposite of yours. No one has even looked! I thought I might put it up on a cinder block and strap it to the wall against the hardibacker. I think I'll wait and do that after hopefully adding another battery or two.

The building department was mainly concerned about the house being able to hold the weight of the PV installation. They had also noted setbacks on my permit. I was concerned that with the angling of my panels I had technical encroached on the easement. The inspector didn't seem concerned. I volunteered that I can easily lower them against the wall if someone needs full access to the easement. She nodded.

I asked her if she wanted to see the electrical inside, she said, "no, but the electrical inspector may want to check that". I called him. Upon hearing I was not feeding back to the grid, and apparently satisfactorily answering a few questions about my installation, he said he did not think he needed to inspect it, but I can call him back if someone at the city or electric coop thinks he should. From what I can tell, the electrical side of my installation seems to have fallen into the crack of homeowner improvements not requiring permits or inspection.

I was born and raised in SoCal, where this all works much differently. I miss a lot about that area, but not all the red tape ;)
Thanks Scott. I just heard back regarding my renovation permit application (which is processed before they take a look at the electrical permit). It was rejected for two reasons. One, the size of my lot is not correct. That can be corrected easily. However, the other takes a bit of explanation.

I'm installing this on my garage who's south side is near the property line of my neighbor. They are concerned that the panels attached to the side of the garage will extend into the neighbors yard. The attachment system that I put on the permit for the wall portion is 30 degrees. I'm attaching the overall plan as well as the plan for this attachment system.

Since the size of the lot is more narrow than I had thought and put in the permit application, at 30 degrees it may intrude into the neighbors yard. However, at 10 or possibly 20 degrees, it may not (ie closer to vertical). However, I don't have any option for this with this attachment system.

I have a feeling that using the struts that you used would allow me to satisfy this requirement.

You mentioned going through the permit process there in KY. Do you have any plans that you might be able to send me through DM that you used for the struts on the side of your wall? If not, no biggie, but just thought I'd ask.
 

Attachments

  • Screenshot 2022-04-21 162436.JPG
    Screenshot 2022-04-21 162436.JPG
    109.6 KB · Views: 9
  • Screenshot 2022-04-21 162307.JPG
    Screenshot 2022-04-21 162307.JPG
    44.5 KB · Views: 9
You mentioned going through the permit process there in KY. Do you have any plans that you might be able to send me through DM that you used for the struts on the side of your wall? If not, no biggie, but just thought I'd ask.
I did not submit a detailed plan for the mounting hardware, just a list of the parts, along with a narrative describing how I was going to mount them and the calculated weight of each of completed arrays. The weight, and if the existing structure could hold it safely was the only concern they mentioned when I originally inquired about the permit process.

I'm still a good 6 feet away from the property line, but there is a 10 foot easement. When angled the bottom edge of my panels is certainly encroaching on that easement. I had thought about mounting them flat against the wall for the inspection and tilting them afterward, but didn't. Fortunately the inspector was not concerned. It may have helped that my neighbor had their large utility trailer parked along his side of line just across from my array. Made my installation look rather conservative in terms of honoring that easement ;)

I think if I were in your position I would pull up the spec sheets for the channel strut, hinges, and hardware bits and than add the narrative with a calculation of where the lower edge of the panels would be relative to the property line or easement. Doing a scale drawing of that would be a stretch for my CAD skills.

We had quarter sized hail last night along with a bunch of wind and lightening. Went out and looked over things at first light. No damage. Everything looked great!
 
Last edited:
I did not submit a detailed plan for the mounting hardware, just a list of the parts, along with a narrative describing how I was going to mount them and the calculated weight of each of completed arrays. The weight, and if the existing structure could hold it safely was the only concern they mentioned when I originally inquired about the permit process.

I'm still a good 6 feet away from the property line, but there is a 10 foot easement. When angled the bottom edge of my panels is certainly encroaching on that easement. I had thought about mounting them flat against the wall for the inspection and tilting them afterward, but didn't. Fortunately the inspector was not concerned. It may have helped that my neighbor had their large utility trailer parked along his side of line just across from my array. Made my installation look rather conservative in terms of honoring that easement ;)

I think if I were in your position I would pull up the spec sheets for the channel strut, hinges, and hardware bits and than add the narrative with a calculation of where the lower edge of the panels would be relative to the property line or easement. Doing a scale drawing of that would be a stretch for my CAD skills.

We had quarter sized hail last night along with a bunch of wind and lightening. Went out and looked over things at first light. No damage. Everything looked great!
Thanks so much Scott for your reply! Will consider your suggestion if the change in dimensions of the lot makes this necessary. Even so I would prefer probably to do it your way.

BTW, I'm just like you. When I've built something and there is a possibility of trouble, I go over it to check for damage and then feel a great sense of relief when there isn't any (hopefully!).
 
After some consideration and calculation, I think I'm going to mount the panels directly to the side of the garage through the studs at 90 degrees (vertical). Hopefully my reasoning below makes sense.

The mounts I was planning on using are available in 45 and 60 degrees from vertical. The fence line is 22 inches away from the side wall of the garage. I would put the panels in landscape. Given this, the panels will extend about 5 inches past my fence line (for the 45 - more for the 60). That's not going to work. The panels are 39" x 77.5".

If I do it at smaller tilts (say 80 degrees from vertical), the difference in KW is not enough to justify the cost for the wall mount items. For example 3 of the panels (310W each) wall mounted at 90 degrees is 839 kwh/year. At 80 degrees, it is 965 kwh/year. At 70 degrees, it does go to 1070 kwh/year. However that is also getting closer to the fence line which may or may not be my property line.

My thinking here is that mounting hardware to get it to 80 degrees will cost (for 3 large panels) approximately $300 or more if diy. That's also (considering diy) a higher probability of not being approved. The difference in kwh/year (for 80 compared to 90 degree tilt) is 126. At $0.15 per kwh, that is $19 per year. So over 15 years to pay off that portion of the install. That's not cost effective IMO.

Let me know if I've made a mistake or any other suggestions. Thanks.

Paul
 
Thanks Scott. I just heard back regarding my renovation permit application (which is processed before they take a look at the electrical permit). It was rejected for two reasons. One, the size of my lot is not correct. That can be corrected easily. However, the other takes a bit of explanation.

I'm installing this on my garage who's south side is near the property line of my neighbor. They are concerned that the panels attached to the side of the garage will extend into the neighbors yard. The attachment system that I put on the permit for the wall portion is 30 degrees. I'm attaching the overall plan as well as the plan for this attachment system.

Since the size of the lot is more narrow than I had thought and put in the permit application, at 30 degrees it may intrude into the neighbors yard. However, at 10 or possibly 20 degrees, it may not (ie closer to vertical). However, I don't have any option for this with this attachment system.

I have a feeling that using the struts that you used would allow me to satisfy this requirement.

You mentioned going through the permit process there in KY. Do you have any plans that you might be able to send me through DM that you used for the struts on the side of your wall? If not, no biggie, but just thought I'd ask.
Currious: In your mounting, Is the long edge of the panel against the wall or the short edge? If it is the short edge, you might gain a little by flipping it to the long edge.
 
Currious: In your mounting, Is the long edge of the panel against the wall or the short edge? If it is the short edge, you might gain a little by flipping it to the long edge.
I am putting the panels in landscape configuration. The long edge will be against the wall. You are right - If I put the short edge, it will stick out much further.

One thing that I was hoping was that I could fit two rows of the 3 panels in landscape. While I can, the fence that separates the yards will create shadows on the bottom panel. Based on what I've seen on youtube that will cause a significant decrease in production for those panels.
 
Back
Top