diy solar

diy solar

Airstreamer looking for some advice on mounting to a curved roof

PeteW

New Member
Joined
Nov 18, 2019
Messages
91
Location
Virginia Beach, VA
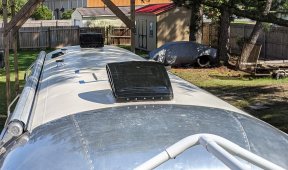
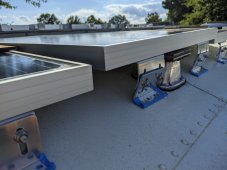
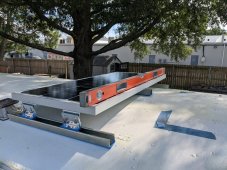
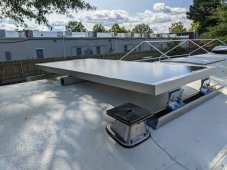
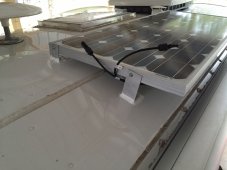
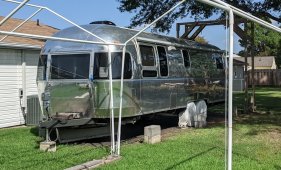
I own an 29' Airstream travel trailer. I'm adding 8, 100W PV panels to the roof. I'm still waiting (it's been a year now) on a 15K BTU Heat Pump for the roof, as indicated by the blue tape in the second picture. This is a rebuild project, so the shell interior is still unfinished. That means I still have really good access to everything. I'm looking for advice and or acknowledgement that I'm on the right track, no pun intended. From the pictures I'm posting you'll be able to see the brackets I'm still considering, but because of a plumbing vent it looks like I will also need to use some solid 12 gauge Aluminum 1-5/8" x 1-5/8" Strut Channel or similar and Channel Nuts of some kind preferably Stainless. Plus, I think using the solid aluminum struts will allow me to use VHB tape and Dicor to fasten them to the roof. Even if I do use some mechanical fasteners to hold the strut's on, I'll be able to do the job with far fewer. In case it's not clear the struts will run length wise and will be mainly for the four center panels. I'm also not sure how much clearance I need to allow for the plumbing vent. I do know that I don't want that odor backing up into the trailer.:oops:o_O I'm just spitballing at this point, but I figure I'll get some experienced advice here.
PXL_20210827_200340908copy.jpg PXL_20210905_193119725copy.jpg PXL_20210904_210358415.jpgPXL_20210904_210441594copy.jpg

PXL_20210904_210449081.jpg
 
Solar is great… but I can’t imagine doing it on an airstream… they are pricy trailers, and such a classic design. We’re it me, I might design an awning fold out or similar to hang the panels from.
 
Yes I hear you, and I have actually seen that done by someone who was just using a single panel. Most folks mount them on the roof. We'll be living in it pretty much full-time once it's finished, so taking panels down and putting them back up would get pretty old, very quick.
 
Sean and Kristy on the “Long, Long Honeymoon” site did their Airsteam here:

Not that you’re wanting to spend what they did, but you might contact them for advice, or contact the vendor who did the install. Those Airstreams are an animal all their own, so a little direction might go a long way.
 
Rather than have 4 mounts per panel and all the associated holes why not build a rack that mounts to the roof out of aluminum?
You should be able to cut the roof penetrations in half or more.
:) Hey there, My thoughts also, as I mentioned in my opening:
From the pictures I'm posting you'll be able to see the brackets I'm still considering, but because of a plumbing vent it looks like I will also need to use some solid 12 gauge Aluminum 1-5/8" x 1-5/8" Strut Channel or similar and Channel Nuts of some kind preferably Stainless. Plus, I think using the solid aluminum struts will allow me to use VHB tape and Dicor to fasten them to the roof.
Do you have any experience with this?

Sean and Kristy on the “Long, Long Honeymoon” site did their Airsteam...
:) Thanks for your imput, I've followed them for years. They produce some entertaining YouTube content, on big projects they mostly hire it out / find sponsors and then film it and provide some limited information and knowledge. Also, in the case of Airstreams and I imagine RVs in general, pretty much each case is different due to length and width, and vent, fan and AC / HP roof placement. In my case their Airstream is a very different roof configuration. Theirs is nearly 20 years younger than mine. It's a few feet shorter, but it's also 6" wider. All that said, you bring up a good point, there is a ton of info out there thanks to YouTube, Instagram and Facebook and believe me, I've watched a lot of it. Then I found this forum and it's hands down the best place I've found to learn solar, electrical, LiFePo4, etc..

We've owned our Airstream since 2012. We bought it used, it's a 1992 Excella Classic. Just in the time we've owned it, we've traversed the country with it 4 times. In 2018 it became clear that she needed extensive repair work. I stripped her down to the frame including completely removing the shell and am rebuilding her from the ground up. Trust me I've had to solve a few problems. This is just the problem du jour. :)
 
If I was an Airstream fanatic, including maintaining the iconic lines of the trailer, I would put flexible panels on the roof. Rigid panels are the way to go for maximum PV harvesting, but they sure do look funny on the rounded top of an Airstream.

IMHO, racks work great when you have a lot of open space. When you're having to play Tetris with your panels, the rack doesn't work so well. In that case, brackets are the way to go. A two-piece bracket, like in your pictures, is more expensive but if you ever plan to remove the panel for repair, replacement or maintenance, it's a lot easier to work with. I wish I had gone with two-piece brackets on my trailer.
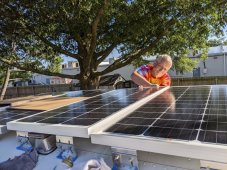
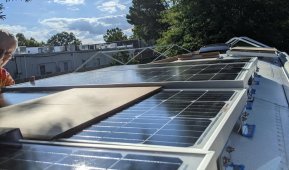
I just did a mock up test a couple of days ago. Here are some pictures. I'm pretty happy with how this looks. The strut channels sit flush to the surface, they allow plenty of air flow beneath the panels, and by using a center strut channel I'll be able to add mid clamps to the panels also. six hold-downs per panel. This set up will allow me to install 4 PV panels side by side down the center of approximately an 8 ft long section of roof. No Tetris. I plan to attach the strut using 4950 VHB tape and elf leveling Dicor to seal the edges. Avoiding lots of holes as apposed to all of the holes it would take to screw mount four brackets per panel (2x4=8 holes per panel). Even if I decide to add some screws it will take far fewer this way.

The strut channel I used for my test is 1-5/8 in. x 1-5/8 in. x 2 ft. gold galvanized steel. Luckily Home Depot sells 2' pieces of this strut. My panels are only 20-1/2 in. wide so the fit was great for my test. The actual strut channel I'll be using is 12 gauge Aluminum in 4 ft. sections. The aluminum is about 1/3 the weight of the steel.

PXL_20210910_185441591.jpg

PXL_20210910_185521407.jpg


I will have an additional panels mounted front and back length wise front to back on either side of the front and back MaxAire Fans. My original plan was to VHB tape mount their mounting brackets directly to the roof. I like this unistrut though, so I'm giving this more thought.
 
Rather than have 4 mounts per panel and all the associated holes why not build a rack that mounts to the roof out of aluminum?

You should be able to cut the roof penetrations in half or more.
Even though I don't have a fancy polished TT, who wants all those holes. My roof is also sloped so I decided a rack would take care of the sloped roof and reduced holes. I am mounting the rack on each ceiling joist other than when they are close and I skip one. I bought 1.5" square alunimum tubing that I intend to Alumaweld.

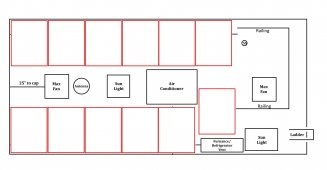
Based on the mockup, it looks like your panel is not nearly as wide as the trailer. Perhaps a "wasted" 16-18" on each side? Maybe you don't need or want to maximize the roof real estate but since I only have a 22' trailer, I needed to maximize the space. My trailer is 8.5' wide and I found that the widest thing was the AC. From the AC to the edge of the roof was ~35" and I found panels that were 33", so I have a row of six down one side, or at least that is the plan. On the other side of the roof, I can put five in a row and can put the 12th panel in the center of the roof. You can see from my roof diagram that I couldn't mount a panel across the width of the roof other than the one spot where I put the 12th panel.

By making a rack I can put shorter legs along the inside and taller legs towards the outside. On my smalled panels, the brackets mount about 1/4 from the top and the bottom so that is where I will run the rail.. The other beauty of putting in a rack system is the legs can be high enough so that all of the panels can be mounted high enough not to be shaded by anything but the AC. I just didn't want to raid the whole rack that high.trailer roof4.jpg
 
Even though I don't have a fancy polished TT, who wants all those holes. My roof is also sloped so I decided a rack would take care of the sloped roof and reduced holes. I am mounting the rack on each ceiling joist other than when they are close and I skip one. I bought 1.5" square alunimum tubing that I intend to Alumaweld.

Based on the mockup, it looks like your panel is not nearly as wide as the trailer. Perhaps a "wasted" 16-18" on each side? Maybe you don't need or want to maximize the roof real estate ...
Nice diagram, it certainly looks like you are maximizing your "roof real estate".;)

My pictures are a bit deceptive. They don't show all of the obstacles on my roof and they certainly don't show the whole roof. As it is, I will be making very good use of my roof space.

I did try lots of layout and panel size variations on paper and on the roof with cardboard mock ups. As #HRTKD mentioned, I could have used flexible panels, but to date having read lots of forum posts and blogs and having watched plenty of videos, I have seen nothing that convinces me they are worth the much higher cost for less than half the warranty of rigid panels and almost certain premature failure.

Regarding rigid panels, I probably could have run some larger panels length wise across the roof, but larger panels worry me. I also looked at turning them length wise along the sides as opposed to across the roof, but again that did not allowed for more panels and made installation harder. So nope, this was the best plan for me. I don't have a digital roof diagram, but maybe I'll make one and post it for fun.
 
I installed panels over my max fans on my truck camper. That way when it rains I can still keep the vents open and I was able to use larger panels.
 
I installed panels over my max fans on my truck camper. That way when it rains I can still keep the vents open and I was able to use larger panels.
I installed a couple of the new super duper Maxx Air Deluxe. They are really well designed. The covers tilt up and never expose the fan opening to the weather so no rain can make it in. That said, sounds like you've solved a couple of problems there.
 
Nice diagram, it certainly looks like you are maximizing your "roof real estate".;)

My pictures are a bit deceptive. They don't show all of the obstacles on my roof and they certainly don't show the whole roof. As it is, I will be making very good use of my roof space.

I did try lots of layout and panel size variations on paper and on the roof with cardboard mock ups. As #HRTKD mentioned, I could have used flexible panels, but to date having read lots of forum posts and blogs and having watched plenty of videos, I have seen nothing that convinces me they are worth the much higher cost for less than half the warranty of rigid panels and almost certain premature failure.

Regarding rigid panels, I probably could have run some larger panels length wise across the roof, but larger panels worry me. I also looked at turning them length wise along the sides as opposed to across the roof, but again that did not allowed for more panels and made installation harder. So nope, this was the best plan for me. I don't have a digital roof diagram, but maybe I'll make one and post it for fun.
I think we need liquid solar panels. Basically you would build a trench around on the roof where you wanted panels and then pour a couple layers of liquid in, connect the leads and go....
 
I installed panels over my max fans on my truck camper. That way when it rains I can still keep the vents open and I was able to use larger panels.
My concern with that is hitting tree branches, etc... The AC is the tallest thing and I thought of installing them at that height, but having the panels "way" up in the air just means trouble for me. As it is, it is hard to get through the McDonalds drive-thru.
 
Kinda too late now, but I'd rather install 2 x 450 watt panels lengthwise in the center of the roof than 8 of those smaller ones hanging to the side..
 
I kept it simple with feet made from aluminum angle mounted with vhb tape and sikaflex.

panel.JPG
 
A security cable is a good idea, but if you are attaching to a suitable surface like aluminum, you prep the surface by cleaning it well (I use brake cleaner), and after firmly attaching with 3M VHB tape you completely caulk with Sikaflex, there no pulling these feet off!
 
A security cable is a good idea, but if you are attaching to a suitable surface like aluminum, you prep the surface by cleaning it well (I use brake cleaner), and after firmly attaching with 3M VHB tape you completely caulk with Sikaflex, there no pulling these feet off!
Still, it is required you secure them if not hardware connected to the vehicle.
 
Back
Top