diy solar

diy solar

Batrium Watchmon Install

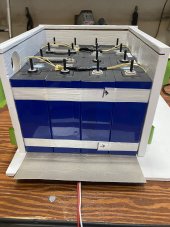
Tonight I finished my battery capacity test on the Fortune 25ah batteries. Success!!!

I charged the battery up to 14.4v (3.6v each. Then I turned on anything I could.
I had a small 150w 12v inverter - plugged a computer into it.
Had a 12v fan and a 12v LED light - with all that stuff I was using about 60watts - 5 amps... OK this is going to take a while. Started on Sunday evening. When I went to bed took off all the loads. After work put them back on. Are we done yet... (Note to self... make sure you have a real load if/when you test the eight 280ah batteries). Finally, got into the lower knee and one cell got down to 2.75v the others were 2.76 to 2.77v, so my Watchmon4 went critical, and the contactor shut off, 1 sec later turned back on, two seconds later shut off. I took all loads off, and about that time it turned back on. Started to charge it back up.

I was using the Batrium software to track the Ah used. I had used about 51ah. I didn't charge to a max 100% 14.4 volts (3.6v) instead of 14.6 (3.65v) and I shut off at 11v (2.75v) instead of 2.5v. So a little more that stated capacity. I am happy. I figure I will charge up to about 50%, then I will finish this portable battery. I have everything for it.

The Fortune 25ah cells are very well matched and stayed in sync all the way up and down. Very happy with them.
 
The Fortune 25ah cells are very well matched and stayed in sync all the way up and down. Very happy with them.
I like reading any positive reports on any of these LiFePO cells that I know so little about but, am designing a major system around. Do you have an anticipated delivery date on the 8 280ah cells?
 
Hello everyone,

I have a 2000 Monaco MotorHome, I will be installing eight 272ah Lishen LiFePo4 cells making a 2p4s 12v 500Ah (useable) battery. My two largest loads are a Victron MultiPlus 12/3000 inverter/charger and the engine "Boost" if my chassis battery gets low. For the BMS I chose a Batrium Watchmon with four Blockmons (cell monitors) and the expansion board.
The main reasons for this BMS are its ability to connect to my Victron CCGX on the CAN-Bus. This will pass bms info to the CCGX. Also I will have a 400 amps of power available. (The size of my Class T Fuse). It will control Fans (to help cool things) and a Heater (for under the battery). I also liked how the software was easy to understand and change. This BMS checked all my "Must Have" boxes and many of my "Like to Have" boxes. The biggest downside is it is an expensive BMS's - especially when adding all the other parts.

View attachment 34972

Supplier
1Batrium BMSBatriumPower 12v 3A Fuse on Pos & Neg - Relays 12v@5A
2ShuntBatriumPower 1A Fuse Positive - Shunt wire to BMS
3BatteriesLishenEight 272Ah Cells 2P4S 544Ah @ 13v (w/4 Blockmon8's on cells)
4Blockmon8BatriumBlockmon8 Qty 4 - one on each SuperCell
5400A Class T FuseBlue Sea 5502Class T Fuse Holder + Fuse +(1 backup fuse)
6Contactor 500AKilovac EV200AAANA500Kilovac EV200AAANA500 Amp Contractor Relay - Max Inrush 3.7A - Holding 1.7W)
7Pre-ChargeREC-BMSPre Charge Controller 5A Fuse
8Terminal Blocks w/ FuseFuse Box w/ Neg. 6 Fuses
92 Relays 10ACZH-LabsFuses (BMS Side) 5A combined
10Fans (2)AmazonFuses 5A
11Heating Pad 12"x 18"Amazon-Facon CW-T1221865 watts (Fuse 10A)
12Victron CCGXVictron CCGXNeed Can-Bus Wire ran between BMS & CCGX
13SwitchAmazonFuse 5A
14LED LightsAmazon12" Lights Qty 3 or 4

Here are my plans for the stuff attached to the BMS.

I have finally received everything except the batteries - they are on a slow boat from China... a very slow boat...

I also decided to make a small portable 12v 50ah lithium battery. I decided on a Harbor Freight "Pelican" case -Apache 2800. For the batteries, I am using eight 25ah Fortune cells in a 2p4s 12v 50ah battery. I picked up those batteries (local to me) at Electric Car Parts Company. I will be putting an Overkill BMS on this battery. I really like these Fortune batteries, I got to see the 60ah & 100ah when I was picking them up. They are very nice!

I figured since I had cells, I would startup the Batrium BMS and start "Playing" around with it. So I put the 25ah cells into supercells, and created the 12v battery. I attached them together with VHB tape. These cells were all at the exact same voltage 3.329v for shipping. I decided rather that doing a traditional top-balance, I would let the Batrium Top balance the cells.

So I have added the Blockmons to the cells and started wiring it up. Have the Shunt and the 30a breaker installed - Yes it is a bit of a mess!


View attachment 34980


And I am slowly charging it. I feel comfortable letting the Blockmons do the Top balance because they can balance 28.8ah per day. (That's half the size the this battery...).

Well - that's about all for tonight. I will update as I work on the project.
I don't have experience with the Batrium systems so I am watching this thread with interest.

What are the loads and chargers that will be on your system? The reason I ask is that I notice that you are using a big contactor to control the current and wondered if you considered using signals from the Batrium to directly control your loads and chargers?
 
What are the loads and chargers that will be on your system? The reason I ask is that I notice that you are using a big contactor to control the current and wondered if you considered using signals from the Batrium to directly control your loads and chargers?

The loads are typical of a MotorHome, plus I want to be able to use one of the A/C's on battery (for a little while at least). I also want to retain the MotorHome feature of using the House Bank to help start the big diesel motor.

I will also be connecting the Batruim to my Victron CCGX via the Can-Bus. The CCGX will use the signals from the Batrium to tell the chargers & inverter - Full Charge, Slow charge (for balancing) or No charge.
No solar charging?
 
D'oh... Missed half the question...

I currently have 800w of solar (Victron SmartSolar 100/50), and will be adding another 200 or 400 watts. I will be disconnecting the connection for the alternator to charge the House batteries, not planning a DC-DC charger. I figure on the days there is not enough solar - my generator needs the exercise.
 
Tonight - I made progress and got the basic wiring done.

View attachment 35142

Yes my work area is still a mess.
I got the cells charged to 3.5v each. One little issue is one of my Blockmons #3 is reading .03 or .04 volts high. I noticed it on the charging, because these Fortune cells were exactly the same voltage to begin and evidently exactly the same charge level - because they all hit 3.5 v at the same time - except the Cell #3 which reported hitting 3.5 a little earlier. The batrium did exactly what was expected and bled off the energy from that cell. I have contacted Batrium and there is a calibration tool to adjust the Blockmon. I figured I will wait until I setup the RV battery pack to run it, besides .03 or .04 really won't matter that much in the knees of the charging or discharging curves. This weekend I will run a discharge cycle and see how close to 50Ah I get. (I think is goes over just a little).

I also got the contactor (relay) wired up directly (Have not wired the pre-charge unit in). The Batrium is running it just fine. It makes a nice clunk sound when turned off or on.
I also used the terminal blocks from Dinkle for my fuses and negative wires. (The items on the rail on the right side). Because there will be like 6 or 7 fuses in this setup, I decided to try terminal blocks. I gotta say I really like them. I think they will help me organize my wiring and keep it looking good. (A real challenge for me - as you can tell from the photo's).

I also got the BMS powering itself from the battery, and the wireless hooked up - so now I don't need the USB cable to have the computer software run the BMS.

Also the OverKill BMS arrived in the mail today - the BMS that these batteries will be attached to.
What is the black device with the red button directly off the positive battery terminal?
 
Yes - it is a self- destruct button. ?

it is NOT a Bussman 30a surface mount breaker.

If you push the red button all the little electrons in the circuit suddenly quit doing the work we want them to and spontaneous self destruct - such horror! Luckily the ones in the battery don’t hear about that so once you push the lever back in they will start doing the work again...?
 
Well my ship came in... that slow boat from China and my lithium battery cells arrived !!!

6DF55B39-32D2-4922-A635-7B1D62BBEF91.jpegThe only problem is they are 5 hours away at my Father’s house (had them shipped there ‘cause he has all the cool tools - and my RV is there too).
I have to wait until work slows down to go and visit and make a battery for my RV.
 
Interesting. My initial config (16S) and conversations with Batrium steered me to the block mon. An MM5 +1 MM8 is about $230 cheaper than MM4+28 blockmon.

I'm not too concerned about .3A balancing vs. 1.2A isn't a big concern. All cells have been tested for capacity and interleaved within a module to ensure each 21P cell capacity is extremely close. I'll have 4A active balancers on there and plan to disable Batrium balancing in most cases.

I may actually like not having the balance heat at the cells.

Thanks for that.

I have all the components including the land... just not the time! :(

For 16S the MM5/MM8 should be the way. For lower cell counts in multi-string the MM4 and BM's are the only way.
 
That's likely the route I'll go. I originally planned 16S of Lithium LMO/NMC since my inverter can handle it, and I preferred the lower current; however, a 14 or 15S pack with a second in parallel has several other benefits over my original 16S plan.
 
Have you STILL not made it to your batteries, @Rocketman ?

And, when you have a minute, could you share from whom you ordered, and if you'd recommend them based on your experience? I'm thinking I may get my order in soon, and am really wanting to just get the best quality, as guaranteed as possible, even if it means paying a little more.
 
I visited my batteries (and my parents) this weekend. They are really nice (both my batteries and my parents).

Anyway, it will be the end of the month before I do anything with them.

I ordered them through Michael Caro (on this website). He ordered them through Shazen Basen(totally spelled wrong.

I believe now he can get them with the studs already installed (get those if you can).
 
Hello everyone,

I just finished the small portable battery using the eight 25ah cells pictured with the BMS.

Here is my writeup on that battery.


Now to go from a 50Ah battery to a 500Ah battery for the MotorHome. I will post pics as I am doing it (Over the next month or so).
 
Hello everyone,

I figured I should finish posting about building the battery (about time... I have been using it for months now).

Here is the photo of the eight cells. I used kevlar cord (from my rocket hobby). Its strong and doesn't stretch. This is so I can lift the cells when I need to.


IMG_2438.JPG

Next I need the posts. I ordered M6 x 30mm flat tipped steel set screw (bag of 25) from McMaster-Carr Plus some M6 locknuts. My batteries included 20mm set screws - but I needed them longer. I found some silver epoxy from Atom Adhesives. For $20 I figured it was a good idea to have the epoxy conduct electricity.

IMG_2453.JPG
Adding a little bit to the end of the set screw, I screwed the set screws in to "very snug" and let epoxy do its work. In my opinion this was very successful choice. I have not had any issues or problems with any of the screws. [ After 3 months on the road - no issues ].

IMG_2455.JPG

Next up is the buss bars... I order 1/4" x 1" copper bar (Nickle plated) from on-line metals. Cut and driller my own buss bars.

IMG_2478.JPG


IMG_2479.JPG

Coming together... Used some strapping tape to lock each 4pk of cells. I also got an RV 12v tank heating pad, for the bottom to hopefully keep the cells warm. I got a Mica sheet (from Amazon) and stuck it to the sticky side of the heat pad. I wanted something that would not conduct electricity and also would conduct heat. The power for the heating pad will run through a relay controlled by the Batrium - the heat pad has a thermostat, but it has a much larger range - so the Batrium gets to control the power. The slot on the top is for some plexiglass to slide in - so no dirt can fall on the batteries. The circles are for fans to add some ventilation - when they might need to cool off.

IMG_2481.JPG
I wanted as neat of a control panel as I could make, so I ordered some Dinkle Terminal Blocks to help out. There are a lot of fuses needed for the Batrium BMS, I have two power sections - one always on (Batrium, Shunt, and Pre-Charge & Contactor), and one that is switched by the contactor. (fans, heater, Victron Shunt). The Black CZH box is two 10amp relays, The Batrium relays could not handle the heater, so they run this relay - which runs the heater.


IMG_2488.JPG

The positive line goes into a 400A Class T fuse, then down to the contactor (the 10 ga wires will be replaced with 4/0 wires). The contactor is a Kilovac EV200AAANA (from Onlinecomponets.com). I have a Pre-Charge from Rec-Bms. to precharge the system for a few seconds (four if I remember correctly) so the capacitors in the inverter get pre-charged, so there is not a giant spark when the system switched on.

The negative line goes to the Batrium Shunt, then will go through the Victron Shunt then out to the system. I really like the Victron data from the shunt, so I added it in.

One of my design criteria, is to be able to keep the Boost ability of the motorhome (this battery can help start the big diesel motor if needed). So I made sure the battery can handle 1000 amp of discharge. Hopefully I never find out... (That's a 2C discharge on the cells for a couple of seconds). If I need to do that, I need to replace the 400 amp Class T fuse. I did make a small buss bar, to replace that fuse for the battery start.

IMG_2489.JPG
IMG_2492.JPG

Well, that's good for tonight. Later I will explain my "path of woe" (all my own fault).

Rocketman
 

Attachments

  • IMG_2481.JPG
    IMG_2481.JPG
    187.6 KB · Views: 13
Back
Top