diy solar

diy solar

Battery Box Build

willo

Solar Enthusiast
Joined
Apr 8, 2020
Messages
450
So I'm just planning out my battery box builds for the new pack.
After doing some winter camping with a crappy shore feed, I knew I had to add some battery heating for the new build.
My batteries live in the unheated compartment of my 5th wheel camper....

The Batteries: 16x 280ah Lifepo4 cells.
I'm going to build to 12V packs of 8 cells each in a 4s2p configuration.
My BMS will be an electrodacus SBMS0 that will run the full system as a 8s 24v.
I'm going to use 3/4 inch plywood to build the boxes, then brad nails and glue.
Each box will be insulated on all sides and have a heating pad installed in the bottom of the pack.

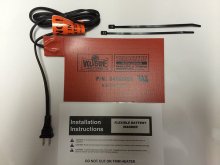
I've decided to use RV water tank heating pads, I ordered these:
I will add a an extra controller to reduce energy usage, but the built in thermostat is reassuring to have.

I put together the packs and measured around 22.5x7 for the pack footprint.
The heater pads are 7.25" x 25", so my boxes will end up just a bit bigger as I think bending these pads is not good.
I'll add some sort of diffuser plate - likely aluminum between the pads and the batteries.

For balance leads, I'm going to use some 22awg silicone insulated wire, with inline fuses at the battery terminals.
To keep wiring sanity, I'll add some connectors on each pack - one for BMS balance leads and one for the heater pads and temp sensors
For temp control, I'll add a pair of one wire DS18B20s and a thermistor to feed the BMS directly.

1609610512843.png
 
Last edited:
Following...I will be doing a similar build for my rv. Two 8s banks in parallel. 24v.
 
These are the fuses I'm going to use for the balance leads:
with 250ma fuses since the SBMS0 balances at a max rate of 200ma.
 
The source I used for my warming pads said that RV water tank heaters are the wrong type to use for batteries. They'll get too hot. RV water tank heaters are based on heating a plastic tank with water in it. You have metal cell walls with electrolyte inside.
 
I'm going to disagree for a few reasons, but I will happily point them out.

First up: energy.
From the rec pro product page: The draw is "5.8 Amps and 78 Watts"
That's really not that much energy. Seriously, think 1500 watt space heater vs 100 watt heating pad.
To drive this further, the pad is 25"x7" (I'm rounding) so that's 175 square inches. 78 watts over 175 is an average of .44 watts per square inch. There are certainly hot spots in there, but more on that in a second.

Second up: distribution.
I plan to add a heat sink plate - probably like 1/4" aluminum across the bottom of the pack, in between the cells and the pad itself.
This is to prevent hot spotting and to evenly distribute heat across the pack. The cells feel denser than water, so this is likely overkill, but it's a cheap price to protect the investment I have in the cells.

Third up:
The built in controller is really overkill, I just like having a safety in there. In fact, I'd hazard a guess that this higher heat level is what your 'source' was thinking of. The things are designed to turn on at 45f and off at 65f. This is far warmer than we need. The goal for me is to keep the pack over say... 41f or 5c. This allows for some heat gradient along the pack itself.
I'll be adding a custom controller with two temperature sensors in each pack, probably along with a compartment sensor too.
I can control the amount of time that the pad is actually powered - for example I can cut the duty cycle to 50% and effectively cut it down to half the wattage.

Cheers.
 
@HRTKD I found your build (nice job), looks like you have a pair of 8x11 pads that run at 1a x 12.5v so 12.5 watts. Surface area is 88sq in, so .142watts per square inch. I can achieve the same heat profile by running my pads at about 30% duty - this is trivial using a PWM signal driven fet and a microcontroller.
 
I posted what I know so that you know it too. RV tank heaters are for a different use case than you've got. You could very well end up finding that your pads don't give enough heating because of how their internal sensor is getting heat reflected back at it from the metal. I don't know that's what will happen, I'm just throwing it out there that it's an unknown.

If it was me, I would have a temperature probe between the battery and the pad/plate so that I could get a clear understanding of how hot the bottom of the battery is really getting. This would be for testing, not production. Once you know for sure what the high temp is, the temperature probe is no longer necessary.

Thanks for the compliments on my build. I got to thinking about it today and how I'm considering rebuilding the compression frame and insulation. The insulation came about a couple months after the batteries and compression frame were installed. Consequently, the insulation doesn't fit nice and tight.
 
In theory, the RV pad shouldn't let the bottom of the battery get over the 65 degree +_5 range. This is pretty darn acceptable and usable for most of these builds out of the box.

Since I'm using an additional controller to reduce the load and provide finer temperature controls, I'm really not worried about over heating.
I used a raspberry pi and a pair of DS18B20s to run my hot tub for a few years, and built various controllers for espresso machines, grilling/smoking, etc, so I'm pretty comfortable with this sort of control system. Also, these temp sensors are very inexpensive, I have no issue running multiples.
The nice thing about the 1-wire sensors is that it's a data bus. You can run a hundred of the things on the same bus, they all have different addresses. Thermisters and thermocouples are actually more annoying since you need dedicated input lines to collect the data.
I would suggest that anyone running a heating system on their batteries have a temperature monitor of some sort!
 
Ok so my pads arrived. I can clearly trim the length down, which is nice. There's a good five inches of foam at the end.
IMG_20210109_160343.jpg
 
I will pick up some longer screws and double up the bus bars. I've also ordered sheets of 24x12 hdpe to stick the heaters to and go between the heaters and the bottom of the cells.
 
I have been planning my batt box for a while and the heating is my primary concern. I had an idea tomuse heater for car seats similar to those:
And add a temp controleler on the low power setting on the pad With a probe 2/3 down the height of the cells.

following this thread :)
 
I have been planning my batt box for a while and the heating is my primary concern. I had an idea tomuse heater for car seats similar to those:
And add a temp controleler on the low power setting on the pad With a probe 2/3 down the height of the cells.

following this thread :)
I tested one heating pad on my bench. It's comfortable to touch. Car heaters would definitely require care and controllers. After doing bench testing, I think the RV heater pad is just about perfect. I'll get more data once I have the pack built. I can easily test time to heat since I live in the mountains and it's plenty cold at night.
 
View attachment 32639
Added foam insulation between the tension bars. Stuck until I get the hdpe spacers in so I can add the heaters, finalize the insulation and built the outer box.
Love-love your design. I'm new to this forum, getting a lot of good reading. This is my first storable energy DIY is on the workbench right now. Been a camper for over 35 years, and living in the mid-west it gets cold in the camper. I have used several tank heaters, and you're correct to get plenty of controls of actual temp within the battery box.
I have seen tank heaters not set up correctly;y (or the first generation of them) actually get the tank hot enough to evaporate what little liquid within the tank left plugged in. I'm sure they are much better made today.

My work in progress is planned for a battery hearer like this:

my box is all metal and much smaller than yours. Hope to get more photos as mine progresses.
 

Attachments

  • 91Fylzl98EL._AC_SL1500_.jpg
    91Fylzl98EL._AC_SL1500_.jpg
    63.2 KB · Views: 30
Mild delay, gotta go to the post office and get boxes that were too big for the postal worker.

Meanwhile, I was talking to Dacian an learned that I have to keep the interconnect between the two sets under 15cm. I'm going to hybridize the design a bit and install both modules into a single box enclosure. That should let me access both, physically deal with both and keep everything tight.
 
IMG_20210118_093824.jpg
Half of the build coming together.
The open end will butt up against the other half to keep the connection short enough to keep inductance low enough.
The entire assembly slides into the outer shell.
 
Cut a notch out of the top of the plywood so the cables can lay flat on the batteries. I cut a notch in mine and it works well, but the notch needed to be level with the top of the battery. I missed that by about 1/2".
mecry.gif
 
I cut one notch already, just haven't decided where the other will go.
 
This is a great thread for me as I’m about to do exactly the same thing for my tiny off grid cabin/home using 8 280ah LiFePO4 batteries. I was looking at milk crates but think I’ll go this way now. I’m not as worried about the battery temp for the cabin as the battery will be in the living space, but I may build another one (same config) that goes in an outbuilding that is not temp controlled so in that build the heat pads will be needed. Thank you...
 
Back
Top