Sounds like a plan! Still learning. ?Happy to see all the blue.
Connecting both main leads to the closest battery causes substantial shift of load to that battery. If you've pulled over 100A from the system routinely, you've likely subjected that battery to currents beyond rated.
Better late than never.


You are using an out of date browser. It may not display this or other websites correctly.
You should upgrade or use an alternative browser.
You should upgrade or use an alternative browser.
Battery fuse blew?
- Thread starter JonL
- Start date
Sounds like a plan! Still learning. ?
Even the leading post whore has something to learn. I swear I encounter something every day that at least clarifies something I thought I understood.
")
Thanks again. This is my second system that I built from the ground up. The first one was a small lead acid battery bank that ran a refrigerator. This one is lithium and it runs my whole house! I didn’t hook up the inverter to the electrical panel, as that was over my head! ?Even the leading post whore has something to learn. I swear I encounter something every day that at least clarifies something I thought I understood.
John Frum
Tell me your problems
- Joined
- Nov 30, 2019
- Messages
- 15,233
Unless you are getting paid that is post slut.Even the leading post whore has something to learn. I swear I encounter something every day that at least clarifies something I thought I understood.
Thanks again. This is my second system that I built from the ground up. The first one was a small lead acid battery bank that ran a refrigerator. This one is lithium and it runs my whole house! I didn’t hook up the inverter to the electrical panel, as that was over my head! ?
Part of success is knowing where you'll fail. Sometimes spending money with the right resource is WAY easier than learning how to do it right.
No shame in that.
No I just didn’t want to get killed! ?Part of success is knowing where you'll fail. Sometimes spending money with the right resource is WAY easier than learning how to do it right.
No shame in that.
No I just didn’t want to get killed! ?
Wisdom takes many forms. I've been shocked more times than true Wisdom would suggest.
No. I don’t have that kind of equipment. But I tighten them down the same way I did all the others and nothing happened. Nothing is loose.
If you make a cable with lugs on each end and the lugs are not aligned for the stud that they'll be mounted to, then you end up with a twist in the cable. That twist adds stress on the lug, possibly causing it to rotate on the stud, preventing a solid contact. Put enough torque on the stud nut and you get rid of the misalignment of the ring terminal. But too much torque can break a bus bar.
My approach when making my cables was to lay out the cable, including the curves needed to make the cable go from one stud to the next. One end of the cable was cut, the other end was not (it was longer than needed). I inserted the cut end of the cable into the lug and made sure the lug sit flat on the stud. If I was unsure that I could take the cable/lug off the stud and maintain the position, I made a mark on the cable/lug so I could put it back into alignment. With the cable/lug aligned, I crimped it and tested the crimp.
The cable was put back in place with the newly crimped lug on the stud that it was on previously. Then, with the cable arranged with the necessary curves and lined up with the next stud, I marked where to cut the cable. Pull the cable off the equipment, cut it for length and trim off the insulation. Put a lug on the cut end and place the cable back on the equipment, ensuring that the lug was in alignment with the stud. If I let go of the cable and the lug rotated, then it wasn't in alignment. Make an alignment mark, pull the cable off the equipment and make the crimp.
None of my lugs stressed the stud of what they were attached to.
Yes I saw one like that that I know I need to get fixed. It just needs to be rotated a bit. Thanks for the added detail! ?If you make a cable with lugs on each end and the lugs are not aligned for the stud that they'll be mounted to, then you end up with a twist in the cable. That twist adds stress on the lug, possibly causing it to rotate on the stud, preventing a solid contact. Put enough torque on the stud nut and you get rid of the misalignment of the ring terminal. But too much torque can break a bus bar.
My approach when making my cables was to lay out the cable, including the curves needed to make the cable go from one stud to the next. One end of the cable was cut, the other end was not (it was longer than needed). I inserted the cut end of the cable into the lug and made sure the lug sit flat on the stud. If I was unsure that I could take the cable/lug off the stud and maintain the position, I made a mark on the cable/lug so I could put it back into alignment. With the cable/lug aligned, I crimped it and tested the crimp.
The cable was put back in place with the newly crimped lug on the stud that it was on previously. Then, with the cable arranged with the necessary curves and lined up with the next stud, I marked where to cut the cable. Pull the cable off the equipment, cut it for length and trim off the insulation. Put a lug on the cut end and place the cable back on the equipment, ensuring that the lug was in alignment with the stud. If I let go of the cable and the lug rotated, then it wasn't in alignment. Make an alignment mark, pull the cable off the equipment and make the crimp.
None of my lugs stressed the stud of what they were attached to.
I made a few tests and even though the wires still gets slightly warm, nothing that would worry me. And the long wire to the right of the switch towards the battery is cool.
Strange that the only two wires that get any heat are from the bus bar to the switch.
Hedges
I See Electromagnetic Fields!
- Joined
- Mar 28, 2020
- Messages
- 20,577
Updated.
Wiring your 2s4p battery bank as shown (positive to first 2s, negative to last 2s) is a big improvement over both cables coming off a single 2s, but it isn't perfectly balanced yet. I'm not sure where the post/picture of ideal battery connection is (can't even find most of my own posts), but the arrangement uses one longer jumper on each of positive, negative to parallel the strings.
First you wire 2s2p, then a second 2s2p, then join those in parallel with longer jumpers across positive left strings and negative right strings. Then connect cables to inverter.
Hedges
I See Electromagnetic Fields!
- Joined
- Mar 28, 2020
- Messages
- 20,577
Thanks again. This is my second system that I built from the ground up. The first one was a small lead acid battery bank that ran a refrigerator. This one is lithium and it runs my whole house! I didn’t hook up the inverter to the electrical panel, as that was over my head! ?
It's not difficult to hook your inverter safely to the electrical panel, so long as inverter isn't something like +/-60V output that doesn't like neutral bonded to ground.
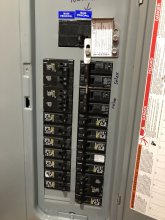
What you do is put a breaker in a slot adjacent to the main breaker, and spend $50 on a sheetmetal interlock which ensures only one of [utility grid, inverter] is ever enabled at one time. As shown in the link I gave here (several pictures to thumb through in the link.)

Finding the right size bus bar
So here’s my set up so far. Everything is not hooked up yet, just the old inverter on the right and my Renogy charge controller in the center. I’m waiting for my other solar panels to arrive. If anybody has any advice on how it looks so far, do let me know. I have a combiner box above the roof...
 diysolarforum.com
It is if you aren’t knowledgeable about such things. I didn’t even know how to charge you lead acid battery not too long ago.It's not difficult to hook your inverter safely to the electrical panel, so long as inverter isn't something like +/-60V output that doesn't like neutral bonded to ground.
What you do is put a breaker in a slot adjacent to the main breaker, and spend $50 on a sheetmetal interlock which ensures only one of [utility grid, inverter] is ever enabled at one time. As shown in the link I gave here (several pictures to thumb through in the link.)
Finding the right size bus bar
So here’s my set up so far. Everything is not hooked up yet, just the old inverter on the right and my Renogy charge controller in the center. I’m waiting for my other solar panels to arrive. If anybody has any advice on how it looks so far, do let me know. I have a combiner box above the roof...
Anyway the wires from the inverter to the garage had to be through conduit and later I found out my whole panel needed to be rebuilt. Unfortunately whoever put it together the first time it was a major fire hazard. I wouldn’t even have known that if the guy who came out didn’t tell me. Plus the main connection had to be undone to put in the interlock switch. Believe me I wouldn’t of had a clue!
Attachments
Interesting, but I would need diagrams, as I’m not experienced with wiring. Most of what I do is baby steps. ?Wiring your 2s4p battery bank as shown (positive to first 2s, negative to last 2s) is a big improvement over both cables coming off a single 2s, but it isn't perfectly balanced yet. I'm not sure where the post/picture of ideal battery connection is (can't even find most of my own posts), but the arrangement uses one longer jumper on each of positive, negative to parallel the strings.
First you wire 2s2p, then a second 2s2p, then join those in parallel with longer jumpers across positive left strings and negative right strings. Then connect cables to inverter.
Hedges
I See Electromagnetic Fields!
- Joined
- Mar 28, 2020
- Messages
- 20,577
Interesting, but I would need diagrams, as I’m not experienced with wiring. Most of what I do is baby steps. ?
Here ya go. Easier to find something with Google than with the DIY Solar search.
It is if you aren’t knowledgeable about such things. I didn’t even know how to charge you lead acid battery not too long ago. ... Plus the main connection had to be undone to put in the interlock switch. Believe me I wouldn’t of had a clue!
Oh OK, you had it done already.
I didn't know the main connection had to be undone either. I didn't when I put mine in.
(unless your panel had "main lugs" and no breaker; in that case a breaker would have to be installed so it could be interlocked.)
This stuff is easy for me to say, since I've been messing with electricity for 50 years.
My mom got me many things to try out, and while I didn't become a chemist, pianist, or pro tennis player, I've made a good living designing electronics. Still learning on the job (may have cooked a $5000 scope probe this past week), but sometimes earn my keep too.
Not yet. Good idea! ??Did you put a fire alarm and fire extinguisher in the room?
Hedges
I See Electromagnetic Fields!
- Joined
- Mar 28, 2020
- Messages
- 20,577
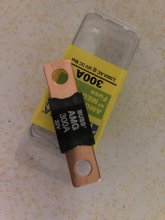
Well I replaced the fuse and fixed the wiring so it’s not stressed. Let’s hope this solves the problem. Jon
That's a start, but I think 2s4p Battleborn can deliver much more current than that fuse could interrupt.
Not yet. Good idea! ??
First step in fighting an electrical fire is to disconnect the electrical source.
Dry chemical A-BC rated extinguishers could be good to save the house, and I wouldn't be very concerned using water around 24V batteries either. But both would be bad for your expensive electronics.
There are residue free extinguishers that are electronics safe. Price may be 10x higher, and effectiveness on wood/paper (class A fire) isn't as good.
So a bunch of tradeoffs.
The battery chemistry itself is relatively safe against fires.
One forum member (fhorst) wired a smoke alarm to shut things off. Considering that overheated wires can smoke and then set things on fire, seems like a good idea. All depends on how things are packaged/housed and what you stand to lose.
First order of business is probably checking how hot things get at full load, fix any contact problems so they don't cause issues.
I’ve been watching the loads very closely these days. Wires can still get a bit warm but I don’t see any real issues so far. Hopefully the new fuses will do their job. ?That's a start, but I think 2s4p Battleborn can deliver much more current than that fuse could interrupt.
First step in fighting an electrical fire is to disconnect the electrical source.
Dry chemical A-BC rated extinguishers could be good to save the house, and I wouldn't be very concerned using water around 24V batteries either. But both would be bad for your expensive electronics.
There are residue free extinguishers that are electronics safe. Price may be 10x higher, and effectiveness on wood/paper (class A fire) isn't as good.
So a bunch of tradeoffs.
The battery chemistry itself is relatively safe against fires.
One forum member (fhorst) wired a smoke alarm to shut things off. Considering that overheated wires can smoke and then set things on fire, seems like a good idea. All depends on how things are packaged/housed and what you stand to lose.
First order of business is probably checking how hot things get at full load, fix any contact problems so they don't cause issues.
Similar threads
- Replies
- 3
- Views
- 232
- Sticky
- Replies
- 65
- Views
- 4K
- Replies
- 11
- Views
- 460