diy solar

diy solar

Bayite shunt

Tyler702

Desert dweller, quiet prepper
Joined
Aug 20, 2020
Messages
178
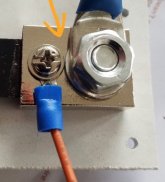
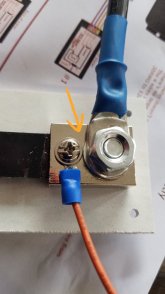
So, I'm browsing all the reviews and tips on Amazon for this unit. Very little mention of this, but I was alerted by the included instruction NOT to short these 2 connections, but holy cow! they are SO darn close, and after lugging up and tightening down everything, I'm just not comfortable with what appears to be no wiggle room at all. Short of building up one side with smaller washers to stagger the height, has anyone else a solution?
Thanks
Tyler

Btw, ettequite question, is it prefered to upload full res pics, or thumbnails? For future reference..
Thx.
20201123_081438.jpg
 
Looks like they are mounted on one piece of metal. If so they are already “shorted”.

A quick check with a DVM will confirm.

Unfortunately I don’t know anything about etiquette ?
 
Looks like they are mounted on one piece of metal. If so they are already “shorted”.

A quick check with a DVM will confirm.

Unfortunately I don’t know anything about etiquette ?
I had one sitting in a bin of unused parts and just checked it out. I can't figure out why the instructions say what they do. It's the same hunk of copper, so the instructions are nonsense.
 
Ok, so I got a reply from bayite.

"Hi Tyler
Thank you for contacting us. Please don't worry. We just consulted it with factory about it. There is no problem of the two close washers. It won't affect the circuit.
If still any question, please contact us freely. Jolin"

So guess that solves that issue, despite their instructions with pictures and arrows warning not to touch those two terminals.
 
I'm oblivious to etiquette myself, but I have noticed that copy/paste makes a huge file and high resolution (10 Mpixel) won't load, so I have to shrink to 1/4 or 1/16 with paint. But if I save as .jpg it is smaller and loads fine.

When you measure voltage of a shunt, you don't want to get the voltage drop from the ring terminal to the shunt.
Touching may not be nearly as bad as putting sense line on top of the ring terminal for battery cable, but I would still try to avoid it. Is that the head of the screw, or a washer under it? Substitute something smaller in diameter.

More important, is that a washer under the large gauge ring terminal?
Don't do that! You don't have to play "Tower of Hanoi" with them.
Is it even copper? If not, very bad electrical contact. Won't mess up the shunt's measurement, but will add resistance and get hot.
Copper lug should go to shunt. Washer on top, then nut.

As a side benefit, fixing the stacking order will probably open up a gap to the sense line.
 
Btw, ettequite question, is it prefered to upload full res pics, or thumbnails? For future reference..
You can upload full size pictures, but after they upload you have the option of displaying a thumb or the full pic. Speaking from someone who has a very slow DSL internet, posting thumbs allows the pages to render faster over a slow link. On threads where there are lots of full size pics, it can take forever to load a page. Thumbs load much more quickly. Once the thumb is loaded, you can always click on it to get the full pic if you want to see it.
 
I'm oblivious to etiquette myself, but I have noticed that copy/paste makes a huge file and high resolution (10 Mpixel) won't load, so I have to shrink to 1/4 or 1/16 with paint. But if I save as .jpg it is smaller and loads fine.

When you measure voltage of a shunt, you don't want to get the voltage drop from the ring terminal to the shunt.
Touching may not be nearly as bad as putting sense line on top of the ring terminal for battery cable, but I would still try to avoid it. Is that the head of the screw, or a washer under it? Substitute something smaller in diameter.

More important, is that a washer under the large gauge ring terminal?
Don't do that! You don't have to play "Tower of Hanoi" with them.
Is it even copper? If not, very bad electrical contact. Won't mess up the shunt's measurement, but will add resistance and get hot.
Copper lug should go to shunt. Washer on top, then nut.

As a side benefit, fixing the stacking order will probably open up a gap to the sense line.
Hedges, yes. that was a "bolt then washer then ring lug then nut" order setup in that pic. I was trying to stack/ seperate and create a gap between the big lug and the sense wire screw. And yes, the big lug ring is a copper-tinned lug.
 
You can upload full size pictures, but after they upload you have the option of displaying a thumb or the full pic. Speaking from someone who has a very slow DSL internet, posting thumbs allows the pages to render faster over a slow link. On threads where there are lots of full size pics, it can take forever to load a page. Thumbs load much more quickly. Once the thumb is loaded, you can always click on it to get the full pic if you want to see it.
Good to know on the pics. I'm sensative to everyones data/time usage. If it's 30sec to a minute download time just to load a particular situation, most may just bail, and move on to the next thread. Posting as a thumbnail, then click for full res if there is an interested/relevant reply seems best.
Noted.
 
Hedges, yes. that was a "bolt then washer then ring lug then nut" order setup in that pic. I was trying to stack/ seperate and create a gap between the big lug and the sense wire screw. And yes, the big lug ring is a copper-tinned lug.
That is what I see as a problem electrically, extra resistance if the WASHER is not copper. And the washer is what may make contact with smaller washer over sense wire ring terminal:

Washer under lug.jpg
Because washer is under the large ring terminal, current from battery goes through the washer.
Ring terminal should go on first, washer second. (unless washer is copper, then it wouldn't really matter.)
 
Back
Top