You just hit the motherload! Frame it - put it under your pillow. This reads like a lot when just starting out, but hopefully this WOT will be shortened in your mind.
Maybe this will help - You are a "monobloc", which simply means that you aren't putting individual 2v cells together like an industrial user, or waaaaay advanced hobbiest would. Ie, car batteries are "monoblock" - a bunch of cells already assembled together. You normally don't find / buy individual 2v lead-acid cells.
Same thing here with yours - you don't have physical access to the individual 2v cells, only the series-combination of them already connected internally. Hence monobloc
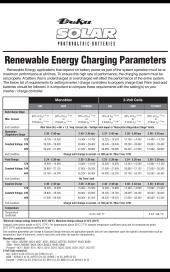
You are FLOODED. So you can ignore the sealed Gel and AGM columns.
(
Understand that your SCC is going to do much of this work for you. For many, they just take note of the CV and Float voltages and set their SCC to that. Later, if you feel so inclined, you can do a full-on EQ, or let your SCC do a mini version by solar. But all this information here is for people that want to do it manually, or make their own SCC controller circuitry follow these rules - if their SCC is actually that flexible)
Max current is 30% of C/20. More easily represented as no more than .3C. Ie, a 100ah batt should get no more than 30A from your panels.
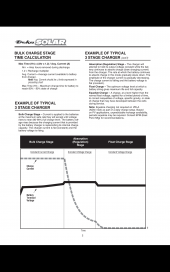
Absorption Stage:
Shows the range of allowable CV (Constant voltage) you set your SCC to depending on whether your system is 12/24/48v. Aka absorb. For a 12v system that would be anywhere from 14.4 to 14.7v
End Condition:
These guys are SMART! You stay in the absorption stage until this condition is met.
Charge until change in current < 0.10A per Hr / Max Time: 12Hr
So this sets you up for deciding when to drop to a float-voltage which follows. Here, instead of trying to watch "tail current" fall to some arbitrary value like .05C, this real-world example is
based on a STALL OF TIME. In other words, it simply means if you are in absorb, and you don't notice any further lessening of tail current by 0.1A IN AN HOUR (say going from 0.7a and falling to 0.6A), then you drop to float!
That's the BEST indication that you are done with absorb. A safety-timeout of 12 hours is also indicated if you have no way of observing or measuring it. This all has to do with the real-world aspects of battery aging, IR and other conditions. Hanging out too long in absorb trying to reach an arbitrary "first day manufacturing birth" 2 years later, is harmful!
Now it's up to you to decide - IF I AM A DAILY CYCLER - do I let my SCC drop to float after 2 hours like it wants to (depending on scc timeouts) when the manual says I could go longer based on those other two variables? If so, should I just stay in CV absorb all day until the sun goes down? Should I defeat the premature timeout my SCC performs by setting my float to the same value as a trick? Or, if I can't defeat the timer, should I just run a high float as long as it is within range in the chart?
Or, if I'm just a weekend warrior, more of a standby random thing, just set my scc up for a more conservative approach, because I'll have plenty of time for the batts to soak in some low-current charging over the course of a few days...
The rest is followed similarly. Look at the voltages, note the "end conditions" too. At the bottom of the chart, you'll see the temperature coefficient, which modifies your voltages in the chart itself!
ACKK!! Don't worry - your SCC should have at least an ambient temperature-compensation feature built in. But because lead does not shed or absorb temperature variations quickly, it is BEST to put a remote temperature-compensation probe from your SCC to at least one of the battery terminals directly.
Sorry for the WOT. I just wanted to get most of this out there, so a possible important item didn't get lost.