diy solar

diy solar

Cinergi's 28 kWh / 4 kW Solar / 10 kW inverter RV build

Rubber feet, even if bolted to the floor, would flex several mm.

You could wrap a ratchet strap around the pack and secure it to eye bolts or whatever. I did that for a spare tire and milk crate organizer in the back of my hatchback, figuring if it ever flipped end over end I'd be better off without heavy projectiles inside. I've similarly wrapped a strap around my home battery bank so it doesn't try to rip cables out of inverters if we get an earthquake.
 
Very nice project!
There's one thing I am failing to understand - if the feet are attached to the side pieces, and the side pieces are expected to move, and the feet are anchored to the floor of the RV, how is the movement supposed to happen? What do you expect will flex?
Also, do you think the four feet are sufficient to anchor this much weight? I'm about to embark on a similar project (16 cell pack inside a van) and am debating how to use a spring side mechanism like you did but also really anchor the pack to the floor/wall so that it can't go flying in case of a bad accident.

They're rubber vibration mounts so they flex in all directions. They only need to flex ~2mm.

I believe they're enough to withstand a pretty significant accident except perhaps a rollover. They're pretty strong and they each only need to handle about 25 pounds...

But, I may change my design (see a new post to this thread, coming shortly).
 
Rubber feet, even if bolted to the floor, would flex several mm.

You could wrap a ratchet strap around the pack and secure it to eye bolts or whatever. I did that for a spare tire and milk crate organizer in the back of my hatchback, figuring if it ever flipped end over end I'd be better off without heavy projectiles inside. I've similarly wrapped a strap around my home battery bank so it doesn't try to rip cables out of inverters if we get an earthquake.

Yeah strapping is quite possibly going to be something I add after I get it into the RV. I just have to figure out how to strap it without interfering with the compression too much - but that should be easy.
 
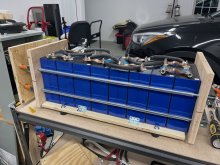
Oh, now I see. Did you consider mounting those feet to the bottom of the lower piece of plywood?

I mocked this up and I think I remember why I didn't do this ...

IMG_9181.JPG

Nothing is holding the bottom to the cells; if I pick up the cells by the compression fixture, the bottom doesn't come with it. The cells could fall out. Nothing prevents the cells from falling out in a rollover situation. But as I sit here and contemplate all of that and the complexity of the Anderson connectors and molex connectors ... I'm probably over-engineering if I'm being honest with myself. I'm not going to be picking up these packs and moving them around once they're in the RV. So in reality, I can just strap it down to accommodate the safety requirements and go with the above mocked-up design (the bottom plywood plate would need to be deeper so I can attach the rubber feet).
 
I didn't like that "floating" design - I want the compression fixture and feet to be one piece and solid ... and I'll use screws to secure the feet.. So I'm back to my previous design. Here's the floating design:

IMG_9183.JPG

I would need those corner braces to keep the cells from sliding off the board, and I'd need a way to secure the cells down (e.g. with straps). Yuck. So yeah, back to the previous design, and I'm now building fixture #2 ... 90% done and took maybe an hour (most of the time was spent deburring the metal pieces I had to cut).

The appointment for picking up my RV has been scheduled for March 30 - Apr 2 .. so I'll be in Kansas all week doing that and getting all of this installed. ?
 
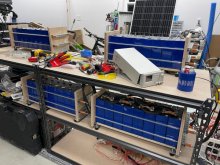
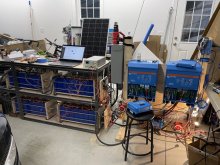
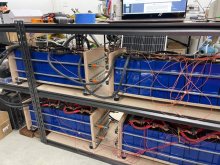
All 4 packs built. They still need wiring, but all the metal and wood cutting etc is finally over.

You can see the Riden 6018 and 1 of the solar panels in the picture, too (I haven't played with either of them yet).

IMG_9191.JPG
 
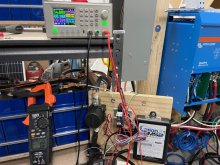
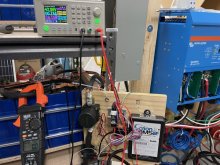
Got the Riden assembled and put it to use. I used it to test the new SSR that drives the main contactor to make sure I got that right before I blow up my BMS. I also was able to see the power utilization - very cool. Notice the difference in power depending on voltage (normal for a relay). I also am happy to discover that the SSR will turn on even at 44 volts (it's listed to turn on at 48).

IMG_9193.JPG

IMG_9192.JPG
 
Just assembled my Riden 6018 last night. The supplied power switch only had one cycle in it, immediately died. Replaced it and the unit is working. But I have no batteries to play with. :cry:
 
Just assembled my Riden 6018 last night. The supplied power switch only had one cycle in it, immediately died. Replaced it and the unit is working. But I have no batteries to play with. :cry:

Out of curiosity, what do you mean about the switch? My switch was able to switch to off but then I was unable to switch it back to on (physically impossible). After playing with it for a few minutes, I finally cleared whatever was wrong and it's been switching fine since then. Curious if you had the same issue.

You can always connect a load to the power supply to play with it. :)
 
Out of curiosity, what do you mean about the switch? My switch was able to switch to off but then I was unable to switch it back to on (physically impossible). After playing with it for a few minutes, I finally cleared whatever was wrong and it's been switching fine since then. Curious if you had the same issue.
Exactly the same thing! Must be a bad batch, then. I could not get it to switch at all, even after wiggling and tapping. So I just replaced it. The new rocker switch terminal tabs are quite a bit more snug into the included female terminals, so bonus.
You can always connect a load to the power supply to play with it. :)
I'm going to test my capacity tester and the power supply, at the same time, tonight. :)

I didn't realize the Ruideng/Riden came with an external temperature probe, as well. What can you use that for?
 
Exactly the same thing! Must be a bad batch, then. I could not get it to switch at all, even after wiggling and tapping. So I just replaced it. The new rocker switch terminal tabs are quite a bit more snug into the included female terminals, so bonus.

I'm going to test my capacity tester and the power supply, at the same time, tonight. :)

I didn't realize the Ruideng/Riden came with an external temperature probe, as well. What can you use that for?
Maybe for battery charging mode. I haven’t looked into those settings yet.
 
It’s alive!

I’m doing a full discharge so I can get all the cells flat again. Then I will do some heavy charge and discharge tests. I have the riden acting as a solar panel, too.

I’m gonna add anderson connectors (3 pairs) between the packs and I still need to insert the molex connectors for the BMS leads. It looks like I have the final hardware config for BMS and relay and breaker, too.

I did a firmware update of the Victrons as they once again shut themselves off for no reason. There are some mentions of possibly related problems having been fixed in recent versions.

VictronConnect on the PC is finally able to manage the system now. I used it to set everything up as if new and it was rather easy. ?
446A0781-7345-4BE5-AAED-78C586C87FE7.jpeg
 
I have my old RV hooked up to the 50A receptacle fed by the Quattro's so I'm now discharging the pack down to 0 so that the cells will go back to being flat and I can properly adjust the springs. Some notes:

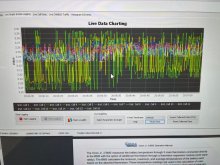
  1. The long dual 1-gauge wires that join each group of 8 are providing (no surprise) a lot more resistance than the shorter ones. Under 8kW DC load, I see 12mv between the short wires and 40mv between the long wires. The BMS can see this, too (yellow and green lines are way outside all the others). This only affects pack 2 and 4 which don't have their own negative voltage tap for the BMS. Pictures for reference are below.
    1. It is incredibly tempting to build this with rigid copper bus bars (now that I've measured very little movement between the terminals); I'll keep testing and observing.
    2. Somewhat related, I was worried about the skin effect of the wires vs. rectangular bus bars. I'm not measuring any AC at the battery when under load (which I find odd; I measured it when I was in a 16s configuration)
  2. One of my cells is definitely stripped. I can't get it to 35 in/lb. It's performing fine now but obviously won't remain that way
    1. It's one of my higher-testing cells, so I'm going to practice a helicoil or something on another cell first. I see some videos of others doing this, too (e.g.
      )
  3. I still need to clean up the wiring and insert the molex connectors
  4. Anderson connectors arrive Monday.
  5. I should have sun on Saturday and Sunday so I'll get the 2 200W panels connected; I need to build some mobile mounts from some steel slotted angle (ends up being the same price as the prebuilt aluminum ones on Amazon)
  6. My RV delivery is probably delayed as the company that does the exterior paint is backed up due to the cold weather in KS :( No ETA yet.
  7. The overall battery resistance as measured by the Orion BMS is 3 milliohms - 18,333 amps (at 55v) of available short-circuit current. (16,000 at 48v)

IMG_9197.JPG
IMG_9198.JPG
 
Exactly the same thing! Must be a bad batch, then. I could not get it to switch at all, even after wiggling and tapping. So I just replaced it. The new rocker switch terminal tabs are quite a bit more snug into the included female terminals, so bonus.
Ridiculous. The replacement rocker had exactly 5 clicks in it before it died in the closed position. :mad:
 
I'm rather unhappy with the inter-pack busbar setup as it's creating a large variance in resistance/voltages (seen in the video 2 posts earlier) and sometimes even triggers events that shouldn't happen (such as SoC correction or balancing) because the voltages aren't accurate under higher loads. I'm doing some charge/discharge cycles and measuring the cell terminals .. if they don't move much, I'm strongly considering using my 1/4" by 1" copper bar for everything (and maybe a short 4/0 or something between packs - not sure yet).

On the other hand, the Newpowa panels performed spectacularly well. I posted a video about it in the solar panels forum topic.
 
BTW I got the Riden 6018 power supply. I absolutely love it. It should have been the first (and last) power supply I purchased.
Glad to know you are happy with it. I love my 6012. The 6018 came out shortly after I received the 6012 but I still love mine.
 
Back
Top