When I did aluminum work, my boss would buy pickleX and later another product for cleaning aluminum prior to tig. It delayed oxidation. It was a long time ago. Would this or similar products be appropriate for cleaning while awaiting assembly?


You are using an out of date browser. It may not display this or other websites correctly.
You should upgrade or use an alternative browser.
You should upgrade or use an alternative browser.
Clean your terminals.
- Thread starter Bazzar
- Start date
Sanwizard
Solar Wizard
- Joined
- Feb 2, 2021
- Messages
- 2,708
Thats exactly what I did, and everything came out really nice. The no ox id special works well. VERY light coating immediately after light sanding.Hello Juntek bro!, good thing offtopic isnt that frowned uppon around here
Yeah i saw a whole post with several pages of people talking about the same, without any clear answers or consensus, maybe you were there too
I guess if the objective is to reduce / avoid the formation of the aluminum oxide layer (After sanding).... any of them could work, you just need to reduce the exposure to oxygen.... however, im guessing the oxide layer forms almost instantly, so its probably a matter of how thick it becomes before you place the isolation agent. If we find something that can achieve this, and also be conductive at the same time... well im sold!
Have you ever try a high discharge test?... my system its also under a conditioned space... tough my battery was pretty fine, until i connected the microwave, the washing machine and other loads... the voltage drop was too much and the system shuted off.... main suspect the conductivity of busbars under high amperage; but still not sure, haven't checked in detail.
So far im thinking in doing a little polish with an aluminum oxide sandpaper (sponge format), then placing very rapidly the NO-ox-id, and finally the busbar with a decent torque. But need to read more about this!
I used some nail files I bought from Amazon and I sanded lightly using those. After the sanding I vacuumed all of the dust off from the terminal and all around the cell. Finally I used acetone to clean the top of the terminals which removed any remaining particles. The terminals looked nice and polished when I was done.The problem with sandpaper is the sand... any particles will insulate the connection.
I recommend stainless steel brushing the connections with mineral oil on the terminals, wipe it off with a paper towel, and a thin coating of noalox, or similar grease to prevent oxidative coating reoccurring...
Someone else on the forum spotted this stuff:Hello Juntek bro!, good thing offtopic isnt that frowned uppon around here
Yeah i saw a whole post with several pages of people talking about the same, without any clear answers or consensus, maybe you were there too
I guess if the objective is to reduce / avoid the formation of the aluminum oxide layer (After sanding).... any of them could work, you just need to reduce the exposure to oxygen.... however, im guessing the oxide layer forms almost instantly, so its probably a matter of how thick it becomes before you place the isolation agent. If we find something that can achieve this, and also be conductive at the same time... well im sold!
Have you ever try a high discharge test?... my system its also under a conditioned space... tough my battery was pretty fine, until i connected the microwave, the washing machine and other loads... the voltage drop was too much and the system shuted off.... main suspect the conductivity of busbars under high amperage; but still not sure, haven't checked in detail.
So far im thinking in doing a little polish with an aluminum oxide sandpaper (sponge format), then placing very rapidly the NO-ox-id, and finally the busbar with a decent torque. But need to read more about this!
From reading the reviews on Amazon, it's supposedly more conductive than NO-OX-ID but I don't think anyone here has used it.
") I welcome thoughts about his stuff.
I welcome thoughts about his stuff.I have only pulled 850 watts or 33 amps from my inverter. I still have a lot of work to do on my system but I didn't notice any voltage drop worth mentioning. The inverter is 24 volts and 2000 watts. It has two AC outlets rated at 10 amps. It also has hard wiring and once I get that straightened out I will test it out further and be able to pull more amps.
My system is just for when the power goes out and I won't be using any high loads. It's way overkill for my needs and I knew that going into this. But I do want to test with a higher load once I get the hard wiring done just to check for things like voltage drop and the performance of the inverter, which is actually a UPS I ordered from China.
I mentioned this at some point, but I've been using MG Chemicals 847 and it works pretty great! You first clean the terminals with an abrasive (steel wool or something that doesn't leave particles) and some oil/grease to avoid having the oxide form right away. Then wipe them, but without taking all the oil/grease off. Then add some of the 847 and put the bus bars on.
hclarkx
New Member
I've changed my mind on some of the above. My old as dirt burnishing files seemed a bit course for the aluminum terminals. I.e., leaving the terminal surface a bit rough (as though I had used too course sandpaper). I was careful to use a finger centered and lightly pressed on the terminal to ensure the file stayed flat on the terminal, but still wasn't happy. A finer burnishing file would have been better. I suspect they are available. I also found that the burnishing file was not so easily used as a clean-up tool once the studs were loctited into place (e.g., to remove any excess loctite). Rotating the file around the stud while ensuring it stayed flat was tricky even after cutting off a 1" piece so that there would be no contact with the other terminal and I could hold the file flat with one finger. Mostly this was just too much trouble.Search Amazon for "burnishing files" and several options will come up. Mine are older than dirt but look very much like the ones I see on Amazon. Scotch brite is made of plastic fibers embedded with Aluminum oxide (alumina) or Titanium dioxide or similar as the abrasive. It's probably better than sand paper but I personally would avoid it.
About the earlier post of the electrician explaining modern aluminum compounds and their resistance to oxidation. I got to wondering if the aluminum terminals in our cells are really a modern aluminum or just near-pure aluminum. They seem awfully soft to be a compound..
So I tried the green 3M Scotch-brite pad as others have suggested or asked about. I found it quite satisfactory. It provided a smooth enough surface that I don't think any of the abrasive particles were embedded in the soft aluminum. The scoring was minor, not a polish, but smooth enough. I cut a 1" square, cut a small hole in the middle, put it over the stud, and spun it with two concentric pieces of rubber tubing (inner one just clearing the stud) to get even pressure. So, I take back what I said in the earlier post. I don't think Scotch-brite is ideal, but it's much more easily used than a burnishing file and leaves a smoother finish.
I seat the lugs by moving them a bit by hand when half-torqued. I think this increases the contact surface. Yes, I'm anal.
Boondock Saint
Solar Enthusiast
- Joined
- Apr 8, 2021
- Messages
- 661
Nice, thanks for that. I purchased some high silver content paste so when I prep and assemble the first time there should be no oxidation after. Will be a super thin layer sandwiched between shoulder and busbar.
This is the first time I'm seeing your battery bank installed and everything mounted. Not too shabby :D
In about 2 weeks I should have a place to do the work up in big sky country.
This is the first time I'm seeing your battery bank installed and everything mounted. Not too shabby :D
In about 2 weeks I should have a place to do the work up in big sky country.
@cinergi , let me urge you to take a minute to crimp a terminal on your pre charge resistor connection and add a nut to permanently connect it.
I’m no fan of alligator clips, much less in a mobile application. ?
For those using Scotch Brite pads on aluminum terminals consider using the red ones which use an aluminum based abrasive. I forget what the green ones consist of.
I’m no fan of alligator clips, much less in a mobile application. ?
For those using Scotch Brite pads on aluminum terminals consider using the red ones which use an aluminum based abrasive. I forget what the green ones consist of.
Amazon.com: Lot of 5 Red 3M Scuff Pads Scotch Brite 3M Brand: Automotive
Buy Lot of 5 Red 3M Scuff Pads Scotch Brite 3M Brand: Buffing & Polishing Pads - Amazon.com ✓ FREE DELIVERY possible on eligible purchases
www.amazon.com
I'm not sure who, but I think it was @Hedges (or someone who knows far more than I do) told me that the silver plated copper busbars I found were not a good idea. Silver does oxidize rapidly and once oxidized is a poor conductor.Nice, thanks for that. I purchased some high silver content paste so when I prep and assemble the first time there should be no oxidation after. Will be a super thin layer sandwiched between shoulder and busbar.
This is the first time I'm seeing your battery bank installed and everything mounted. Not too shabby :D
In about 2 weeks I should have a place to do the work up in big sky country.
Boondock Saint
Solar Enthusiast
- Joined
- Apr 8, 2021
- Messages
- 661
I have tinned plated copper bb, and not worried atm about this causing oxidation as a microscopic thin filler conducting agent. Silver goo is still better than nothing. Anyway this is all I have to say about it.
Hedges
I See Electromagnetic Fields!
- Joined
- Mar 28, 2020
- Messages
- 20,436
I've read that silver oxide is a decent enough conductor. But then I read that silver tarnish which forms with sulfur (don't put rubber bands around your sterling sliverware) is non-conductive. Silver is used in electrical applications, including relay contacts, so if cleaned and with a corrosion inhibitor (or in a paste) should be fine for compatible metals.
Your link is for the epoxy version. Maybe you meant to link to this stuff?Nice, thanks for that. I purchased some high silver content paste so when I prep and assemble the first time there should be no oxidation after. Will be a super thin layer sandwiched between shoulder and busbar.
This is the first time I'm seeing your battery bank installed and everything mounted. Not too shabby :D
In about 2 weeks I should have a place to do the work up in big sky country.
I don't know if it's a good idea to use anything adhesive between the busbar and terminal.
Sanwizard
Solar Wizard
- Joined
- Feb 2, 2021
- Messages
- 2,708
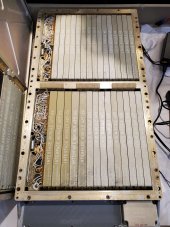
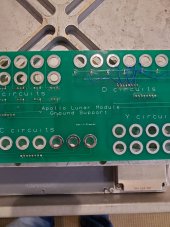
If you want the best conductor, use Gold! Wait, my last name is not Gates.... never mind. Interstingly enough though, I had the opportunity on Thursday to take apart the guidance computer for the LEM on Apollo 14. Sure enough, Gold contacts!
They dont build things like they used to. I know a guy who used to melt down old IBM mainframes for the gold in the contacts.
They dont build things like they used to. I know a guy who used to melt down old IBM mainframes for the gold in the contacts.
Attachments

If you want the best conductor, use Gold!
Gold is actually a worse conductor than silver and copper. The advantage (and why it's used in the industry) is that it is corrosion resistant, since it's the most non-reactive of all metals.
While gold is excellent for contact points and connectors due to near zero reactance and oxidation protection... it is a poor conductor of electricity.If you want the best conductor, use Gold! Wait, my last name is not Gates.... never mind. Interstingly enough though, I had the opportunity on Thursday to take apart the guidance computer for the LEM on Apollo 14. Sure enough, Gold contacts!
They dont build things like they used to. I know a guy who used to melt down old IBM mainframes for the gold in the contacts.
Sanwizard
Solar Wizard
- Joined
- Feb 2, 2021
- Messages
- 2,708
Well, if its good enough for NASA and IBM, it must work ok.While gold is excellent for contact points and connectors due to near zero reactance and oxidation protection... it is a poor conductor of electricity.
Sanwizard
Solar Wizard
- Joined
- Feb 2, 2021
- Messages
- 2,708
In order of most conductive to least conductive:While gold is excellent for contact points and connectors due to near zero reactance and oxidation protection... it is a poor conductor of electricity.
- Silver.
- Copper.
- Gold.
- Aluminum.
- Zinc.
- Nickel.
- Brass.
- Bronze.
Hedges
I See Electromagnetic Fields!
- Joined
- Mar 28, 2020
- Messages
- 20,436
While gold is excellent for contact points and connectors due to near zero reactance and oxidation protection... it is a poor conductor of electricity.
Wirebonds between semiconductors and packaging have traditionally been gold or aluminum. Gold and aluminum wedge bonding, or gold ball bonding. Avoiding dissimilar metals was key to avoiding corrosion in other than hermetic packaging. If mixed, better to have gold wire on aluminum pads (common for ICs) than aluminum wire on gold pads (common plating on package lead fingers.) Aluminum tends to develop heel cracks, and will corrode right through there. Had that problem with an unsealed test package we asked the vendor to hand solder. They ran it through reflow oven, and when I lifted the package lid there were tiny "L" shaped wired lying all over the place.
As plating, gold doesn't introduce much resistance in the path. As wirebonds, it is the path.
Looks like copper wirebonds have come. Primarily for lower cost compared to gold, but other advantages seen. I'll bet process simplicity wasn't one.
If anyone really wants "the best", high quality here:

 www.mcmaster.com
This is "good enough":
www.mcmaster.com
This works well, and is pretty reasonably priced (3/4 inch covers terminals nicely for Eve cells):
www.mcmaster.com
McMaster-Carr
McMaster-Carr is the complete source for your plant with over 595,000 products. 98% of products ordered ship from stock and deliver same or next day.
This is "good enough":
McMaster-Carr
McMaster-Carr is the complete source for your plant with over 595,000 products. 98% of products ordered ship from stock and deliver same or next day.
This works well, and is pretty reasonably priced (3/4 inch covers terminals nicely for Eve cells):
McMaster-Carr
McMaster-Carr is the complete source for your plant with over 595,000 products. 98% of products ordered ship from stock and deliver same or next day.
Similar threads
- Replies
- 9
- Views
- 468
- Replies
- 21
- Views
- 965
- Replies
- 23
- Views
- 1K
- Replies
- 13
- Views
- 662