diy solar

diy solar

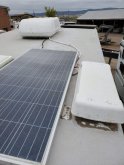
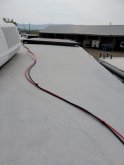
Couple of cells in shade of AC unit on RV roof top

sunrise

New Member
Joined
Jul 16, 2020
Messages
206
Hi,
I am about to install 2-3 Renogy 100W compact panels on roof top of my 16' travel trailer, due to space constraint, panels will be installed by sides of the AC unit.
As you can see the top row of PV2 cells could be entirely in AC's shadow if sun shines from the other side of the AC unit. This is not ideal and I accept this . But for Pv1 and Pv3, they both have only a small corner (1-2 cells out of 33) that could be in shadow of AC unit, I have read different stories on how much a single cell could drag down output to a fraction of its max.
Could some one give some idea on how much of PV1/3's output would be reduced? If it's more than half, then maybe it's better to do a 50w panels instead to so the panel is completely off the shadow of the AC unit?

Note that the grey area in diagram is not suitable to mount panels, no room to maneuver there due to fan, vent, antenna, etc.

Thanks!
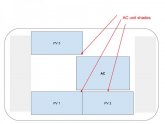
Untitled drawing (1).jpg
 
It is really gonna depend on the panel and how it's internals are configured. If it is a modern panel with diodes I 5hink you will be fine. If you have the panels it's best just to hook them up 1 at a time and see how many watts they produce. If you do not have them ask the vendor.
 
AltE store has several videos on this, here’s one:


You will likely need to test yours, then see how different wiring options can help get your best output. Amy is on this forum as SolarQueen if you have a questions.
 
AltE store has several videos on this, here’s one:


You will likely need to test yours, then see how different wiring options can help get your best output. Amy is on this forum as SolarQueen if you have a questions.

Thank you, the video is very helpful.
I will definitely wire the 3 panels in parallel, looks like PV2 in above diagram would be more impacted than Pv1 and Pv3 as multiple cells would be entirely in shade of the AC unit.
 
I had the same issue on my trailer. The air conditioning unit has a big footprint and the height would have caused shading for any panel mounted nearby. The caveat to that is that shading would only occur in the early morning and late afternoon. High noon would have no shading. The parking orientation of the trailer could also increase or decrease the shading factor.

I ended up going with two larger panels instead of the planned four smaller panels. I also implemented a portable, ground-deployed pair of panels connected to their own solar charge controller.

@HRTKD
Thank you for the information, I am wondering when your nearby panel are shaded, how much drop did you experience? I have option to install a shorter 80w panels instead of 100w panels, which will minimize the shaded areas. If a small shaded corner causes more than 50% drop of input then I think maybe it's worth it to go with a smaller panel.
 
Once one cell is completely shaded, I'd expect all current from that string in the panel, for how ever many cells have a bypass diode, to stop producing. Depending on remaining voltage, that might eliminate output from that panel. If half shaded, current would be cut in half.

Some panels have two parallel sets of cells, two parallel strings inside. In this case half might be lost. You can tell by number of cells and voltage if that's the case.

How about tilting the panels? They'd either be edgewise into the wind, or would serve as a ramp to deflect air over the A/C.
Or keep them flat, but elevate to height of A/C.
 
Last edited:
How high you mount the panels will affect how long the A/C would affect output. On an MH I had I mounted them at 6" off the roofline. Just some food for thought.
 
@HRTKD
Thank you for the information, I am wondering when your nearby panel are shaded, how much drop did you experience? I have option to install a shorter 80w panels instead of 100w panels, which will minimize the shaded areas. If a small shaded corner causes more than 50% drop of input then I think maybe it's worth it to go with a smaller panel.

Because I went with the two, larger panels, there is no way the air conditioning unit will cause shading unless it is at the very extremes of the day.
 
Still building my RV system, and I have the same panels as you and tilt mounting kit on them.

Although I that would allow less shade with certain orientations of the vehicle, I will never put in tilt panels again, unless its for a system I will use for weeks at a time. Setting the up requires me to do and undo six bolts per panel, and doing those 18 bolts for your setup, I would not do that just for a weekend trip. Could take me 30 minutes to an hour.

Couple of my lessons learned: Renogy said to keep a 1/4" between panels. They also had the positive outputs from the MC4 cable as both positive and negative depending on what literature you looked at, but the stickers were labeled good.

Now that I have the panels mounted, I have some blank space on the roof like in your diagram, and for my next upgrade it will be some ground mounted panels, or a couple more panels that will fit in the puzzle. Whether I add those panels on or not will depend on how much energy my PV system produces between what it is speced to produce and what it actually produces.
 
My approach to the RV rooftop solar panels is similar to the Ronco Rotisserie Oven that was advertised as, "Set it and forget it" I don't want to futz with the panels. My RV trailer is a toy hauler so it's really tall. I don't want to be up there in the first place and there's no room on the sides or back to mess with them.

If I had unlimited money, time and patience I would put in a motorized tilt system. Given that I'm just a plain mortal, that isn't going to happen. :(

Chris, have you started making your own MC4 connectors? I burned one connector because I used the wrong one. Given that I had a limited supply that spurred me to verify things twice and get it right the next time.
 
Chris, have you started making your own MC4 connectors? I burned one connector because I used the wrong one. Given that I had a limited supply that spurred me to verify things twice and get it right the next time.

How did you burn a connector up? I'm finding the devil's in the details for this. I'm finding a few of these niche market things that have wrong specs published, like a battery box listing inside and outside dimensions as the same.

I do make my own. I bought standard MC4 connectors rated for 10 gauge wire. I forget the amps, but it was much less than what my panels were pushing. I got MC4 crimpers. I used these to crimp the connectors to some wire. I bought two rolls of 10 gauge PV wire, each 100' long, one red and one black. I ended up using 100' total for two strings for installation. I could have bought them manufactured, but not to the dimensions I needed.

The left over 10 gauge will get used for whatever I use for additional panels.

With a motorized tilt system, I'd always be driving down the road, afraid its going to fail, open, and blow off.
 
I used the wrong crimpable piece. They aren't interchangeable and I found that out the hard way.

I too bought 100' each of red and black 10 awg PV wire. I used the first length on the roof. The second length was used to make a cable to plug the portable panels into the side of the trailer. The last length will be used to make a long extension for the portable panels.

It would have been nice to find PV wire that was red and black together. Keeping the two wires together on the roof and on the ground is a bit of a pain. I used a lot of heat shrink tubing and cable ties.
 
I found some red and black together on Amazon, but that was early and don't know if it was suitable. I put the cable in a white split loom, used white zip ties, white stick on cable secureres, and it blends into the white roof.
 
The split loom is a good idea. That's a good way to keep the sun off of it, even though the PV wire is rated for outdoor/sun exposure.
 
Split loom installed. I forgot the cable ties for around the split loom, so I'll be back on the roof again this weekend. I did secure the split loom to the frame of the air conditioner in three spots. That should keep it from moving around too much.

I'm interested to know how long your adhesive backed cable mounts last.

20200927_124620.jpg

It looks a heck of a lot better than this.

20200926_143703.jpg
 
Are the white cable ties or wire loom rated for UV?
Quick search, I find lots of black UV resistant cable ties, "natural" color cable ties not mentioning UV, and wire loom not mentioning UV.

Often black is the color of plastics with UV inhibitors, but not always. There are some white plastic roof/tent materials with long life as you have.
The wire loom especially I anticipate not having tolerance for UV, since it is normally used inside cabinets.

I have used some myself, along with an inverted jar, to provide protection for a rope-light power supply that has zip cord. I figure the wire loom is sacrificial, will protect the wire until it falls apart.

Maybe if you can stick on a strip of the roofing material to cover the wire & loom run ...
 
I watched a YouTube video, and the adhesive held for a year, but what that guy did was take a piece of 2" X 2" roof tape and cut a small square hole in the middle where the rings you secure the zip ties to poke out. With that 2" X 2" white Dicor Roof tape he used, I'm sure it will last the life of the RV.

I just cleaned as good as I could and stuck them down. I secured mine every 18" with simply the adhesive backing. I had two come off, but I think that's because I was impatient and stuck them down prior to the alcohol drying.

If my white ones start to degrade, I plan on getting the black wire loom and painting it white. Hopefully it will be on the roof for a while and won't need this. I'm purchasing some thicker loom to cover the MC4 cables connecting panels.
 
Are the white cable ties or wire loom rated for UV?
Quick search, I find lots of black UV resistant cable ties, "natural" color cable ties not mentioning UV, and wire loom not mentioning UV.

Often black is the color of plastics with UV inhibitors, but not always. There are some white plastic roof/tent materials with long life as you have.
The wire loom especially I anticipate not having tolerance for UV, since it is normally used inside cabinets.

I have used some myself, along with an inverted jar, to provide protection for a rope-light power supply that has zip cord. I figure the wire loom is sacrificial, will protect the wire until it falls apart.

Maybe if you can stick on a strip of the roofing material to cover the wire & loom run ...

Here's what the product specification says: Made from durable polyethylene with a temperature rating of -40°F to to 200°F, (-40°C to 93°C).

Not even the black loom on the site calls out a resistance to UV. I bought enough split loom that I can do it again in 10 years. But by then, it will probably be someone else's problem.

I did buy UV resistant cable ties. I specifically looked for those. I wish I had bought the install tool for the wire loom. That was more work than I expected, even for that short length.


"PE can become brittle when exposed to sunlight, carbon black is usually used as a UV stabilizer."

Maybe that's used in the black loom, since it would be about the cheapest thing on earth. There must be a real surplus in California now.

Yea, popping the loom over wire can be a bit of bother. I've only used a small amount, those zip cords and loose wires to my furnace thermostat.

I've also used braided loom in my lab. It becomes shorter when squished lengthwise to be made fatter, so need to buy longer piece/roll.
I made harnesses for my quad output supplies and remote sense. Used fish tape to get it through.
Heatshrink to finish the ends, but didn't know about hot melt glue in heatshrink at the time, so they're not secure.
 
Back
Top