diy solar

diy solar

DIY 3.6kW bifacial ground mount system

Subdood

Photon Wrangler
Joined
Mar 27, 2022
Messages
503
Location
NE Kentucky
Hello all, I had posted a thread regarding ground mount grounding and posted a few pics of it. So, I wanted to start a new thread on here showing the progress of my system. We are situated in a rural location NE Kentucky, and wanted to have a supplemental/backup solar system in case of frequent power outages and the fragility of the power grid. It'll be mostly to run 120V items like lights, frig/freezers, TV's, lights, etc.

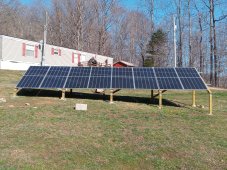
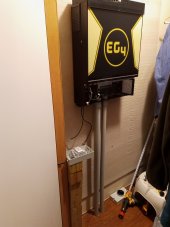
To begin, I bought eight 445W Canadian Solar bifacial panels back in July from Santan Solar and received them about a month later. I got a really good deal on them, about $195 apiece. They were returned by an installer who had decided they didn't want them. So other than a few frame scratches, they are practically new. I didn't want to build the ground mount until I got the inverter, an EG4 6500, which arrived in late October. I don't have any batteries yet, but plan on adding some when funds become available. I was planning on getting one or two of EG4 Lifepower4 rack batteries, but have considered building my own.

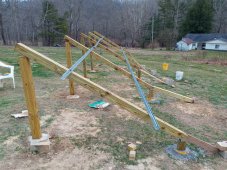
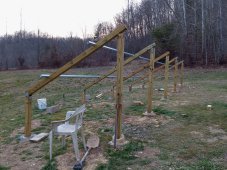
Anyways, I started the mount in early November and finished it last week, and with the help of my wife we installed the panels last weekend. It took a long time because I got sick a couple times, and the weather was either very cold or too wet to pour concrete. So I had to wait for it dry up some and be warm enough to pour concrete.

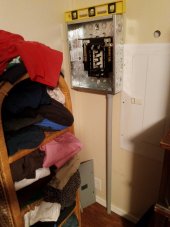
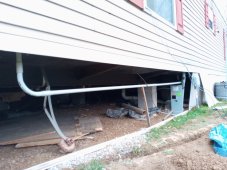
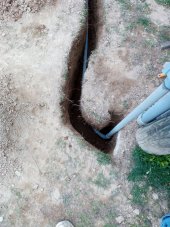
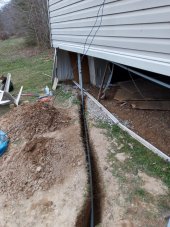
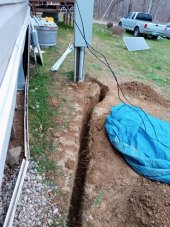
I am in the process of running some capacity tests on the panels and inverter before I start running wires and laying conduit. I plan on mounting the inverter in a closet closest to the array, which is about 50ft away. I will be installing a critical loads sub panel next to our home main panel and running conduit between the two. I will slowly be moving my 120V circuits over to the sub panel.

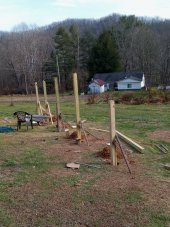
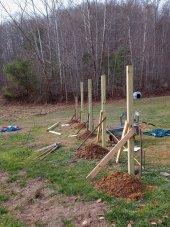
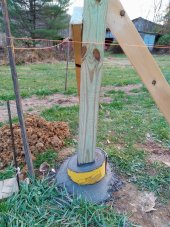
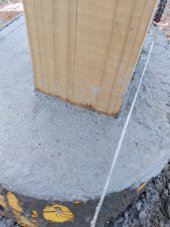
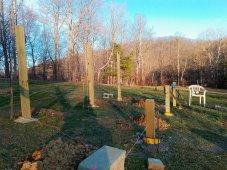
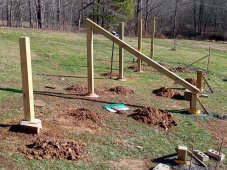
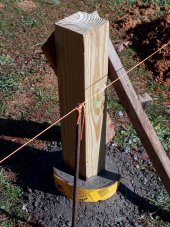
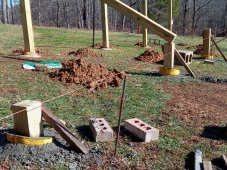
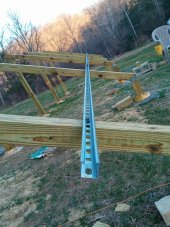
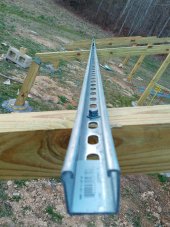
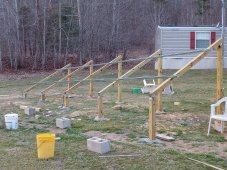
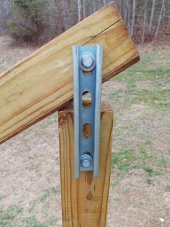
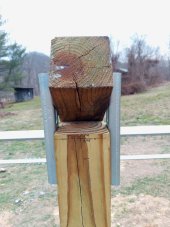
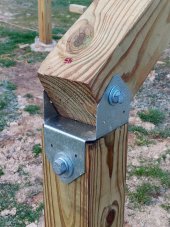
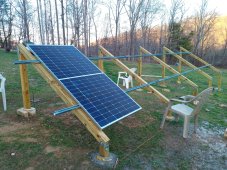
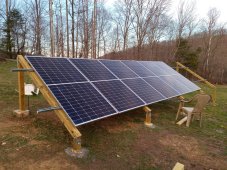
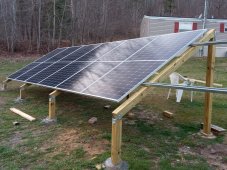
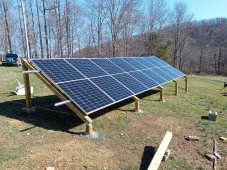
Ok enough talk, here are some pics. For the back support posts, I used 8ft long 4x4's spaced 7ft apart, except the west post is 6ft. Total length is about 28ft. I dug them about 2ft deep, with a couple inches of gravel at the bottom to rest the posts on. I used a couple 50lb bags of quikrete to anchor them. On top of the holes, I put cut sonotubes at an angle on one side and flat on the other to help drain water away from the posts.
 

Attachments

  • 20221210_134834.jpg
    20221210_134834.jpg
    489.2 KB · Views: 159
  • 20221210_134918.jpg
    20221210_134918.jpg
    313.7 KB · Views: 166
  • 20221210_135035.jpg
    20221210_135035.jpg
    378 KB · Views: 167
  • 20221211_155645.jpg
    20221211_155645.jpg
    316.4 KB · Views: 168
  • 20221211_163146.jpg
    20221211_163146.jpg
    155.9 KB · Views: 169
I ran a level line from the west post to the east post because of the slope of the hill side. The east post level point was about 28 inches above ground level. I wanted the back posts to be 48in above level, and 7ft apart. I was able to get them within a couple inches of 28ft. After the back posts' concrete had set I used a circular saw to cut the tops off at 48in above level.

I wanted about 33 degrees angle front to back, so using some geometry, I determined that the front posts had to be about 82in in front of the back ones. I dug the front post holes about 20in deep. Since they were obviously going to be shorter, I calculated their length (height) according to a level line 82in in front of the back posts. Accounting for more slope, I cut up some 6ft 4x4's accordingly.
Last month, I installed the front posts in more quikrete. After I ran the level line, I trimmed those down to their level point.

I placed the rail support posts, 8ft 4x4's on top of the vertical posts to get an idea how they would look.
 

Attachments

  • 20230128_165409.jpg
    20230128_165409.jpg
    550.3 KB · Views: 61
  • 20230119_113037.jpg
    20230119_113037.jpg
    760 KB · Views: 61
  • 20230119_112942.jpg
    20230119_112942.jpg
    328.1 KB · Views: 58
  • 20230119_112855.jpg
    20230119_112855.jpg
    1.3 MB · Views: 58
After I was satisfied with that, I placed 10ft unistruts on the support posts. I had to put some washers underneath a few of the rails because my posts weren't exactly at the same level, which at 28ft long is understandable. After these adjustments, I drilled holes thru the posts and anchored them down with 3/8” x 4" bolts run thru the posts. The panel frames mounting holes were about 45in apart, so the rails had to be that distance apart parallel to each other. I used strut splints to tie the ends of the struts together.
 

Attachments

  • 20230213_173235.jpg
    20230213_173235.jpg
    299.2 KB · Views: 100
  • 20230213_174220.jpg
    20230213_174220.jpg
    369.4 KB · Views: 90
  • 20230213_174248.jpg
    20230213_174248.jpg
    253.7 KB · Views: 92
  • 20230214_133622.jpg
    20230214_133622.jpg
    587.6 KB · Views: 92
  • 20230215_173744.jpg
    20230215_173744.jpg
    540.4 KB · Views: 98
  • 20230215_173836.jpg
    20230215_173836.jpg
    503.7 KB · Views: 102
To anchor both ends of the rail support posts, I used a cap plate on the front posts, using 3/8" lag screws to attach the support posts to the cap, and 1/2” lags to attach the caps to the front posts.

For the top of the support posts, I anchored them in place using 8" mini struts, cut in thirds from 2ft struts on either side the posts, using 3/8" lag screws. BTW, I sealed all the wood posts with Thompson's water seal.
 

Attachments

  • 20230215_173744.jpg
    20230215_173744.jpg
    540.4 KB · Views: 61
  • 20230214_133455.jpg
    20230214_133455.jpg
    192.2 KB · Views: 60
  • 20230214_135059.jpg
    20230214_135059.jpg
    150.9 KB · Views: 55
  • 20230215_173807.jpg
    20230215_173807.jpg
    238.6 KB · Views: 58
And finally last weekend my wife and I installed the panels. They were hefty, about 63lb apiece, and were stored in our old house about 75 yards from the array, so it was a chore getting them up to the site and then mounting them. She held them roughly in place while I fastened them onto the struts. I added 10ft 2x4's on the tallest of the back posts to give it more lateral stability. I plan on adding some from the front to back posts as well. It's pretty stout and stable as is.
 

Attachments

  • 20230218_173941.jpg
    20230218_173941.jpg
    577.8 KB · Views: 150
  • 20230219_174823.jpg
    20230219_174823.jpg
    564.8 KB · Views: 133
  • 20230219_174903.jpg
    20230219_174903.jpg
    477.6 KB · Views: 139
  • 20230221_105649.jpg
    20230221_105649.jpg
    700.3 KB · Views: 140
  • 20230221_105754.jpg
    20230221_105754.jpg
    713.1 KB · Views: 146
  • 20230221_105823.jpg
    20230221_105823.jpg
    652.8 KB · Views: 151
  • 20230223_163157.jpg
    20230223_163157.jpg
    1 MB · Views: 165
Been a while since I updated on this thread. But since then I put up hardibacker in my solar closet and hung up the inverter (EG4 6500). After doing some capacity tests over a few weeks, I laid conduit and pulled wires from the inverter output to the critical loads sub panel, and today, I pulled wire from the service pole panel to the inverter input. Everything seems to be working okay, next step is getting the PV wire trench dug, conduit laid and wires pulled and I should be done.
 
Last edited:
Some pics of my progress.

Pic 1, inverter hung with conduit installed. Output goes to sub panel seen in Pic 2.
Pic 2, 12/24 sub panel. Will transfer critical loads to it soon from house panel, via hole in wall above house panel seen to the right. I opened up a 1.5 inch knock out on the top of that panel, and will run the wires through a 90 degrees elbow and thru flex pipe into the top right of the sub.
Pic 3, view of conduit (1") running under house between inverter and sub panel.
Pic 4, view of conduit (1”) coming thru trench up into pole service panel where 60A DP breaker is installed to provide grid power to inverter.
Pic 5 and 6, view of input conduit trench from where it goes up into the house. Curve happened because I had to work my way around buried ground rod which was in the way. I ran about 9ft of straight conduit up to where it starts to curve back left. So I used a 45 degree elbow to get it around the corner, then a 90 degree elbow up to the panel. Was a difficult wire pull with two 4 gauge and an 8 gauge wires. Had to retape it so it was more streamlined in the pipe.
 

Attachments

  • 20230323_214200.jpg
    20230323_214200.jpg
    102.4 KB · Views: 98
  • 20230322_192545.jpg
    20230322_192545.jpg
    103.1 KB · Views: 97
  • 20230322_184244.jpg
    20230322_184244.jpg
    214.8 KB · Views: 96
  • 20230323_190046.jpg
    20230323_190046.jpg
    276.7 KB · Views: 94
  • 20230323_190026.jpg
    20230323_190026.jpg
    240 KB · Views: 92
  • 20230322_184258.jpg
    20230322_184258.jpg
    275.2 KB · Views: 95
Last edited:
How are the panels attached to the strut? Did you isolate the dissimilar metals to avoid corrosion?
 
How are the panels attached to the strut? Did you isolate the dissimilar metals to avoid corrosion?
I just mounted them on without anything in between the panels and struts. But after discussing it with some folks on here, I was thinking of putting in some wide stainless steel washers under the panels.
 
Great thread, keep it up.
Thanks, it's been a lot of work, still not totally done, but after I get the PV wires run in conduit and ground the panels I will be. Plus, I'll need to switch over the critical loads to the sub-panel.

The weather was the biggest impediment, plus I got sick a couple times, otherwise I would have been done much sooner. But it is satisfying to see it working, I ran it today and got about 5kwh out of it. It's not a big system, but it's a good start, I'd like to add another array, but first I need to get some batteries to go with it as the funds come available.
 
Great post Subdood, I like your approach - in steps as you can afford - I think for many DIY'ers this is the best way to go. Lets you do the work yourself, a bit at a time if needs be, and 'self finance' ie pay as you go as you can. The added benefit of building in stages, it lets you ask questions on the forum or research similar situations on here to see what others did in certain situations, or others in your neck of the woods. Hope to see more as you build out your system.
BTW on the battery topic, nothing wrong with getting a couple factory built rack batteries to get you going, (I did to start) but DIY batteries to me are a great way to gain higher capacity at a lower cost, if you're comfortable with the DIY. I now have two factory and three DIY batteries -all are awesome).
Thanks. Yeah, for now a couple rack batteries would make more sense, mainly because of space. My "solar room" is my clothes closet that I partially cleaned out to make room for the inverter. So the space available is limited, so a rack battery or two would be a better fit.

I get it, making your own battery bank would probably cost less, especially since good cells are getting so much more affordable. I'm not too familiar with making a bank, but am learning more every day. So it's not totally out of the question, especially if I can relocate more of my clothes. ?

You're right, this forum has been a wealth of information. It feels like this tech is still in the "Wild West" stage and we're all learning as we go, from our own and other's experiences. I knew practically nothing about solar a year and a half ago, but ever since we got a small (720wh) Ecoflow solar generator, I dove into the subject and wanted to expand on that. My reason is more from a preparedness than a green approach. Saving money on our utility bill would be nice, but this setup isn't probably going to pay for itself anytime soon.

Just curious what kind of battery setup do you have?
 
Last edited:
Just curious what kind of battery setup do you have?
I started off with one Sig solar 100Ah 48v rack, back when these were branded "Power4" in 2021. Six months later I found a Canadian supplier (duty and exchange can be killer-expensive) so my second rack was from Solar Parts Store near Toronto. By this time in my journey I was watching Will, Andy, Ray and others building batteries on YT, and I joined this forum to learn more. I took the plunge in 2022 and ordered my first set of 280Ah cells from Alibaba and waited two months for these to arrive (I call this the "Pay-and Pray" purchasing system) the cells arrived in perfect condition and I built my first rack. Ran this for three-four months and was supper happy with the results so ordered a second set of cells later in 2022 and built my second rack in September/October in time for the crappy part of my solar year. This spring with an expansion to my system I ordered the third set of cells and now have three DIY rack batteries.
I know some members have spoken against Daly BMS but I use these with active balancers and could not be happier, any time I check the cells are all within a few millivolts of each other in both my DIY packs and in the factory racks.
As far as how I connect the racks, On the POS side I use disconnect breakers between each battery and a fuse block, then from the fuse to a main copper buss. On the Neg I go directly from the battery terminal to a NEG main buss. Each buss is then connected to a bidirectional DC rated breaker/disconnect 300A rated, and from their to T-Class fuse blocks and then splits to two inverters.
I use 1AWG wire from batt to Buss, I use 4/0 from Buss to 2P-disconnect to twin T-class fuse blocks, then 4/0 from after the T-Class fuses to each Inverter (x2). The inverters don't need the 4/0 wire each but I have lots of this size welding cable (from my other hobby) so I just stuck to this size.

For your needs and space I think the factory built server racks will work well for you, and with one or two you can stand them up against a wall if you need to save space - or lay them flat on a shelf if you have one and it can take the weight. let us know how it goes as you progress!
 
...the cells are all within a few millivolts of each other in both my DIY packs and in the factory racks.
As far as how I connect the racks, On the POS side I use disconnect breakers between each battery and a fuse block, then from the fuse to a main copper buss.
How well does your system share load between the different packs? Are you maintaining low mV differences between packs? Like the belt and suspenders protection!
 
And finally last weekend my wife and I installed the panels. They were hefty, about 63lb apiece, and were stored in our old house about 75 yards from the array, so it was a chore getting them up to the site and then mounting them. She held them roughly in place while I fastened them onto the struts. I added 10ft 2x4's on the tallest of the back posts to give it more lateral stability. I plan on adding some from the front to back posts as well. It's pretty stout and stable as is.
To have more bifacial gain, you should leave space between panels if possible. 10-15cm (4-6") should do it. At least that's how I'd do it (and have done it).

And paint the ground white like I did today...
20230328_113624.jpg
 
Last edited:
To have more bifacial gain, you should leave space between panels if possible. 10-15cm (4-6") should do it. At least that's how I'd do it (and have done it).

And paint the ground white like I did today...
View attachment 141711
Ugh, you can keep that stuff, I hate the cold. Grew up in Oklahoma and lived in north Texas for 30 years before moving here. I'm getting more used to it, tho, and I do appreciate a real four seasons climate compared to Texas.

Regarding the bifacials, I was considering laying down some white gravel under and a little behind the panels to get better reflectivity.
 
I started off with one Sig solar 100Ah 48v rack, back when these were branded "Power4" in 2021. Six months later I found a Canadian supplier (duty and exchange can be killer-expensive) so my second rack was from Solar Parts Store near Toronto. By this time in my journey I was watching Will, Andy, Ray and others building batteries on YT, and I joined this forum to learn more. I took the plunge in 2022 and ordered my first set of 280Ah cells from Alibaba and waited two months for these to arrive (I call this the "Pay-and Pray" purchasing system) the cells arrived in perfect condition and I built my first rack. Ran this for three-four months and was supper happy with the results so ordered a second set of cells later in 2022 and built my second rack in September/October in time for the crappy part of my solar year. This spring with an expansion to my system I ordered the third set of cells and now have three DIY rack batteries.
I know some members have spoken against Daly BMS but I use these with active balancers and could not be happier, any time I check the cells are all within a few millivolts of each other in both my DIY packs and in the factory racks.
As far as how I connect the racks, On the POS side I use disconnect breakers between each battery and a fuse block, then from the fuse to a main copper buss. On the Neg I go directly from the battery terminal to a NEG main buss. Each buss is then connected to a bidirectional DC rated breaker/disconnect 300A rated, and from their to T-Class fuse blocks and then splits to two inverters.
I use 1AWG wire from batt to Buss, I use 4/0 from Buss to 2P-disconnect to twin T-class fuse blocks, then 4/0 from after the T-Class fuses to each Inverter (x2). The inverters don't need the 4/0 wire each but I have lots of this size welding cable (from my other hobby) so I just stuck to this size.

For your needs and space I think the factory built server racks will work well for you, and with one or two you can stand them up against a wall if you need to save space - or lay them flat on a shelf if you have one and it can take the weight. let us know how it goes as you progress!
Thanks for the reply. That sounds like an impressive setup. Considering our cloudy climate, having batts would better serve us than more panels, but I'm sure that's true for a lot of folks, especially in these northern climes.

I'm an electronic tech by trade, so I have some electrical knowledge so I think I could build a diy battery, but again it's a matter of space for me. Unless I put like a small rack in back of the closet, and put like a string of 8 cells above the other 8. Anyways I got some useful info on the 18650 store from @w8dev, and they seem to have very good prices on good cells, plus they are based here, so no "pay and pray” to worry about, like you said.

What kind of inverter do you have and what do you think of its performance? I have an EG4 6500EX, and it seems to work just fine for me. But it's not been put in full time operation yet either, even tho I've run about 50kwh thru it.

Edit- I just saw your tagline showing you're using two LV6048's. But I'm still interested to see how they've done for you. Also you have adjustable solar arrays? Do you have any pics of this? I considered making mine like that, but in the end I just wanted to get it done. I used some site that had a formula for the best fixed angle and it gave me about 32 degrees, and using that, I calculated my front and back post heights and distance between the two accordingly. It ended up being about 33.5, which is fine.
 
Last edited:
And finally last weekend my wife and I installed the panels. They were hefty, about 63lb apiece, and were stored in our old house about 75 yards from the array, so it was a chore getting them up to the site and then mounting them. She held them roughly in place while I fastened them onto the struts. I added 10ft 2x4's on the tallest of the back posts to give it more lateral stability. I plan on adding some from the front to back posts as well. It's pretty stout and stable as is.
What's the purpose of an array being lower on one side and higher on the other? Is this to make it slope a little to catch the west sun? If so..why not just build another small array and face it west? Also, I'm curious of what the downsides are to using wood to build the panel/s support framework as oppose to using a metal racking system? Good pressure treated wood should last a few decades ...right?
 
What's the purpose of an array being lower on one side and higher on the other? Is this to make it slope a little to catch the west sun? If so..why not just build another small array and face it west?
Yes, there is a slope west to east and north to south, so it's done that way to be level on a horizontal plane. I think I calculated the slope at about 6-7 degrees west to east. So, it makes the east panel a couple feet higher than the west one. I didn't do it that way to get more west sun, it just worked out that way. The array is oriented almost due south. An added benefit is since the array is higher on that end, it ought to catch more sun early in the morning on the back side cells in the summer months.
 
Back
Top