diy solar

diy solar

DIY BUSBARS

It's nice to have the right tools! I was able to make do with what I had. If I could have taken it somewhere to have it done inexpensively I would have. These days that probably will never happen though. So, a hand drill, hand jigsaw, a strong table, big clamp, a piece of scrap 2x4 and some imagination get's her done!

I think to cardboard cutout templates was my best brainstorm though!
I also used thick carboard templates . Then made a busbar template with the aluminum I used. In my case I was connecting vertical groups of 8 Nissan Leaf batteries so I needed 42 busbars about 11 inches long and 36 busbars about 7 inches long to connect the series connections at top bottom and middle of each 8 parallel cels . This adds up to over 714 inches of busbar or about 60 feet but I bought a few more feet than this side I wasted some ends though I bought 8 foot pieces of 1/8 by 1 inch aluminum flat stock. This ads up to 408 holes drilled just for the leaf cells. I also made square tubing connectors for Chevy Bolt batteries which would have been very difficult without drill press so I bought a cheap one at Harbor freight and it was well worth it. As you can imagine I didnt look forward to doing this by hand.
Each battery bank of about 20kwhr capacity only receives 1/4 of the charge of at max 212 amps but usually more like 160 amps so 40 amps per bank. each bank is connected by 2 guage welding cable to common busbars and then by short 2 guage cable to inverters. I havent yet but I plan to double the 48 series busbars. These cells are rated 250 amp continuous dc and double that intermittent load. I may in the future make each bank 4 parallell and about 10 Kwhr and the bolt batteries to 3 sets of 10 Kwhr . When I do that will make 7 sets of banks and each one will only receive max about 31 amps and usually less than 20 amps.
The aluminum is also much easier to work with and I used no ox.
I cut the busbars to length with a table saw using a worn blade and no problem but make sure and wear eye protection and leather gloves etc.
 
It didn't link to anything for me . I could probably find it though.
One way to get a good idea but you have to have some data. Compare a known length of the bar to a known length of copper wire like say 2 guage welding cable or whatever you have availiable and equal weights will have very close to the same amp rating though copper bar I believe carries a few more amps than the same weight of stranded wire. I did see one size copper bar compared to similar weight of copper wire on Carson urban solar youtube channel Think it was about equivalent to 2 guage copper . If I find it easily I could post it.
 
When I look for amp equivalents, I compare the cross sectional area. A quality cable manufacturer will provide the diameter of the conductor. From that you can calculate the cross section of the cable. Using that you can then look for similar bus bar stock.

TEMCo Industrial's guide to their welding cable:

 
I found some 3/8" Copper bar @ the local surplus store, and also found some on ebay.
Not sure of the amp capacity, but the inverter can only take about 250A DC input, so I just guessed “thick is good” and went with that.
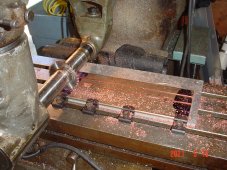
Acquired a slitting blade for the mill arbor, (McMasters-Carr) and made piles’o chips!
Copper is kind of gummy & sticky when cutting, used WD-40 as spray lubricant, works fine & stinks
up the workshop.
cuttingcopperbusbarcopy.jpg
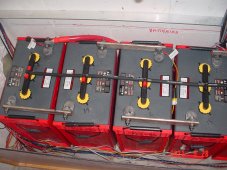
bussbarsinstalled.jpg
 
if the busbars are for indoor use with lithium batteries I do not bother with "tinning".
Agree with the liquid tin as a nice protective coating (a bit pricey) but it puts on a nice thin (really thin) layer (buy it when you need it, does not like long term storage, at least for me).

definitely make a jig to setup your busbars for drilling. I would not recommend you try and "mill" with a drill press.
There is a huge difference between mills and a drill press and it has to do with the lateral (sideways)forces on the quill bearings. A drill press is designed to ONLY take forces directly along its vertical axis (up and down). Any sideways force rapidly starts to damage to quill bearings/housing (it just is not made for that). A mill has bearing surfaces that are designed to handle lateral forces. You can get an x/y table and try to mill with your drill press but, well, be really really careful as you will certainly start to cause a lot of runout in your drill press.
The safest way is to just drill a series of hole and then use a burr with a hand grinder to even things out. fyi, put a release agent (like wax) on your burrs to keep them from getting gummed up hehe
You can drill the first hole then "plunge" the adjacent hole using the drill press using an endmill. No side loading
 
I think I will try making some busbars.

I am making an 8 cell 25 amp 24 volt battery for a smaller project. The cells do not come with busbars. Once I get the cells, I'll figure the best way to package them and cut bars to match.

I was having trouble finding the best way to tin the copper busbars, but the download section gave some instructions. I've tinned plenty of wires with a solder iron, but did not know what would happen if I took a MAP torch and tried the same thing. Both Google and YouTube is pretty empty on the topic.

The Liquid Tin looks easy, but at $80, I'll stick to the MAP torch, solder, and flux I already have to get these bars tinned.

Probably don't need to go through this amount of work for a busbar that will not carry more than 20 amps, but the next battery pack getting built could get up to 250 amps.
 
Any of yall try nickel plating?

We all have power supplies. It's allegedly just a matter of getting a few strips of nickel, vinegar, and salt.

I aim to try this out at some point in the future.
I've done it with specialized solutions you buy for this purpose but this article aims to make the solution at home.

 
Any of yall try nickel plating?

Yep:
 
Back
Top