I was wondering if anyone has ever messed with DIY heliostats or solar trackers? I'm working on a solar project at work, and it inspired me to look back into solar for my house.
As much as I'd like to build a PV array right now, big investments with long paybacks are not feasible for me currently, even diy (except maybe picking up the occasional cheap used panel on facebook marketplace). We currently heat with propane though, and running the numbers, 1kW of solar thermal collection in MI would save me about 50 cents a day in propane at this year's prices. This works out to something like a $100/m2 target for a one year payback. That's a tight target to hit.
I've always loved solar thermal power towers. I love steam engines, and I love the idea of a field of remote controlled mirrors. If I ever won the lottery, I'd build and operate my own mini solar thermal powerplant. So I got to thinking about heliostats. I think I could build a heliostat for less than $100/m2 no problem. It's also much easier financially for me to build things $20 at a time. This kind of device is exactly the kind of thing I build at work and for fun.
I'm working on a prototype heliostat to shine sunlight into a window. I built a proof of concept tracker to test the software, and it seems to work quite well. So, I figured I'd go ahead and start working on a small heliostat. I'm going to start small, a 1 square meter heliostat to shine sunlight into the living room window. It will make a perfect test platform. I'm using the software from Gabriel Miller, with some modifications to fit my circuitry. His website is gone, but you can access it through the internet archive.
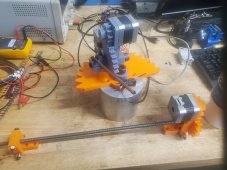
I built a tiny little tracker to test the software, and it seems to work correctly. I left it running for several days at my desk, and it always seemed to point in the right direction and was never messed up when I came in to work in the morning.

Turns out this is the perfect project to use an old 3d printer board and motors for. It's got 4+ stepper drivers, connections for limit switches, etc. At the bottom of the picture is the screw axis I'll be using two of on the real prototype. It's printed in PLA plus, which unlike regular PLA, is stronger and doesn't soften at higher temperatures like in a car in summer. If any of the printed parts are too weak, I'll remake them in aluminum on the HAAS CNC I have at work. If the motors don't have the torque to move the heliostat in higher winds, I'll redesign it with a bigger gear reduction. The printer board isn't designed with efficiency in mind, but it only consumes 30mA 12V when the motors aren't moving, so I'll eventually add a 10 watt panel to keep the battery topped off. The board and software have the ability to run two heliostats, so that will cut the per unit cost of the electronics in half. However if I go on to build more I'll probably make my own circuit boards.
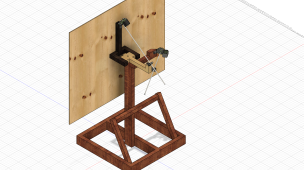
Here's a general concept of my heliostat. It's not going to be exactly the same as the model, as some things clip into each other, but it's a good general idea. Plus, I'll probably add a counterweight. Since it's a heliostat and not a solar tracker, it doesn't need as much horizontal travel as you would think.

I'll probably use thin plywood covered with reflective tape for the first panel. And I'll either lay a couple sand bags on the frame or use some tent stakes to keep it in place. This first prototype is just a proof of concept to test the design and software. If It can hold up for a few months without major issues, I'll know it's a viable setup for my real plan.
My eventual dream is to build a field of heliostats that focus the sunlight on a single thermal collector. Based on my thermostat's reporting of furnace usage, last January I averaged 150kWh of heating a day. This works out to something like 30 square meters of solar thermal power. That seems like a lot, but that's only the upper limit before diminishing returns really kick in. I plan on starting small and slowly building up if it works and I feel like it. Normally you'd start by making your house more energy efficient, but it's a cheap manufactured home from 1990. It has thin walls with little insulation, and I want to replace it in a few years anyways.
I have a plenty big enough field for something like this, so that's not a problem. Existing commercial and diy designs for solar thermal collectors really aren't designed for concentrated sunlight. However, I have a good bit of hobby experience with boilers, burners, and steam engines, so it won't be hard to design a concentrated thermal collector of maybe 3-4 square meters that I can put maybe 6-10 feet up above the ground. This should be able to heat pumped circulating water. For storage, I live in farm country, so it's cheap to buy used IBC totes around here. These are those big white plastic containers with the metal cage around them. They hold between 270 and 330 gallons. That can store 40kWh going from 100 to 150 F. It would be pretty easy to get one of those and insulate it. The only hard part is pumping this stuff to the house without freezing and expelling the heat in the house. My furnace has a condenser coil for central air that I don't use. I might pump water through that and run the blower. Or I could get some junkyard radiators and box fans to start with. Anyways, that's getting way ahead of myself. The storage wouldn't be much different than the solar shed from builditsolar.com.
So that's my crazy idea.
As much as I'd like to build a PV array right now, big investments with long paybacks are not feasible for me currently, even diy (except maybe picking up the occasional cheap used panel on facebook marketplace). We currently heat with propane though, and running the numbers, 1kW of solar thermal collection in MI would save me about 50 cents a day in propane at this year's prices. This works out to something like a $100/m2 target for a one year payback. That's a tight target to hit.
I've always loved solar thermal power towers. I love steam engines, and I love the idea of a field of remote controlled mirrors. If I ever won the lottery, I'd build and operate my own mini solar thermal powerplant. So I got to thinking about heliostats. I think I could build a heliostat for less than $100/m2 no problem. It's also much easier financially for me to build things $20 at a time. This kind of device is exactly the kind of thing I build at work and for fun.
I'm working on a prototype heliostat to shine sunlight into a window. I built a proof of concept tracker to test the software, and it seems to work quite well. So, I figured I'd go ahead and start working on a small heliostat. I'm going to start small, a 1 square meter heliostat to shine sunlight into the living room window. It will make a perfect test platform. I'm using the software from Gabriel Miller, with some modifications to fit my circuitry. His website is gone, but you can access it through the internet archive.
I built a tiny little tracker to test the software, and it seems to work correctly. I left it running for several days at my desk, and it always seemed to point in the right direction and was never messed up when I came in to work in the morning.

Turns out this is the perfect project to use an old 3d printer board and motors for. It's got 4+ stepper drivers, connections for limit switches, etc. At the bottom of the picture is the screw axis I'll be using two of on the real prototype. It's printed in PLA plus, which unlike regular PLA, is stronger and doesn't soften at higher temperatures like in a car in summer. If any of the printed parts are too weak, I'll remake them in aluminum on the HAAS CNC I have at work. If the motors don't have the torque to move the heliostat in higher winds, I'll redesign it with a bigger gear reduction. The printer board isn't designed with efficiency in mind, but it only consumes 30mA 12V when the motors aren't moving, so I'll eventually add a 10 watt panel to keep the battery topped off. The board and software have the ability to run two heliostats, so that will cut the per unit cost of the electronics in half. However if I go on to build more I'll probably make my own circuit boards.
Here's a general concept of my heliostat. It's not going to be exactly the same as the model, as some things clip into each other, but it's a good general idea. Plus, I'll probably add a counterweight. Since it's a heliostat and not a solar tracker, it doesn't need as much horizontal travel as you would think.

I'll probably use thin plywood covered with reflective tape for the first panel. And I'll either lay a couple sand bags on the frame or use some tent stakes to keep it in place. This first prototype is just a proof of concept to test the design and software. If It can hold up for a few months without major issues, I'll know it's a viable setup for my real plan.
My eventual dream is to build a field of heliostats that focus the sunlight on a single thermal collector. Based on my thermostat's reporting of furnace usage, last January I averaged 150kWh of heating a day. This works out to something like 30 square meters of solar thermal power. That seems like a lot, but that's only the upper limit before diminishing returns really kick in. I plan on starting small and slowly building up if it works and I feel like it. Normally you'd start by making your house more energy efficient, but it's a cheap manufactured home from 1990. It has thin walls with little insulation, and I want to replace it in a few years anyways.
I have a plenty big enough field for something like this, so that's not a problem. Existing commercial and diy designs for solar thermal collectors really aren't designed for concentrated sunlight. However, I have a good bit of hobby experience with boilers, burners, and steam engines, so it won't be hard to design a concentrated thermal collector of maybe 3-4 square meters that I can put maybe 6-10 feet up above the ground. This should be able to heat pumped circulating water. For storage, I live in farm country, so it's cheap to buy used IBC totes around here. These are those big white plastic containers with the metal cage around them. They hold between 270 and 330 gallons. That can store 40kWh going from 100 to 150 F. It would be pretty easy to get one of those and insulate it. The only hard part is pumping this stuff to the house without freezing and expelling the heat in the house. My furnace has a condenser coil for central air that I don't use. I might pump water through that and run the blower. Or I could get some junkyard radiators and box fans to start with. Anyways, that's getting way ahead of myself. The storage wouldn't be much different than the solar shed from builditsolar.com.
So that's my crazy idea.


