This post is to show the Dokio 220w panels that I've got, how you can modify them for higher voltage, and give you test data of the results.
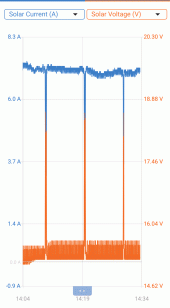
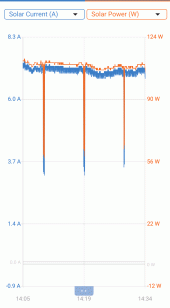
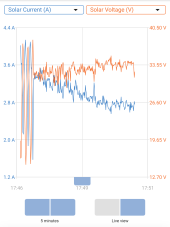
Below is power readings for a single Dokio 220w panel during 2pm sun in the Dallas, TX area. My conventional panels were putting out 85% capacity, and this panel was on the ground next to them. As you can see by the readings, I was getting around 100 watts which is 45% of the rated capacity of the panel.
There is concern about 12v panels being used with MPPT chargers. Namely, that panels under load will have enough voltage drop to cause problem for the charger. The easy solution for most is to wire two panels into series so the voltage is higher. This has a benefit of being able to send more wattage over the same conductors. However, buying two panels requires double the money. So I decided to modify the panel instead.
The thick rubber chunk joins the two sides together and feed the SAE connector. If you cut this chunk closer to the SAE connector, you can salvage more of the individual panel wiring. I first used large cutters to split the chunk, then used a razor to slice out a chunk and pulled the cables out.
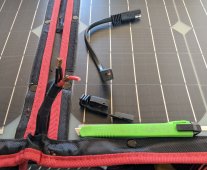
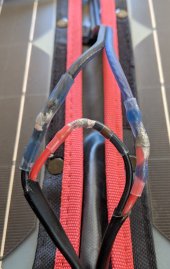
As you look closely, the wires are crimped with brass. I was able to pull the wires out without having to cut the leads going toward the solar panel, saving more of the existing wiring.
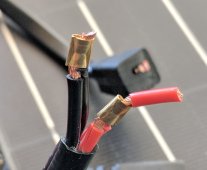
Now that the leads are separated you can wire the two sides into series instead of parallel. This will yield roughly double the voltage and half the amperage, which is still the same wattage. I used Camtek heat-shrink solder butt-connectors to join the individual wires, then covered the entire junction with another layer of clear heat shrink tubing for more mechanical strength. I also prefer Anderson PowerPoles for many of my connections as they are genderless, provide reliable connection, and inter-connect with many other items in my collection.
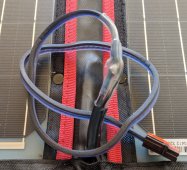
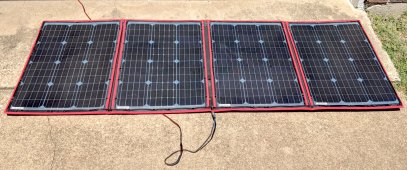
This is the final panel after modification. The left two panels are now in series with the right two panels, where they were all in parallel before:
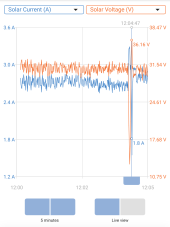
This is the result of the modification, as you can see the amperage is lower and the voltage is higher. Doing the math you can see the panel is still yielding 85~95 watts, or 43% of the rated capacity. This day I was still getting 85% of rated capacity from my conventional array of panels.
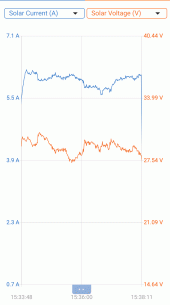
This is two panels modified as above placed in parallel, on a day with high UV index, and my fixed panels providing 95% of rated capacity. So theoretically I should be getting 400watts or so, but the numbers show about 200watts for two panels.
Final Thoughts:
The modification is a great way to ensure you get higher voltage for MPPT charge controllers to be happy, or to use the 12 panel to charge a 24v battery system, or simply to loose less power over a long cable run. However it's clear that the panels are only performing at about 50% of their "rated" capacity. Being able to fold them up and carry them to a remote site is nice, but you're paying a premium for this one feature.
Below is power readings for a single Dokio 220w panel during 2pm sun in the Dallas, TX area. My conventional panels were putting out 85% capacity, and this panel was on the ground next to them. As you can see by the readings, I was getting around 100 watts which is 45% of the rated capacity of the panel.


There is concern about 12v panels being used with MPPT chargers. Namely, that panels under load will have enough voltage drop to cause problem for the charger. The easy solution for most is to wire two panels into series so the voltage is higher. This has a benefit of being able to send more wattage over the same conductors. However, buying two panels requires double the money. So I decided to modify the panel instead.
The thick rubber chunk joins the two sides together and feed the SAE connector. If you cut this chunk closer to the SAE connector, you can salvage more of the individual panel wiring. I first used large cutters to split the chunk, then used a razor to slice out a chunk and pulled the cables out.

As you look closely, the wires are crimped with brass. I was able to pull the wires out without having to cut the leads going toward the solar panel, saving more of the existing wiring.

Now that the leads are separated you can wire the two sides into series instead of parallel. This will yield roughly double the voltage and half the amperage, which is still the same wattage. I used Camtek heat-shrink solder butt-connectors to join the individual wires, then covered the entire junction with another layer of clear heat shrink tubing for more mechanical strength. I also prefer Anderson PowerPoles for many of my connections as they are genderless, provide reliable connection, and inter-connect with many other items in my collection.


This is the final panel after modification. The left two panels are now in series with the right two panels, where they were all in parallel before:

This is the result of the modification, as you can see the amperage is lower and the voltage is higher. Doing the math you can see the panel is still yielding 85~95 watts, or 43% of the rated capacity. This day I was still getting 85% of rated capacity from my conventional array of panels.


This is two panels modified as above placed in parallel, on a day with high UV index, and my fixed panels providing 95% of rated capacity. So theoretically I should be getting 400watts or so, but the numbers show about 200watts for two panels.

Final Thoughts:
The modification is a great way to ensure you get higher voltage for MPPT charge controllers to be happy, or to use the 12 panel to charge a 24v battery system, or simply to loose less power over a long cable run. However it's clear that the panels are only performing at about 50% of their "rated" capacity. Being able to fold them up and carry them to a remote site is nice, but you're paying a premium for this one feature.


