diy solar

diy solar

Ecoflow Wave Powered from 24v LifePo4 battery?

gds191

New Member
Joined
May 1, 2022
Messages
2
Hi all,

I am considering purchasing the Ecoflow wave and I cannot seem to figure out if I will be able to hook it up to my existing 200AH 24V LifePo4 battery bank. I have asked Ecoflow and they either don't have trained staff or they are told to say no without really thinking through my question.

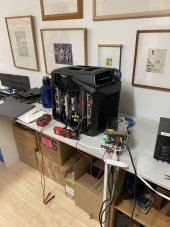
As you will see, the Wave can run off of a 1000Wh battery pack that connects via a small cable to a port on the unit. I also know that the Wave can be powered by the Ecoflow Delta Max with a cable called the "Extra Battery Cable". This goes into the DC output of the Delta Max, and right into the DC input for the Ecoflow Wave, powering the unit to the 400ish watts that it runs at.

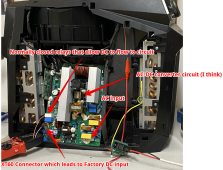
My question is, can I simply purchase this extra battery cable and create something like a fused anderson powerpole connection to my 24V 200AH bank? The Delta prodduct support team is being very cagey about voltages of units - they only speak in watts. I can't seem to figure out if the Delta Max actually puts out 12v/24v/48v from it's "extra battery cable" port. I do know it says it can handle up to 3400 watts, at at that AWG, I would highly doubt it's 12V, but maybe it's 48V and the Wave won't run unless I change my bank configuration to be 48V.

I would really like to use this unit, but I have no need for one of their Delta products with my existing setup. If i ever do upgrade it'll just be to add another 1-2 Lifepo4 batteries to my existing setup.

P.S I'm not concerned about runtimes and power draw. I'll use a generator if needed, or I'll splurge and add some solar panels and 24V 200AH to my setup.

Thanks everyone for the input.

-Glen
 
Hobotech posted a video on this. Gotta view Tom's reviews with a bit of skepticism.....but it does help.

 
I’m trying to do the same thing.

Someone has to find a hack for this,
I bet there’s a way to short out two of those 6 pins to trick the unit into thinking a legit eco flow battery is connected.

Anyone with the battery want to give it a shot and probe which pins have continuity?
 
For anyone else who is trying to do this, I got the pin out from the inside of the PCB board today,
1666468565207.png
 
hey @plloppii were you able to get this to work? I am in the process of making my own cable and would be neat to also get the data pins to work too.

1667745111510.jpeg
 
hey @plloppii were you able to get this to work? I am in the process of making my own cable and would be neat to also get the data pins to work too.

View attachment 119307
I did not get to trying to reverse engineer the data pins,
but the first thing I was going to try was to apply 57v to the main terminals, then 3.3v to the wake pin to see if the display comes up.
If 3.3 doesnt work, slowly increase the voltage to 5 and see if it does anything. We might not need any CAN communication, maybe just the wake ping to get the display up.
 
It might worth a try! Do you mean you are trying to "wake" the Wave? If you just connect the main terminals, the Wave wouldn't turn on?

Let me know how far you are able to make it to work!
 
Check out this video,

He connects 57V but the unit does not turn on.
And so I opened up the unit and got the pin out from the PCB, seems like there is a Wake pin that you have to apply voltage to.
 
I did not get to trying to reverse engineer the data pins,
but the first thing I was going to try was to apply 57v to the main terminals, then 3.3v to the wake pin to see if the display comes up.
If 3.3 doesnt work, slowly increase the voltage to 5 and see if it does anything. We might not need any CAN communication, maybe just the wake ping to get the display up.
I am interested in reverse engineering the data pins as well, did you have any luck with that?
 
So.... Heres something exciting to show everyone here--
Ecoflow wave 1 running off of 48v -- 60v DC

Lmk if you are interested in a short write up,
I basically took the board out, shorted a relay out, and grounded a data pin to get the screen working, and that tricks the unit in "thinking" its plugged in the wall, but actually being powered by 48v DC.
 

Attachments

  • IMG_4345.jpeg
    IMG_4345.jpeg
    172.2 KB · Views: 43
So.... Heres something exciting to show everyone here--
Ecoflow wave 1 running off of 48v -- 60v DC

Lmk if you are interested in a short write up,
I basically took the board out, shorted a relay out, and grounded a data pin to get the screen working, and that tricks the unit in "thinking" its plugged in the wall, but actually being powered by 48v DC.
Looking for that write up! It may work for Wave 2.
 
So.... Heres something exciting to show everyone here--
Ecoflow wave 1 running off of 48v -- 60v DC

Lmk if you are interested in a short write up,
I basically took the board out, shorted a relay out, and grounded a data pin to get the screen working, and that tricks the unit in "thinking" its plugged in the wall, but actually being powered by 48v DC.
Im also interested in a write up.
This is exciting news. Thank you.
 
looking forward to the write up. I purchased the unit without the battery thinking I could run it off a 12v or 24v power bank. Please share the details and I'll test them on my unit. Thanks
 
Sorry for being late, I didn't realize that there was some interest here.

I actually decided to part ways with my unit. I'm trying to sell it now because it didn't provide enough BTUs for my application, which was cooling off my newly built Ford Transit camper.
But as for my reverse engineering efforts, I've included some pictures and explanations based on what I discovered.

Before delving in, I must clarify that I am not responsible for any damage or loss to your EcoFlow products resulting from this DIY hack. This approach most likely invalidates your warranty and could cause significant damage if you happen to create a short circuit.

Moving on, if you've seen the HoboTech video, you might have noticed that when he connects 48V to the terminals, a relay activates. However, the screen remains off. I tried this, and my initial reaction was that there must be a pin that wasn't triggering the screen to turn on. So I proceeded to rip my unit apart. I found the pin that needed to be pulled low on the display control circuitry located under the plastic piece on top of the unit.
Unfortunately, I only managed to capture a low-quality shot of it (I didn't take any better ones when I was disassembling it). It's the last pin of the connector, to which I jumped a wire across to GND.

I got super excited thinking that was it, but when I supply 48V to the XT60-like connector, the display powered up, but no sound from the compressor. At this point, I got a bit frustrated as I believed I needed to reverse-engineer the CAN bus pins to trick the unit into thinking a factory battery was connected. This was something I didn't have experience in and wasn't keen to try.

However, after a bit more probing, I traced the XT60-like connector to the actual XT60 connector on the circuitry board and found some relays adjacent to it.
When I powered the unit on with AC, I also examined the high-voltage side of these relays and observed approximately 57V. I concluded that these were the relays I needed to bypass. These were the normally closed (NC) relays that would open when the CANbus communications registered an OEM battery connected to the unit.

I researched these relays and their specifications, and considered connecting to the low-voltage side of the relay and activating it with a microcontroller. However, I wasn't sure which leg needed to be grounded and I feared causing damage to the upstream circuitry.

I went with the more ghetto approach of shorting the relay leg pins. After shorting these pins, I connected 48V to the factory DC input, and voila, both my screen and compressor powered up. I believe the DC input can vary between 48V and 57V, but I didn't perform any efficiency tests. I'm sure theres a optimal voltage for maximum efficiency.

I also repurposed the solar input wire, connecting it to the factory DC input on the board, allowing me to use a standard XT60 connector to supply 48V. I cant use solar input now, but was not planning to do so anyways.
The factory plug is some sort of proprietary system, which is quite inconvenient. It's not an AS150U (@astremtan), and there are six middle pins, not four.

In summary, here's how to get the unit to run off DC without their factory-supplied battery:

  1. Disassemble your unit
  2. Ground one of the pins on the display board
  3. Remove the large board and turn it over. Locate the high-voltage side of the DC relays
  4. Scrape off the epoxy coating and solder a 10g wire to short the relay pins
  5. Reassemble the unit. Presto, you've got your unit running off your own battery bank.
One thing to note: Eco mode won't function correctly as it assumes it's connected to AC power. Thus, it will operate at full capacity until the desired temperature is achieved.

As I mentioned before, I abandoned my unit because it failed to cool my van in the 90-degree weather we have here in NY. If anyone finds the Wave 2 more effective, please let me know.

Although I'm unsure if this method will work with the Wave 2, I hope you find it somewhat useful.

EDIT: Chatgpt grammer
 

Attachments

  • Ecoflow Display Pin.png
    Ecoflow Display Pin.png
    2.7 MB · Views: 37
  • Circuit.png
    Circuit.png
    1.9 MB · Views: 34
  • IMG_4343.jpeg
    IMG_4343.jpeg
    135.7 KB · Views: 35
Last edited:
Sorry for being late, I didn't realize that there was some interest here.

I actually decided to part ways with my unit. I'm trying to sell it now because it didn't provide enough BTUs for my application, which was cooling off my newly built Ford Transit camper.
But as for my reverse engineering efforts, I've included some pictures and explanations based on what I discovered.

Before delving in, I must clarify that I am not responsible for any damage or loss to your EcoFlow products resulting from this DIY hack. This approach most likely invalidates your warranty and could cause significant damage if you happen to create a short circuit.

Moving on, if you've seen the HoboTech video, you might have noticed that when he connects 48V to the terminals, a relay activates. However, the screen remains off. I tried this, and my initial reaction was that there must be a pin that wasn't triggering the screen to turn on. So I proceeded to rip my unit apart. I found the pin that needed to be pulled low on the display control circuitry located under the plastic piece on top of the unit.
Unfortunately, I only managed to capture a low-quality shot of it (I didn't take any better ones when I was disassembling it). It's the last pin of the connector, to which I jumped a wire across to GND.

I got super excited thinking that was it, but when I supply 48V to the XT60-like connector, the display powered up, but no sound from the compressor. At this point, I got a bit frustrated as I believed I needed to reverse-engineer the CAN bus pins to trick the unit into thinking a factory battery was connected. This was something I didn't have experience in and wasn't keen to try.

However, after a bit more probing, I traced the XT60-like connector to the actual XT60 connector on the circuitry board and found some relays adjacent to it.
When I powered the unit on with AC, I also examined the high-voltage side of these relays and observed approximately 57V. I concluded that these were the relays I needed to bypass. These were the normally closed (NC) relays that would open when the CANbus communications registered an OEM battery connected to the unit.

I researched these relays and their specifications, and considered connecting to the low-voltage side of the relay and activating it with a microcontroller. However, I wasn't sure which leg needed to be grounded and I feared causing damage to the upstream circuitry.

I went with the more ghetto approach of shorting the relay leg pins. After shorting these pins, I connected 48V to the factory DC input, and voila, both my screen and compressor powered up. I believe the DC input can vary between 48V and 57V, but I didn't perform any efficiency tests. I'm sure theres a optimal voltage for maximum efficiency.

I also repurposed the solar input wire, connecting it to the factory DC input on the board, allowing me to use a standard XT60 connector to supply 48V. I cant use solar input now, but was not planning to do so anyways.
The factory plug is some sort of proprietary system, which is quite inconvenient. It's not an AS150U (@astremtan), and there are six middle pins, not four.

In summary, here's how to get the unit to run off DC without their factory-supplied battery:

  1. Disassemble your unit
  2. Ground one of the pins on the display board
  3. Remove the large board and turn it over. Locate the high-voltage side of the DC relays
  4. Scrape off the epoxy coating and solder a 10g wire to short the relay pins
  5. Reassemble the unit. Presto, you've got your unit running off your own battery bank.
One thing to note: Eco mode won't function correctly as it assumes it's connected to AC power. Thus, it will operate at full capacity until the desired temperature is achieved.

As I mentioned before, I abandoned my unit because it failed to cool my van in the 90-degree weather we have here in NY. If anyone finds the Wave 2 more effective, please let me know.

Although I'm unsure if this method will work with the Wave 2, I hope you find it somewhat useful.

EDIT: Chatgpt grammer
Can you still connect the 110v and does it act the same?
 
Yes it does. I just wouldnt leave your DC power connected as you could damage your power supply because the high relay side gets 57V when AC is connected.
Where did you ground the last pin? On the chassis or incoming negative lead? I'm going to pull apart my ecoflow wave this weekend. Bought it to cool my enclosed 48v solar trailer.
 

Attachments

  • 20230626_175456.jpg
    20230626_175456.jpg
    188.7 KB · Views: 15
  • 20230626_175515.jpg
    20230626_175515.jpg
    159.9 KB · Views: 11
Sorry for being late, I didn't realize that there was some interest here.

I actually decided to part ways with my unit. I'm trying to sell it now because it didn't provide enough BTUs for my application, which was cooling off my newly built Ford Transit camper.
But as for my reverse engineering efforts, I've included some pictures and explanations based on what I discovered.

Before delving in, I must clarify that I am not responsible for any damage or loss to your EcoFlow products resulting from this DIY hack. This approach most likely invalidates your warranty and could cause significant damage if you happen to create a short circuit.

Moving on, if you've seen the HoboTech video, you might have noticed that when he connects 48V to the terminals, a relay activates. However, the screen remains off. I tried this, and my initial reaction was that there must be a pin that wasn't triggering the screen to turn on. So I proceeded to rip my unit apart. I found the pin that needed to be pulled low on the display control circuitry located under the plastic piece on top of the unit.
Unfortunately, I only managed to capture a low-quality shot of it (I didn't take any better ones when I was disassembling it). It's the last pin of the connector, to which I jumped a wire across to GND.

I got super excited thinking that was it, but when I supply 48V to the XT60-like connector, the display powered up, but no sound from the compressor. At this point, I got a bit frustrated as I believed I needed to reverse-engineer the CAN bus pins to trick the unit into thinking a factory battery was connected. This was something I didn't have experience in and wasn't keen to try.

However, after a bit more probing, I traced the XT60-like connector to the actual XT60 connector on the circuitry board and found some relays adjacent to it.
When I powered the unit on with AC, I also examined the high-voltage side of these relays and observed approximately 57V. I concluded that these were the relays I needed to bypass. These were the normally closed (NC) relays that would open when the CANbus communications registered an OEM battery connected to the unit.

I researched these relays and their specifications, and considered connecting to the low-voltage side of the relay and activating it with a microcontroller. However, I wasn't sure which leg needed to be grounded and I feared causing damage to the upstream circuitry.

I went with the more ghetto approach of shorting the relay leg pins. After shorting these pins, I connected 48V to the factory DC input, and voila, both my screen and compressor powered up. I believe the DC input can vary between 48V and 57V, but I didn't perform any efficiency tests. I'm sure theres a optimal voltage for maximum efficiency.

I also repurposed the solar input wire, connecting it to the factory DC input on the board, allowing me to use a standard XT60 connector to supply 48V. I cant use solar input now, but was not planning to do so anyways.
The factory plug is some sort of proprietary system, which is quite inconvenient. It's not an AS150U (@astremtan), and there are six middle pins, not four.

In summary, here's how to get the unit to run off DC without their factory-supplied battery:

  1. Disassemble your unit
  2. Ground one of the pins on the display board
  3. Remove the large board and turn it over. Locate the high-voltage side of the DC relays
  4. Scrape off the epoxy coating and solder a 10g wire to short the relay pins
  5. Reassemble the unit. Presto, you've got your unit running off your own battery bank.
One thing to note: Eco mode won't function correctly as it assumes it's connected to AC power. Thus, it will operate at full capacity until the desired temperature is achieved.

As I mentioned before, I abandoned my unit because it failed to cool my van in the 90-degree weather we have here in NY. If anyone finds the Wave 2 more effective, please let me know.

Although I'm unsure if this method will work with the Wave 2, I hope you find it somewhat useful.

EDIT: Chatgpt grammer
Thanks for the writeup, first of all you are right and I was wrong about the connector, I guess it was late at night when I found it and didn't pay attention to the little pins. with that said, I also gave up on the ecoflow mainly for the same reason you mentioned that it doesn't cool enough, but also for the complications of hacking into it and having a separate 48-57v power bank. I will be going with a 12v ac unit like this one https://www.amazon.com/conditioners...mzn1.fos.ac2169a1-b668-44b9-8bd0-5ec63b24bcb5

the only downside is that it's only AC no heat.
 
Back
Top