diy solar

diy solar

Europe - cheap LiFePo4 (eve) cells 230Ah

xychix

New Member
Joined
Nov 3, 2021
Messages
33
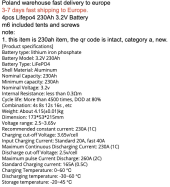
This is the set I've ordered in Netherlands. Arrived within 8 days, price is bizarre.
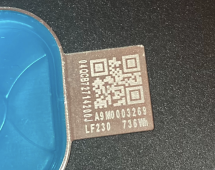
They have a valid QR and appear to be EVE cells produces about 1 year ago.

for 0.17 EUR/KwH almost impossible to beat.

Will post more later. unfortunately I'll still have to wait for the QUCC BMS to arrive.
1635963010152.png
 
Last edited:
This is the set I've ordered in Netherlands. Arrived within 8 days, price is bizarre.
They have a valid QR and appear to be EVE cells produces about 1 year ago.

for 0.17 EUR/KwH almost impossible to beat.

Will post more later. unfortunately I'll still have to wait for the QUCC BMS to arrive.
Did you notice the odd addition though:
"Input Charging Current: Standard 20A, fast 40A"
40A is not really 1C for a 230Ah cell.
 
good catch... what could that mean for these cells?
discharging is open for 1C it appears.

All together the QR does match for normal good EVE cells
 
Last edited:
Frankly I am no LifePo4 manufacturer expert and hope others will chime in but I imagine that if these are not remanufactured cells then they may nog have fully satisfied EVE requirements. If you can measure the internal resistance, that would be useful.
 
2 lines above that they do mention 1c in a chinglisgh line that might point to charging :)

I'll have to look up the method of measuring the internal resistence. Do have an Ohm meter and should have some small resistors lying around... Does anyone have a good howto on measuring resistance?

Note that the seller has a high reputation, that is what helped me decide.
 
At the moment doing a top balance with my 30v charger set to 3.6v and allowing up to 10A (only draws 2a at the moment with a battery voltage of 3.3v)

hm shouldn't I expect it to draw 10A (max of supply)? The supply is capable up to 30A so it for sure can handle 10!
 
Check your wiring: are you using some included wires with crocodile clamps? If so, replace with thicker wiring and ring terminals.
the wireing is buggerbad... for SURE but should do more than 2Amps as each connection is ATLEAST 1.5mm2 copper and short.
I'll let is sit for a while an try and find a manual to do a resistance test.

Once the BMS is in I'll try a capacity test as well.
 
Nope. You need better connections. The delta between the battery voltage and the power supply is what, 0.5V? Bad wiring and connections lead to high voltage drops over them and lead to what you're seeing. Change the connections, you'll see. Ring terminals and proper wire gauge.
 
thanks for being so clear. Made new cables now the voltage drop is 0.09V over the new 10cm 2.5mm2 cables and it's taking full 10A at 3.4V (unit set to 3.6V)

weight of the cells is perfect. all at 4.17 something KG's

Will let it sit for a little, I can also consider giving it up to 30A at (4*3.5 = 14V) in series and then back down to parallel. But as these are supposed to be new (maybe some shelf life) I was hoping to find a reasonable state of charge.
 
Last edited:
Please don't do this without a BMS.
This may not be the best advice you could get since we do not know when you will receive your BMS. If you would run out of time to file a complaint with AliXXX then I would not wait for the BMS. After all, you have 230Ah cells and want to charge with just 30A which is a palty amount for such cells - remember the official specs show charging at .5C of 115A. Also given the cells should be shipped at 30% SOC you will have have some 140Ah to charge. That will take more than four hours. I would set a timer to check every so many minutes until one of the cells hit 3.45 or so, and then reduce the interval. But perhaps I am a little late responding since you have been charging already.
 
This may not be the best advice you could get since we do not know when you will receive your BMS. If you would run out of time to file a complaint with AliXXX then I would not wait for the BMS. After all, you have 230Ah cells and want to charge with just 30A which is a palty amount for such cells - remember the official specs show charging at .5C of 115A. Also given the cells should be shipped at 30% SOC you will have have some 140Ah to charge. That will take more than four hours. I would set a timer to check every so many minutes until one of the cells hit 3.45 or so, and then reduce the interval. But perhaps I am a little late responding since you have been charging already.
My charger is a quite strong power supply. I'm now running 20A at 3.6V (the safe way). been doing zo for ~24hours by now I think. (alternating between 10 and 20a as 20A makes the fan of the charger run and it sits in my office)

So there should be roughly 160~200A charge in there already.

Still running at 20A as we speak and no real drop of current yet. Voltage of the pack has risen from 3.33 to 3.35 (under charge)

*facepalm moment* even if 230A was in there already charging this way that leaves 3x230A or room :p.
assuming they where at 25% SoC I've gor 460A left to go.
 
1637514751999.png
there we go.

Did a proper top balance, will now discharge some. recharge (so the BMS can reset to 230Ah instead of the pre configured 150Ah) and start testing.

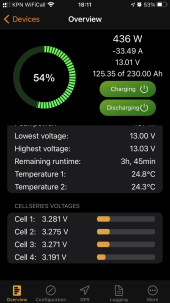
Already a bit worried on cell 4... and the voltages in general ~3.3 volt should be 60% while I only pulled 0.334 KwH (according to my external induction AMP meter)

(foto is taken a bit later at 0.385KwH now.)
1637515154538.png
 
Had to reset, but got to the 1kwh mark so far. 80ah, hopefully another 150Ah to go...

Can already tell 1 of the cells is 0.12v below the others (only balancing while charging). Fingers crossed on end results.
 
YESSSSS BMS tells me I got the full 230 and is now at 0 for a while, the hall sensor was a tad more conservative and tells me I've used 232 now and I'm still running.

Lowest cell is at 2.876V now so almost done.

As I'll have to go I will have to stop here. Consider the test a WIN.

GOOD cells despite one of them showing a constant 0.12v lower under load (not when resting)

I was testing at ~33.14 Amp draw (300watt heater on a very inefficient old inverter).
 
Last edited:
Back
Top