• Have you tried out dark mode?! Scroll to the bottom of any page to find a sun or moon icon to turn dark mode on or off!

diy solar

diy solar

EVE 280Ah LFP cells in a Goal Zero Yeti 1250

Bob142

Build more, learn more.
Joined
Oct 31, 2019
Messages
1,505
Location
Rhode Island, USA
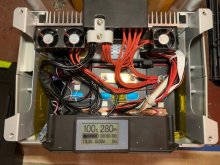
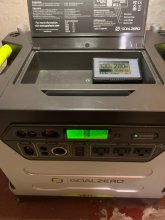
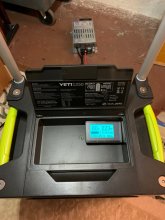
Thanks to what I've learned from so many people on this forum I've been able to level up my modified Goal Zero Yeti 1250 again. This time I took out the Lion UT1200 LFP battery and put in 4 EVE 280Ah LFP cells that I got via @Craig, and added an Overkill 120A 4s BMS. Goal Zero must have seen the future because the cells fit into the battery bay perfectly with just enough room to the side for the BMS and battery monitor.

Some highlights for me on this build:
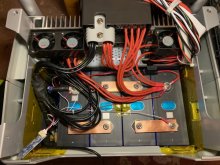
  • Finally put together a DIY LFP battery. Now that I've done it I don't know what took me so long.
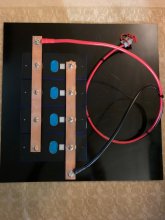
  • Made my own busbars out of 1/8" x 1" 110 copper bar stock (thanks to @backwash for the link). Didn't have a drill press so I bought this WEN for $89 and it worked well for me. I made three busbars for the battery cell connections and two long ones for top balancing in parallel. (Wish I saw @Bob B's comment about using a center punch a little earlier. Will do that next time.)
  • Followed @FilterGuy's top balancing tutorial and charged the cells in series with the BMS first, then used a 15V 40A lab power supply to finish the job with the cells in parallel. (There should be zero drama doing it this way if you follow the instructions carefully. It also goes fast compared to just putting the cells in parallel.)
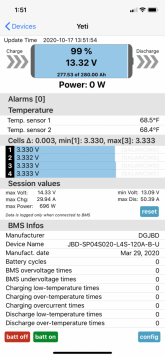
  • Added a TF03K shunt-based battery monitor because the GZ internal monitor uses voltage for state of charge since it was a lead acid system originally. (I tried a Drok hall effect battery monitor in the initial system customization and it turned out to be useless.)
  • Learned that the Overkill BMS short circuit protection works... and that I shouldn't let my guard down in my exuberance to finish a build.
Here are the pics:
IMG_3332.jpgIMG_3333.jpgIMG_3334.jpgIMG_3328.jpgIMG_3336.PNG

(Yes, I fixed the red balance lead that got pulled a little too taut.)
 
Last edited:
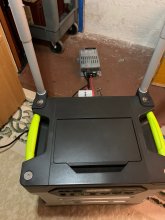
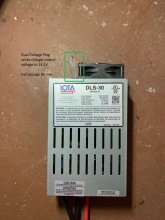
Currently running a test of what may become the dedicated grid/mains charger for the Yeti. It's the $40 IOTA DLS-30 12V 30A charger @HaldorEE tipped people off to in this thread. I'm not using the IOTA IQ-LIFEPO IQ4 "smart" charge controller module as it's actually kind of dumb. Thanks to a heads up from @carlos1w I'm using the dual voltage plug to make the charger voltage 14.2V. (See other thread for more details.)

Charger is connected to the Anderson SB175 chaining port on the back of the Yeti. The third pic shows the little dual voltage plug connected to raise the output voltage to 14.2V. I'm satisfied with that as my absorption voltage. I'll be monitoring charging so I can terminate it when the pack reaches 14.2V so it won't hold it too long.

As long as the IOTA behaves well in tests, I'll sort out some form of mounting to the roll cart handles or maybe I'll use my go-to milk crate solution like I did to add a 3rd party SCC to the Yeti. I'll post the solution(s) when I get to them.

IMG_3346.jpgIMG_3347.jpgIMG_3348_2.jpg
 
@Bob142 This looks great! I'm a total solar and power newb with a Yeti 1250 that I bought in 2013. Original deep cell battery is dead and will cost $250 to replace. I've been debating if I should use that $250 to upgrade to a new consumer Lithium system instead of getting another lead acid (and maybe sell the Yeti as parts?). But I love DIY and if there's a good way to leverage my existing Yeti, I'd love to give it a try.

Do you have full build instructions somewhere, parts list, etc? I'm comfortable with low power DIY, but never dabbled with higher power solar/batteries/etc. So any hand-holding would help.
Welcome to the forum, @tauren!

If you haven't already, take a look at my original Yeti mod that used a Lion Energy LFP drop-in battery. Depending on what your use cases are and your appetite for DIY, that might be a worthwhile and sufficient upgrade to the system. It spares you the DIY battery part of the build so is a faster upgrade. Costco occasionally runs great deals on the Safari UT1300. You'd also need to install a battery monitor like I did in this thread to get an accurate state of charge for the LFP battery.

If you decide that you'd prefer to go the DIY battery route as I did in this thread, you'll need to do a little homework on the size of the currently available large LFP cells. When I did this build the EVE 280Ah cells were ubiquitous, but those have dried up. Most people seem to be getting the Lishen 272Ah cells now so you'll need to figure out if those cells will fit in the battery bay of the Yeti 1250. I suspect a quick search of this forum will get you the answer. I recommend you reach out to @Michael B Caro to get your cells. I believe his suppliers are providing grub screws, serrated washers, and double busbars so it's a nice package (for this build I had to make my own busbars and procure the screws and washers separately.)

The first post in this thread has links to all the major components that I used, so that's your starting point parts list. I can provide guidance on particular questions you may have in a PM (conversations in this forum - the envelope icon up top). I've been doing that for others and it's working well.

Good luck and I look forward to another Yeti 1250 LFP conversion!
 
Thanks for the response. It feels like I should go the DIY route with 4x280ah batteries, but I'm not clear what the practical differences are between the two builds. Can you clarify a couple things?

- Based on cost alone, which solution is less expensive? The UT1300 appears to cost $900 (not available at Costco right now) vs about $300-400 for the EVE/Lishen (I've reached out to @Michael B Caro for more accurate pricing). But what other costs will there be for the 4x280ah solution that aren't also in the UT1300 build?

- Based on performance alone, which solution is superior, has more power, charge cycles, longevity, least amount of maintenance, etc?

It looks like the Lishen and EVEs have essentially the same size:

In this video he says the Lishen 280ah is actually listed as 272ah, so I think the two items are basically the same dimensions:
 
Based on cost alone, which solution is less expensive
The costs of the two solutions are almost the same if you get a good deal on the UT1300 at Costco.

But what other costs will there be for the 4x280ah solution that aren't also in the UT1300 build?
The cost of a BMS and a power supply to top balance. Those costs can vary quite a bit depending on which model of each item you buy. Search the forum and you'll find plenty of good options and advice on each.

Based on performance alone, which solution is superior, has more power, charge cycles, longevity, least amount of maintenance, etc?
  • The Yeti system has the same power no matter which battery solution you go with.
  • 280Ah > 105Ah so you get much more runtime with the DIY battery implementation.
  • The DIY battery build takes a lot more time compared to dropping in the UT1300 (that time includes months waiting for the cells to arrive after ordering).
  • Both the raw cells and the UT1300 marketing material promise thousands of charge cycles (read the fine print on the raw cells and you'll see you need to provide compression. I didn't do that in my build).
  • The UT1300 provides a warranty. There is no warranty with the DIY battery build.
My preference is obviously the raw cell DIY battery build, since I upgraded from the drop-in UT1200 to it. I only brought up the other option so you and others reading this can compare the two and decide how much DIY you are willing to take on based on your use cases.
 
I've really enjoyed your 1250 upgrade evolutions. i finally found a used 1250 for cheap and picked it up yesterday, along w/ ordering the costco LION special

This will be plenty of Ahs for my current application, so i will hold off on the 280 DIY upgrade.

For your next trick, please swap out the 1200/1500 inverter for the newer 1500/3000 or better yet, the 2000/3500! : )
 
For your next trick, please swap out the 1200/1500 inverter for the newer 1500/3000 or better yet, the 2000/3500! : )
Now that you brought it up I'm really interested in doing it. But I don't want to mess with my current system and I am having no luck finding another Yeti 1250...
 
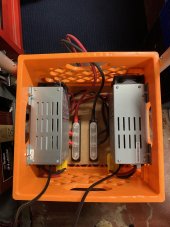
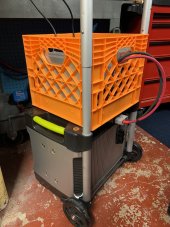
It took a while to get to, but I eventually packaged up the IOTA DLS-30 based charge solution for the Yeti.

Surprise, I used a milk crate...

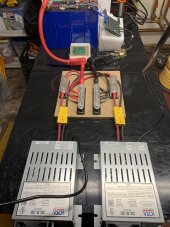
I took my charging rig from when I was doing capacity tests of 16 EVE 280s and mounted it in a crate. It's two individually fused IOTA DLS-30s in parallel (more details are in the charging rig post). Some 4 AWG cables and an Anderson SB175 connector and I've got the ability to push 800W into the Yeti and anything else I cook up.


IMG_3517.jpgIMG_3988.jpgIMG_3987.jpgIMG_3989.jpg
 
The story of my modified Yeti 1250 has sadly come to an abrupt and unexpected end.

As the remnants of Hurricane Ida dumped rain on us a couple weeks ago, my sump pump failed overnight and I woke up to 6+ inches of water in my basement. Unfortunately the Yeti was the one system of mine down on the floor. I dragged it out into the garage that morning and have been letting it dry out since.

Today I finally had time to check in on the damage. I found that the cells are fine (whew!) but the BMS was fried. After swapping that out it became clear the Yeti's native components didn't make it. The Yeti's last act of valor was to hold up the charging crate to save it from a similar drowning fate. I'm gonna raise a glass to it tonight. All are welcome to join in... ;)

I officially pass the torch to @snosrfr and @invento123 as the new resident experts on this particular DIY modified system. May theirs and everyone else's live a long life.
 
Last edited:
i'll raise a pint tonight in it's honor. ?
Thanks for the support! Headed out now to get something a *little* stronger than beer.

I appreciate the heads up on the used Yeti. I'll keep looking for one a little closer to me (RI) while also thinking of another way to use the cells. My Yeti may be gone, but my building days are not done by a long shot!
 
Have you folks used solar panels to charge your Yetis with the LiFePO4 cells? I noticed that the newer Yetis (1000, 3000, etc) have a lower limitation on the solar input voltage, so wondering if that's an issue with the charge controllers and the Li cells, or just the way they designed the newer units.

Also, why not charge through the BMS? I can set the high, low voltage cutouts and the temp limits.
 
Have you folks used solar panels to charge your Yetis with the LiFePO4 cells?
Yes. Before mine died in the flood I charged it via the native Yeti 1250 charge controller as well as my with the PV crate component of my milk crate army. Both worked great for me.

Also, why not charge through the BMS? I can set the high, low voltage cutouts and the temp limits.
I'm not sure what you mean by this. In my build, the BMS is never bypassed. So all charging and discharging goes through the BMS.
 
The story of my modified Yeti 1250 has sadly come to an abrupt and unexpected end.

As the remnants of Hurricane Ida dumped rain on us a couple weeks ago, my sump pump failed overnight and I woke up to 6+ inches of water in my basement. Unfortunately the Yeti was the one system of mine down on the floor. I dragged it out into the garage that morning and have been letting it dry out since.

Today I finally had time to check in on the damage. I found that the cells are fine (whew!) but the BMS was fried. After swapping that out it became clear the Yeti's native components didn't make it. The Yeti's last act of valor was to hold up the charging crate to save it from a similar drowning fate. I'm gonna raise a glass to it tonight. All are welcome to join in... ;)

I officially pass the torch to @snosrfr and @invento123 as the new resident experts on this particular DIY modified system. May theirs and everyone else's live a long life.

Just saw this, what a sad end to such a marvelous creation! My Lithium swapped Yeti 1250 is still going strong and has saved me a few times this last month during this insane heatwave! The power was out for over 6 hours one day but running some fans, my internet router and a laptop was no problem for the 1250!

I've added on a second external battery, similar to your milk crate creation @Bob142, and now have seemingly unlimited power! Granted only 2Kwh of "unlimited" power but I have yet to use more than 1Kwh or so during any use case.

Planning on also following with your IOTA charging milk crate to give the 1250 a bit of a "fast charging" system compared to the 150 watt external brick I use now. Albeit only using one IOTA charger as I can't afford two of them (yet).

Sorry to hear about your 1250 and thank you again for all the advice and inspiration you've given me on my Yeti 1250 endeavors!
 
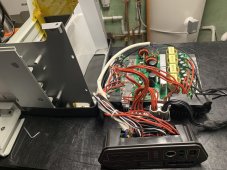
I can't believe my Yeti 1250 has been sitting dead for over a year. I never disposed of it and just pulled it out from under a pile of other stuff. Time for an autopsy (it's like I exhumed the body for this).

Second pic shows... corrosive damage?

Anybody think I can salvage this? If so, any suggestions on steps? @Supervstech @BiduleOhm

IMG_6083.jpgIMG_6084.jpg
 
That doesn't look too bad. Actually. I don't see any traces eaten through. Maybe a toothbrush and a little baking soda?
 
That doesn't look too bad. Actually. I don't see any traces eaten through. Maybe a toothbrush and a little baking soda?
Thanks! I got some offline advice to that effect as well. Distilled water and baking soda with a soft-bristle brush. Then isopropyl alcohol to clean it further. I'll detach it from the big heat sink and check out and clean the underside as well. No idea if any of the components got compromised, but I'm barreling towards a magic smoke test. There will be pics...
 
Unless that got very wet, or you live near salt water, I would scour the board with a microscope and find the blown capacitor that caused the corrosion…
 
It looks half decent. Can't promise it'll work again but you can try to clean it (water and soap is fine, avoid harsh solvents like acetone), dry it (an hair dryer is great for that), then clean it and dry it again with some 99 % IPA ;)

Avoid putting liquids in the transformers (the blocks with the yellow tape around) as they would take a long time to dry (lots of layers, etc...).

What's really irritating is that you can see they put some conformal coating on the board but not everywhere (really looks like a case of "let's quickly swipe the brush here and here, done!"...), if they would have then the board would be fine :rolleyes:


Unless that got very wet, or you live near salt water, I would scour the board with a microscope and find the blown capacitor that caused the corrosion…

It's not a cap, the whole thing took a bath because of an hurricane.
 
It looks half decent. Can't promise it'll work again but you can try to clean it (water and soap is fine, avoid harsh solvents like acetone), dry it (an hair dryer is great for that), then clean it and dry it again with some 99 % IPA ;)

Avoid putting liquids in the transformers (the blocks with the yellow tape around) as they would take a long time to dry (lots of layers, etc...).

What's really irritating is that you can see they put some conformal coating on the board but not everywhere (really looks like a case of "let's quickly swipe the brush here and here, done!"...), if they would have then the board would be fine :rolleyes:


It's not a cap, the whole thing took a bath because of an hurricane.
Thanks @BiduleOhm. I appreciate your input. I'll take care to keep the transformers dry as I work to clean it up. If nothing else, we've learned a little about Goal Zero's manufacturing attention to detail back in the day. I wonder if they've improved.

I'm hoping to get to this in the next few days. ?
 
I cleaned up everywhere that looked like it needed it as well as I could. Connected up a battery and... no joy.

Nothing ventured, nothing gained. In this case, something ventured, nothing gained. Time to cook up a new plan for this shell...

IMG_6092.jpg
 
For those of you keeping score at home, the Yeti 1250 has a combined nearly 9 lbs (4.078 kg) of aluminum heat sinks. Most of it being the massive slab that forms the back of the unit. Not sure what to do with it at this point.

004BF446-7C58-4D7A-9BAC-49955DF9C7DF.jpeg
 

diy solar

diy solar
Back
Top