My forklift's 36v 875Ah FLA battery was barely managing to unload a truck before dying. My new 23 kWh LiFePO4 battery is in and is functioning correctly so far. It should give me about 75% of the capacity that a new FLA would give me. Price wise I'm in it about $5,300 compared to almost $7,000 for a new FLA. I should get $500 for the old Forklift battery too.
Only time will tell with capacity, hot spots, and reliability. I'll need to use it for a few weeks after the holidays and adjust accordingly. I didn't have a good way to capacity test after top balancing. They're out of balance right now, probably from some of my tinkering, so I'm working on that too. I also may have begun stripping a stud that I'm a bit hesitant to unscrew and find out.
For initial acceleration or lifting a heavy load quickly I peak at about 400 amps. Realistically I pull 100 to 300 amps most of the time and only in short spurts. I considered some contactless JBD BMS's but they don't support parallel functions. I should go on a short drive to warm things up and get the BMS fans going. It's cold here right now. During summer when my warehouse is 100 degrees I might appreciate the second BMS more.
Charging
The EG4 charger appears to max out at 25a and not 30a. It'll take around 20 hours to charge from 0 to 100%. My first time using the charger it stopped after 10 hours stating "full charge" but it still needed another 4 hours. Its only setting is to charge to 43.8v or 3.65v/cell. When my BMS turns the charging off, the charger sometimes turns back on 30 seconds later after the cell rests momentarily. With 2 BMS's, one may still be charging while the other turns off, but even with both BMS's disconnected the charger re-engages within a few minutes. Does the Daly BMS have a setting to adjust the voltage for when to enable charging after a high voltage disconnect? I can't find it.
Components
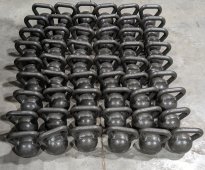
The kettlebells destined to life as a counterweight. Bought for less than $0.50/lb which was the best I could find. I had hoped to find scrap metal but did not find any good fits.
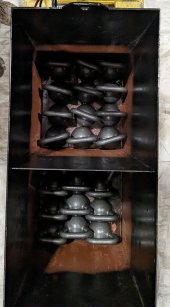
I reused the steel enclosure that held the lead acid cells. There were 3 layers of kettlebells.
The bells are buried. I should have smoothed the concrete. I ended up chipping away rocks to ensure the cells rested at the same height.
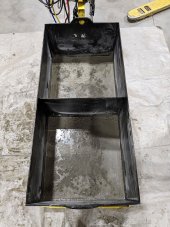
Prepping for concrete surrounding the cells.
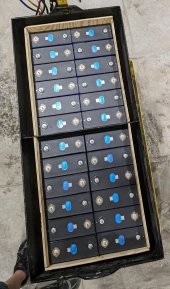
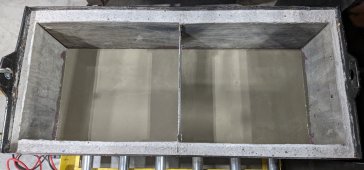
Concrete enclosure ready. I really wish I would have shortened the height of the steel crossmember. It made wiring the BMS B- and P- a pain. I did chip away concrete that bleed from the sides to the flat area.
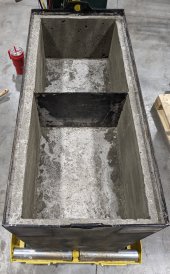
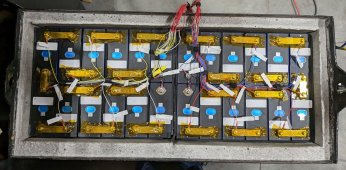
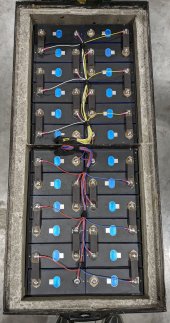
This picture gives you a good visual of the rubber/neoprene between cells.
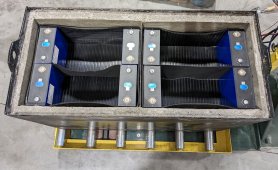
BMS leads all attached and ready for final assembly.
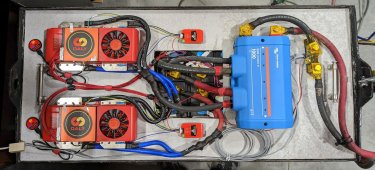
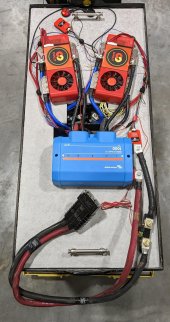
Everything mounted to hardie board and resting on the concrete and steel crossmember. But none of the components are accessible without winching the battery out of the forklift. Total weight is just over 2200 lbs which is what my forklift requires. The BMS B- and P- were barely long enough. I would find a better fit if I did it again. The BMS's are angled for fan exhaust airflow and wire fit.
I'm using the Victron Lynx Power In as a bus bar combiner. Basically wired in reverse of typical use cases but it works great.
EDIT: There are some more updates posted in my reply below.
Only time will tell with capacity, hot spots, and reliability. I'll need to use it for a few weeks after the holidays and adjust accordingly. I didn't have a good way to capacity test after top balancing. They're out of balance right now, probably from some of my tinkering, so I'm working on that too. I also may have begun stripping a stud that I'm a bit hesitant to unscrew and find out.
For initial acceleration or lifting a heavy load quickly I peak at about 400 amps. Realistically I pull 100 to 300 amps most of the time and only in short spurts. I considered some contactless JBD BMS's but they don't support parallel functions. I should go on a short drive to warm things up and get the BMS fans going. It's cold here right now. During summer when my warehouse is 100 degrees I might appreciate the second BMS more.
Charging
The EG4 charger appears to max out at 25a and not 30a. It'll take around 20 hours to charge from 0 to 100%. My first time using the charger it stopped after 10 hours stating "full charge" but it still needed another 4 hours. Its only setting is to charge to 43.8v or 3.65v/cell. When my BMS turns the charging off, the charger sometimes turns back on 30 seconds later after the cell rests momentarily. With 2 BMS's, one may still be charging while the other turns off, but even with both BMS's disconnected the charger re-engages within a few minutes. Does the Daly BMS have a setting to adjust the voltage for when to enable charging after a high voltage disconnect? I can't find it.
Components
- 24x Eve 304Ah LiFePO4 cells with laser welded M6 studs (Connected 12S2P) Per the QR codes they were all manufactured in June 2022.
- 2x 500a Daly Smart BMS /w parallel modules (I don't see the modules in the smart app but I assume they're functioning)
- Victron 500a BMV-712 Shunt
- Victron Lynx Power In 1000a bus bar
- 2x stacked 2mm copper bus bars with nickel plating
- 2/0 from each 12S to Lynx and 3/0 from Lynx to forklift
- EG4 Battery Charger 36v 30a
- 0.25 inch tailgate rubber mat sits between concrete and the cells (The cells aren't compressed but they are tight. They're just loose enough to be removed with some effort.)
- 1/16th inch neoprene between cells
- 950 lbs of iron kettlebells
- 720 lbs of concrete
- 1 steel enclosure (38" x 17" x 28")

The kettlebells destined to life as a counterweight. Bought for less than $0.50/lb which was the best I could find. I had hoped to find scrap metal but did not find any good fits.

I reused the steel enclosure that held the lead acid cells. There were 3 layers of kettlebells.

The bells are buried. I should have smoothed the concrete. I ended up chipping away rocks to ensure the cells rested at the same height.

Prepping for concrete surrounding the cells.

Concrete enclosure ready. I really wish I would have shortened the height of the steel crossmember. It made wiring the BMS B- and P- a pain. I did chip away concrete that bleed from the sides to the flat area.

This picture gives you a good visual of the rubber/neoprene between cells.

BMS leads all attached and ready for final assembly.

Everything mounted to hardie board and resting on the concrete and steel crossmember. But none of the components are accessible without winching the battery out of the forklift. Total weight is just over 2200 lbs which is what my forklift requires. The BMS B- and P- were barely long enough. I would find a better fit if I did it again. The BMS's are angled for fan exhaust airflow and wire fit.
I'm using the Victron Lynx Power In as a bus bar combiner. Basically wired in reverse of typical use cases but it works great.

EDIT: There are some more updates posted in my reply below.
Last edited:


