diy solar

diy solar

Horsefly's Cabin Solar LiFePO4 Upgrade

Horsefly, I wish I had your skills. I don't, but I can frame. I'm building a 10 x 12 shed out of 2x8 that I have, and insulating it with 8" rockwool that I also have left over from our cabins' build. I'm installing 2 wall mount low btu, direct vent wall heaters with wall mount thermostats. One set to come on at 40f +- and one set at about 35+- for redundancy. I have propane and wiring to pv and cabin already trenched in to the shed site. I'm going to forward this thread to the electrician I know. I'm sure he could help a few people that don't have the luxury of propane roughed in for a solar shed. My shed is going to have a small area framed and wrapped with hardware cloth in the corner, with a feeder, and a small cat door, for a couple feral cats, to keep them warm enough, and, to keep the mice at bay. Thanks for sharing.
 
A quick update here.

In my original design I was using a Thornwave PowerMon-5S and an SSR (Solid State Relay) to cut off power to the heating circuit if the battery voltage got below a defined level. The idea was that I didn't want to run the battery down too low with the heater. I chose this approach because I already had the PowerMon-5S shunt, and adding an SSR was easy.

I found this system to be overkill, and consumed a bit more power than I wanted.

I ended up buying the Victron Smart Battery Protect which did the same thing in one tiny box that consumes very little power. It's still a bit overkill. I bought the smallest Smart Battery Protect, which is rated at 65A and cost $60 on Amazon. For my little 1.2A heater, that is not much of a challenge.

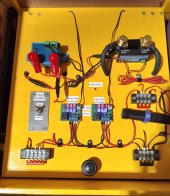
Here's the photo of the electronics board with this new modification. The Smart Battery Protect is the little blue device in the upper left.

IMG_20220325_055350640_HDR.jpg
 
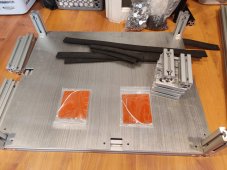
The heating pads I chose (after experimenting with lots of heating pads) were some 12V, 12W pads I got from Aliexpress. Two of these in series work with my nominal 24V battery, drawing around 1A (24W). Although I'm not sure how much heating I will need, I am going to try 2 pads at first, but if it turns out I need more there is room on the aluminum sheet for 4, which would be 2s2p of the pads, drawing 2A at 24V, or about 48W.

View attachment 61858

View attachment 61859

Once I got everything wired up, I wanted to test it before I went through the trouble of plugging in my big 230Ah cells. I used my "practice" pack of 8s 25Ah cells from BatteryHookup.com.
View attachment 61860

This allowed me to confirm my wiring worked as designed. So the thermostats and SRR controlled the heating pads.

Meanwhile, I was pre-staging my 230Ah cells on my workbench.
View attachment 61861

I finished labeling the controls, then put the "real" cells (8S 230Ah) into the box:

View attachment 61862

View attachment 61864

Note that you can't really see it, but the "heat plate" thermostat temp sensor is actually between the two rows of cells, at the bottom.

There's not a lot of room, but I have verified that I have room for 280Ah cells if I ever need to go that way.
Thank you for all the information! Can I ask how you wired the pads in series? I have the same pads but I am unsure how to wire them since they all have the same white sheath around them.
 
Thank you for all the information! Can I ask how you wired the pads in series? I have the same pads but I am unsure how to wire them since they all have the same white sheath around them.
There is no polarity on the heating pads, so you just hook one wire from one pad to one wire of the other pad, and then hook the power (through the thermostat) to the two other white wires. I assume you are doing a 24V system like mine, so your two 12V pads wired in series will work as intended under 24V.
 
There is no polarity on the heating pads, so you just hook one wire from one pad to one wire of the other pad, and then hook the power (through the thermostat) to the two other white wires. I assume you are doing a 24V system like mine, so your two 12V pads wired in series will work as intended under 24V.
Awesome! Thank you for the quick answer! Yes my system is 24V like yours, but slightly larger. I have 16x cells and a 26" x 29" aluminum base plate. The whole box bolts in under my van. So I hope that 4x pads will be sufficient.
 

Attachments

  • IMG_20220927_124009.jpg
    IMG_20220927_124009.jpg
    274.9 KB · Views: 25
Awesome! Thank you for the quick answer! Yes my system is 24V like yours, but slightly larger. I have 16x cells and a 26" x 29" aluminum base plate. The whole box bolts in under my van. So I hope that 4x pads will be sufficient.
If you can give the pack some insulation (and depending on your charging sources) you should be fine with four pads.
 
An update that is not much of an update....

The battery has been at our cabin all winter. We have no access to it since November of 2022, and no idea how it has done. I designed the system based in part on the fact that my logging of information for the four previous winters showed that the solar panels were never completely covered for more than a couple of days at a time.

Well, this winter has been a bit different. There has been significantly more snow in the vicinity of our cabin than for many years past. The current models say that there is something around 4 ft of snow on the ground now, in early April.

Some may recall that I built a failsafe into the system (using a Victron battery protect) to shut down the entire heating system if the battery voltage got down to a bit above 3.2V / cell. The SCC remains on though, so theoretically the panels should eventually clear, raising the voltage seen at the battery, and then power the heating circuit back up.

Obviously I'm anxious to get up there and see how things did, but with the amount of snow on the ground now I doubt we will be able to get in there until late May.

I put no logging on the system as installed at the cabin. I'm now thinking I need to put together something to log the temps, heating activity, and battery voltage through the winter. I've done a bit of ESP32 / ESP8266 and Arduino stuff in the past, so maybe that will be my next project. With no Internet at the cabin, I still wouldn't be able to see the logs until spring, but it would be interesting to look at. I've not really paid much attention, but I would guess there is something here on the forum that I could model it after. I'm open to suggestions!
 
So I realized that I never updated this. The battery survived the winter and has performed great all summer. In fact, we decided to upgrade our loads a bit (added a fridge), so I decided to build a build a second battery. I didn't document the whole build as much, but may post a few pics of it. Bottom line is that it is like the battery described here but stripped down to just the components I determined were needed, and less open space inside the box.

What I decided was not needed for the second battery:
  1. I had a second thermostat to make sure that the bottom of the pack didn't get too warm before the top of the pack got to the desired temp. By using the smaller heaters, this turned out to not be a problem, so I used the same heating pads and left out the second thermostat.
  2. The Victron SmartShunt is an awesome device, but now I have a JuncTek battery monitor for the overall bank, so having a separate battery monitor for the first battery is no longer needed.
  3. The lexan lid over the cells was a nice aesthetic item, but by taking it out I could save some space.
The end result of this was that I was able to build a second copy of this battery in about half the space, but with the same capacity, same insulation, same protection, and same temperature control. Putting it in next week!
 
Back
Top