diy solar

diy solar

Horsefly's Cabin Solar LiFePO4 Upgrade

That is it! Wow it does not look like it is 4-ft long in the picture.
Yeah, the scale is hard to appreciate with this big equipment. The yellow board everything is mounted on in that picture is a 4' x 8' with just a fraction of an inch trimmed off the length. It was pretty big, and HEAVY.
 
Very Impressive work indeed, Thank You VERY Much for sharing it, there is a lot of inspired work there and may likely inspire others. Gave me a couple of ideas and at a most fortuitous time to boot. I have to do something similar for my "Toolshed" battery system for which parts are en-route already, as the building is going up.
 
Very Impressive work indeed, Thank You VERY Much for sharing it, there is a lot of inspired work there and may likely inspire others. Gave me a couple of ideas and at a most fortuitous time to boot. I have to do something similar for my "Toolshed" battery system for which parts are en-route already, as the building is going up.
Wow Steve, thanks! You're one of the members here with the most useful information to learn from, and I HAVE been inspired by you. To hear these kind words from you means a ton!
 
and I HAVE been inspired by you.
Awwww shucks, foot shuffling thanks man. I try to help and share knowledge and it's good that it does.
I'll be posting on the "toolshed" build which is something a bit different and as far as I am aware, no-one here has used the gear I am using, well some of it anyways. I'll likely post some about the structure too as it's also a bit unusual, ;-) hehehe... Guys way out in the bush with time & materials can lead to interesting things.... hehehe. Solar is Midnite KID SCC, E-Panel, SillFab Panels, Yiyen 3024APC, 24V-LFP.
 
I couple of things I forgot to say...

I did mention that I used Rust-oleum spray paint on both the interior exterior. Probably 6-7 cans of each. However, I discovered quickly that any slight bump of the box on anything else would chip the paint. So I used up a quart of polyurethane on the outside. That's why it looks glossy in some of early photos but then had a matte finish when I started putting hardware and wiring on the outside.

I did have to make a couple of changes along the way. The top hinged panel (with the electronics on it) would stay up when I first attached it, but once the 2 AWG wire was put in running between the panel and the innards of the box (two reds, and two blacks), the wire made it want to close. So I had to add two more of those screen door latches to hold the panel up. I can post another photo of how that all looks if anyone is interested.

Those same 2 AWG wires also didn't fit nicely with the squared off back corners of the Lexan. So I took the Lexan back off and cut off a 45° corner on both sides, leaving plenty of room for the wire. I think you can actually see in some of the photos where the back of the Lexan had 90° square corners early on, but I finished with it having the 45° shortcut at the end.
 
Super nice work! I need to quit being so lazy and start documenting my build with some decent photos.
 
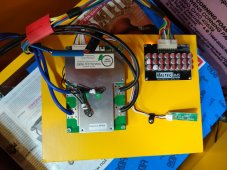
I realized I didn't post the pic of the board holding the BMS and the Active Balancer. As discussed earlier, this board was not attached, but is held in place by some window screen latches.
IMG_20210819_193516169.jpg

I have a ton of little plastic offsets that I used for the BMS and the Active Balancer, as well as the thermostats on the top panel.
 
(excuse my feet):
View attachment 61790


More to come.
Great documentation. one of the things I am not that great about. . I was really digging your posts up until this point..... but those feet.... are your toes prehensile? are the digits opposable? Are you the next evolution in mankind? Damn Bro... Inquiring minds want to know! ;)
 
Great documentation. one of the things I am not that great about. . I was really digging your posts up until this point..... but those feet.... are your toes prehensile? are the digits opposable? Are you the next evolution in mankind? Damn Bro... Inquiring minds want to know! ;)
Yeah, you should see me swinging in trees using only my feet! Funny thing is, I almost edited my feet out of the shorts where they snuck in. I also didn't post the picks that had way more of my ugly feet!
 
Great documentation. one of the things I am not that great about. . I was really digging your posts up until this point..... but those feet.... are your toes prehensile? are the digits opposable? Are you the next evolution in mankind? Damn Bro... Inquiring minds want to know! ;)
Bro, seriously though, good job. looks like mine minus the wood. My box is simply the insulating foam only and with the local temp drops I will soon be able to figure out how well the heating pads and temp controllers actually work. sorry folks too busy converting ethanol to methane to take photos of anything. :)
 
Yeah, you should see me swinging in trees using only my feet! Funny thing is, I almost edited my feet out of the shorts where they snuck in. I also didn't post the picks that had way more of my ugly feet!
the controllers you used??? got a link? (if i missed it i was drunk and thats my story).
 
Your photos and documentation style inspired me to try... It's just not one one my talents.
 
Bro, seriously though, good job. looks like mine minus the wood. My box is simply the insulating foam only and with the local temp drops I will soon be able to figure out how well the heating pads and temp controllers actually work. sorry folks too busy converting ethanol to methane to take photos of anything. :)
I think I saw your heating pads (although I can't find the post now), and they look pretty similar to mine. I've done a couple of tests of them on the aluminum plate and it doesn't get too hot too fast. I'm hoping 2 of the 12W pads is enough.
 
Your photos and documentation style inspired me to try... It's just not one one my talents.
I don't think I have any particular talent for this. In my case, the partners in owning the cabin (my brother and my sister) spend more time at the cabin than I do, but don't know what all the equipment is for or what to do with it. In addition, we are all over 60 now so the next generation will at some point have to assume responsibility for everything in the cabin, including the solar. So when I did the design of the solar in 2016 and installed it in 2017, I ended up writing a 46 page design document that walks through all the load analysis, NREL data, solar panel temperature coefficients, and everything else that drove us to the particular design that was installed, as well as how to do the settings on the SCC and Inverter.

So this time I need to do a similar document about the LFP upgrade. So once again I need to document all the temperature sensitivities of LFP and what I built to hopefully last the next couple of decades up there. That meant I needed to take a bunch of notes and pictures to help me put together the document.
 
I think I saw your heating pads (although I can't find the post now), and they look pretty similar to mine. I've done a couple of tests of them on the aluminum plate and it doesn't get too hot too fast. I'm hoping 2 of the 12W pads is enough.
mine will get their first real test in the next couple of weeks. the real question is will the temp controllers I am using cycle in a way that prevents overheating? I use two of the cheap controllers in series, one actually measures and cycles the pads, the second set is a high temp cutout in case the first one does not work properly. trying to avoid the old battery catching on fire routine that seems to be making the rounds by us third tier DIYers. We read all the stuff on forums like this and think we know what we are doing... (me included)
 
yep the thermostats.
The ones I ended up using were two of these:
https://www.amazon.com/gp/product/B076YD8H19

It's the 24V version of the thermostat that I think I've seen several people here on the forum use, but most use a 12V version.

Earlier (mid-2020) I bought one of these:
https://www.amazon.com/gp/product/B07GQPT9VG

That one would have worked fine and had some additional features, but because it worked in Celsius I figured that would add more complexity for anyone trying to deal with it. So I still have it, maybe for some future project.
 
mine will get their first real test in the next couple of weeks. the real question is will the temp controllers I am using cycle in a way that prevents overheating? I use two of the cheap controllers in series, one actually measures and cycles the pads, the second set is a high temp cutout in case the first one does not work properly. trying to avoid the old battery catching on fire routine that seems to be making the rounds by us third tier DIYers. We read all the stuff on forums like this and think we know what we are doing... (me included)
Your two thermostats in series is almost exactly what my system is set up to do. One thermostat sensor is on the aluminum plate the pads are attached to. The other one is measuring the temp on the top of the cells. You are right that if one thermostat fails, the other should prevent the batteries from getting too hot - Or at least that is the hope!
 
Back
Top