diy solar

diy solar

Hydraulic Crimper Review and Upgrade

highwater

New Member
Joined
Jun 21, 2022
Messages
13
Location
Oklahoma
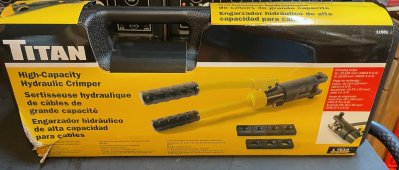
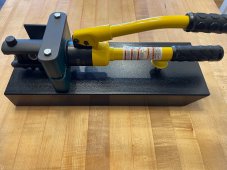
This is my experience thus far with the Titan 11981 Hydraulic Crimper.
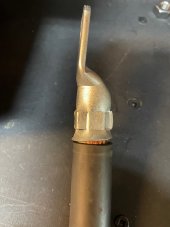
I settled on this one because it had the D frame, as opposed to the C frame, which I had heard of the C frame cracking its casting.
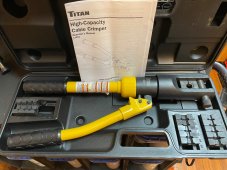
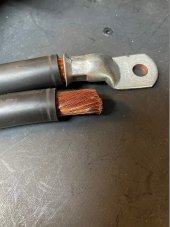
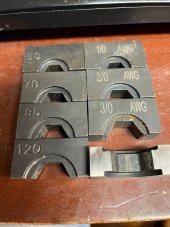
There are 8 hex die sets in the case, which will cover the bigger gauge wires.
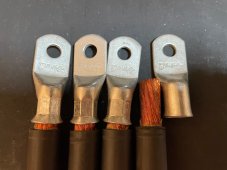
I have a ratcheting crimper for all the smaller stuff.
Randall
 

Attachments

  • IMG_1726.jpg
    IMG_1726.jpg
    559.9 KB · Views: 26
  • IMG_1724.jpg
    IMG_1724.jpg
    649.5 KB · Views: 25
  • IMG_1725.jpg
    IMG_1725.jpg
    202.2 KB · Views: 23
So far I have only made 8 crimps with the 2/0 dies, but I will be doing some 4/0 next.
The dies left no sharp swaging marks on the barrel of the cable end.
I did rotate 60 degrees just to make sure of a good crimp.
Randall
 

Attachments

  • IMG_1722.jpg
    IMG_1722.jpg
    533.5 KB · Views: 43
After those few crimps, I realized I needed a couple more hands.
You need to hold one handle with one hand, pump with the other hand, hold the wire in place in the terminal end, and hold the end in place while the dies come together.
I came up with a sort of bench mount to solve these mentioned issues.
Randall
 

Attachments

  • IMG_1775.jpg
    IMG_1775.jpg
    709 KB · Views: 32
  • IMG_1776.jpg
    IMG_1776.jpg
    160.6 KB · Views: 31
First I measured the barrel diameter.
This one was 2.215 inches.
If you want to do something like this, you will need an anti-vibration mount.
I had one in my extensive pile of crap, but this is what I would have got from the McMasterCarr candy store.
Randall
 

Attachments

  • IMG_1727.jpg
    IMG_1727.jpg
    922.1 KB · Views: 16
  • IMG_1723.jpg
    IMG_1723.jpg
    602.5 KB · Views: 17
I had to make the 2.25 inch clamp slightly smaller, so I made a sharpie mark around the mating surfaces, and cut them behind the line on the bandsaw.
This allows the clamp to squeeze the barrel of the crimper.
Randall
 

Attachments

  • IMG_1744.jpg
    IMG_1744.jpg
    198 KB · Views: 11
I ran into the same issue with needing more hands to hold it in place. Luckily the pattern on one of my trucks tailgate when opened was just right to sit the crimper into. Not as solid as what you made but worked.
 
Mine came with 4/0 Dies but I bought my kit from a local discount store.

But it still does at at least this Amazon.com seller Titan 11981 7.5 Ton Hydraulic Crimper

Otherwise, look at a similar looking one as there is nothing special about the "Titan" brand and it may even be made in the same factory as the other brands that look the same, yellow/black and 7.5+ Tons pressure.

You may also consider a model that goes to 12-15 Tons, as I've read once that force should be considered for 4/0 crimps. As well, the terminals make a difference as in my experience, not all AWG terminals or cables meet exact standard for circumference measures, so if the terminal is a little bit bigger than the cable or cable a bit smaller than the terminal, these dies may or may not do a great job, That's the one negative of using dies vs say a Temco dieless crimper. To increase my odds of no wings in die crimps, I try to only use the best quality, thicker walled tinned terminals and good quality cable, where Mfgs may be less likely to skimp on the materials.
 
I bought mine through my local NAPA store I share a zip code with.
Small rural area, and I try to support the only support we have close by.
I have done some more crimps this past weekend, and will post the 4/0 pics and story probably this coming weekend.
To get them on this old laptop and off of my phone, I have to email them to myself, then save them on the laptop.
 
Made 16 more 2/0 crimps, all good.

Started making 4/0 crimps and right away the 4/0 dies are not making satisfactory crimps.
The cable lug was loose on the cable after the die bottomed out.

I put the 3/0 dies in and got more squeeze than was probably needed.
It left the little knife edge (2 ears) where the dies meet.
Rolled the lug 30 degrees and re-crimped to get rid of the knife edges.
Made 8 4/0 crimps with the 3/0 dies.

I took the 4/0 dies and did some measurements with calipers and compared those, for surface area, with the dies in our industrial crimpers at work.
Looked up some dimensions and calculations on line for hexagons, and determined that I needed to take point 050 (50 thousandths) off of the ears on the 4/0 dies that came with the crimper. Put them on the mill and removed the .050.
Just laying the 3/0 and 4/0 dies on top of each other they look the same now, but I have not measured the 3/0 for its dimensions.

It appears the 3/0 dies are making a suitable crimp on the 4/0 lugs, as they don't twist or pull by hand.

Might need to make a pull test tool ?.
Randall
 

Attachments

  • 4_0_ears.jpg
    4_0_ears.jpg
    142.9 KB · Views: 20
  • 30_degree_roll.jpg
    30_degree_roll.jpg
    247.9 KB · Views: 20
I bought a hydraulic crimper like yours but metric (in error), so marked each die for the SAE sizes, with a sharpie.
Some of the dies were a little too lose, I carefully ground down the die faces a fraction to ensure they close tight enough on SAE sized wires.
I like your fixture to hold the tool, I admit I have been putting mine into a bench vise to hold it while crimping lol.
if you get sharp edges from the crimp - take them down smooth with a few strokes of a file before installing the heat shrink.
 
Yes sir,

The dies with my crimper come marked for metric and AWG (SAE), which I'm sure makes for a little (or alot) of tolerance.
I'm sure there is a chart somewhere with the surface area of each.
I think in the end, the last word on crimp correctness is a pull-test Mil-spec value.
The pull test stuff that I have looked at on-line are in the thousands of USD range.

I would still like to have a shop made something, to produce a value, that I could compare to correctness.

You can see the modification to the 4/0 dies in the pic.
Randall
 

Attachments

  • dies.jpg
    dies.jpg
    238.9 KB · Views: 13
I think in the end, the last word on crimp correctness is a pull-test Mil-spec value
Before I modified the faces of the dies, to allow the 4/0 to close a few thou further, the connections heated up during high amperage use. Pulling on the wire with the lug in a bench vise didn't show any problem. {(4/0 is 107 sqmm, not 120) edit.}
After modification to those dies, re-crimp/re-heat shrink, those same lugs do not heat up excessively.
Checking for heat generation is an easy test anyone can do with a laser temp sensor or just your hand if no other options.

Edit:
Actual metric size of AWG wires: (what I do with the metric dies)
4/0 = 107.2 mm^2 (grind down the 120mm die)
3/0 = 85.0 mm^2 (grind down the 95mm die)
2/0 = 67.4 mm^2 (70mm die seem to work okay as is)
1/0 = 53.5 mm^2 (50mm die works, some sharp edges sometimes - file them before heat shrink)
 
Last edited:
Back
Top