Installing MPP Hybrid Inverter 5KW
HV2-5048
Australia is 240 volt 50 hertz and my place is single phase. This model also suits India ,Germany and South America it says.
Cost $1156 AUD all up .(72c US conversion rate). Took 2 weeks to get to me.
I received this unit today with a little bit of knock around damage on the outside of the box but no damage to the Inverter as it is pretty well cushioned in dense foam. Handbook gives install details so into the install.
Comes with a CD that has Linux Inverter and battery monitoring program in Mac and Windows also. Installed the Linux 64 bit version . There is a 32 bit version too.
That installed and started fine so now to the inverter wall fitting . I already have my battery set up as 2 strings of 24 volts with appropriate BMS’s and active balancers on each so the first job is to get my solar panels on the roof and connect them to the inverter .
This unit will take up to 24 normal 250 watt panels in 2 strings for a total of 6000 watts PV input , 6KW. Well I think I have about 18 spare so that will have to do.
It will operate without a battery if needed and will feed into and take from the grid if needed. So while the sun is shining I can draw up to 27 amps of 240v and run my stuff without battery attached. I can feed the grid if I want also during the day. So logic says buy whatever solar panels you can first ,install them , buy this inverter and you are producing your own power daytime . Add batteries and the grid if you want them later. A small cheap battery bank will do to run light and TV at night. Anything you can cobble together to get to around 54 volts.
It has an inbuilt charger so if a battery is attached it will feed solar charge or utility charge into it at a rate you can set in 10 amp increments up to 80 amps. Handy if you have a small battery attached that can only take say 20 amps . You can limit the charge to 20 amps.
The software and manuals are all available on the web at
MPP Solar Inc » Download Center
 www.mppsolar.com
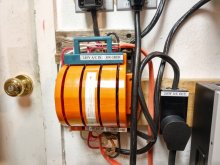
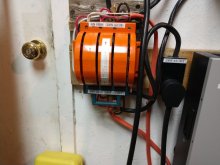
Put up on the wall and ran cables to the battery . Heavy guage AWG2 wires specified but I had some old insulated heavy copper about 5 mm diameter copper cross section and that will have to do for now. Crimped on some lugs with about a 7mm hole and they worked well. I have a small insulated shifter but you may as well buy yourself a screwdriver handle type driver to suit a 10mm socket too as everything I meet seems to have 10mm nuts . With a screwdriver hand tool you won’t over-tighten and strip them. Insulate it with Heat shrink to avoid shorting terminals . I have a boat swage tool for crimping but have just ordered the hydraulic crimper type for $25 AUD on ebay.
I wanted to check the inverter was working properly so I connected up the 240 volt grid input to the A/C input point . With nothing else connected ,no battery , no solar PVs, no A/C output and inverter switched off, I turned on my other 24v inverter supplied a/c at the plug. It fired into life and gave me a flashing warning that said “6P”. That worried me a bit but I had a look through the menu and saw that it showed A/C coming in in standby mode so I switched the inverter on. That showed that the unit was ready to supply A/C out and I heard the relays click on. Showed 230 volts in and out because my present 24v inverter was putting that out.
Turned out on reading the manual “6P” was “bP” which was simply telling me the battery was not connected ,so all was well.
On to getting the solar panels up and then connected.
I have a couple of panels on the roof and I’ll put 4 more up so 6 in one string should give me a start at least 30v each approx by 6 of = 180v. The MPPT voltage starts at 120 volts input so that will do for now .Better fix the roof before I put the rest of the panels up. This at least will allow me to change over from 24v to 48v and continue to have solar power available in the house. In Battery I’ll only have 100Ah at 48v so I’ll have to secure another string of 16 100Ah cells and BMS etc in the near future before China stops all trade with excessive tariffs.
Also I have a 16s BMS but Ill leave the two 8s BMS’s attached to each half for now and see if that causes any unforeseen problems. In operation the second in line BMS does not like that arrangement. I don’t know why but I bypassed that BMS for now.
When thats all done the system should supply about 27 amps of 240 volts as advertised but in the meantime I will gradually work up.
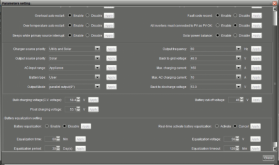
Settings time .
The settings I will change for my use in Australia are:-
01 sbu Solar/Battery/Utility
03 240 My voltage out needed
05 lbu Load/Battery/Utility
09 g|-d Grid disabled..default
10 oso Solar to battery only
11 20 Max charge amps atm
14 use User set battery
17 54v c/v voltage
18 53v float
19 48v low dc battery cut off (this is as high as it goes)
20 48v cut battery disharge
21 53v battery stop charging when grid available(?)
All the rest are left at default.
I’ll see what needs adjusting in operation . I took the float up to 54v temporarily to top up my batteries which were down a bit .
Well, put up 6 panels first as its full summer here and hot on the roof. Input is about 200 v so its fine to test . Current coming into battery was about 10 amps with a clamp meter so I’ll need to look at this as the amps out of the panels all in series should be 8 amps and if MPPT is actually happening then you would expect to get 16 amps or so charging but battery was filling up so maybe not.
Connected PV and also battery in 48v configuration . All running fine
It does not seem to have a wi-fi connection just USB and RS-232. Ill have a look at the supplied program when I get a longer usb lead.
Anything else related to the install I’ll tag on here.
It is very bright at night (I found you can turn off the backlight in the software ) and there does not seem to be any adjustment ,also the fans run all the time so its noisy at night . There is no adjustment on that either so this is best placed away from your sleeping areas.
The password to get into the software is “administrator”.
For more on LFP,LiFePo4 see here
On your battery, have a look at the discharge curves below to help understand at what voltage your cell is full and what voltage is empty.

")