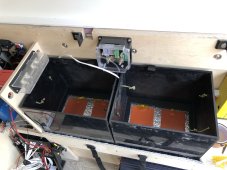
For those trying to heat smaller cell packs, here's a heating pad test we did on a 4s 200ah pack (8.5" x 8" x 6.75") that some may find useful.
We applied a pair of 3x4" 12v 25w (6 ohm) silicone heating pads directly to the cells, on both, long sides of the pack (total 4 pads). Wired them series, parallel which dropped the total current for all 4 pads to 2.2a (26w) at 13.6v. With all 4 pads wired in parallel, they got too hot to comfortably hold, approx. 160f, and drew almost 9a of current. Two pads in series, approx. 120f (1.1a).
Used a power supply to power the pads for this test. As for future plans, haven't decided whether to power the pads via the heating port on a JBD 200a BMS or use a separate thermostat.
Temp sensor for the cells was located on the top, center area of the pack, in between the 2nd and 3rd cell.
Placed the cell pack (with the 4 heating pads active) inside a generic, plastic Group 24 marine-type battery box (with a top attached) and *no* insulation, outside around 10pm. Outside temps 8f. Cell temps 64f. 8 hours later, outside temps had dropped to (zero) 0f. Cell temps had only dropped 2 degrees to 62f. An IR gun confirmed cell temps on all four sides and top.
Wanted to confirm these 4 pads would heat the cells low and slow using minimal current, and give us the capability to safely charge the cells in sub-zero (<0f) temps. For us, this test was a pass on both counts.


")