diy solar

diy solar

Lishen 272 Ah Top Balance and Capacity Test

Inq720

Odysseus, expert on the Siren's call
Joined
Nov 25, 2020
Messages
142
Location
North Carolina Mountains
Trying to be as thorough as possible, I've Top Balanced and Capacity Tested my first battery build.

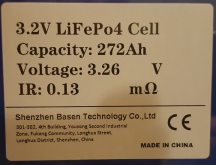
I received the cells on 2/11/21. My cells did not come as consecutive numbered items (see table below). I'm assuming this is a sign that they were hand-selected as being similar to each other as all other parameters where identical on the stickers.
1613352619092.png
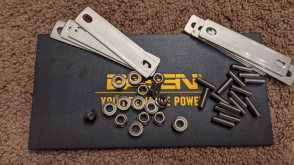
Many who purchased 272 Ah cells in the same time frame as I received cells labeled as 280 Ah cells. My cells arrived with better hardware - studs and serrated nuts.
1613353715916.png

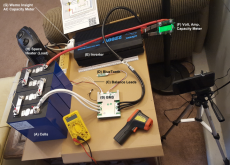
Here is the setup for the capacity test.
1613354422740.png

Here are my list of cells, and voltages out-of-the-box, after Top Balancing and after shut-off of the Overkill Solar BMS with default settings.
1613354108071.png
After setting up for the capacity test, I drained the batteries to the normal 100% capacity value of 13.3 volts from the Top Balance value of 14.5 volts. Since there is very little energy in this area of the curve, it didn't take long. 3.9 Amp-hours were drained. The capacity meter was reset. I was able to find a combination of loads that gave me 0.2C or 54.4 amps via a Giandel 2200 watt and a space heater and several incandescent and LED lights.

The test ran till the BMS kicked out. The results are:
275.2 amp-hours
3513.4 watt-hours
5:06:18 of time


I'd say that's pretty close to a 0.2C test as I'll ever be able to do again!
Would anyone have any issues with the variability of the voltages in the chart above? Thanks.
 
Last edited:
I find nothing unusual in the voltages and how much they diverge. At the top and bottom, just one or two amp hours difference in capacity gives you "runners ". Especially for commodity cells, this is expected. My 280AH Eve cells give a battery pack capacity of 274AH, so you got your money's worth.
 
What’s the rationale for discharging the cells a little after top balancing and before capacity testing? Why wouldn’t you want those 3.9Ah to be part of your measured discharge capacity instead of discarding them before the test began?

Also, you said you started discharge from 13.3V, which is 3,325V per cell. I assume that must be a typo, but what was the right number, 14.3V? Do you know what voltage the BMS terminated the test at?

Your voltage variation probably isn’t going to cause you issues. Maybe 269196 has a little more self discharge, or perhaps it’s just older than the other cells. All four of the Lishen cells I received arrived at 3.25V
 
Trying to be as thorough as possible, I've Top Balanced and Capacity Tested my first battery build.

I received the cells on 2/11/21. My cells did not come as consecutive numbered items (see table below). I'm assuming this is a sign that they were hand-selected as being similar to each other as all other parameters where identical on the stickers.
View attachment 37167
Many who purchased 272 Ah cells in the same time frame as I received cells labeled as 280 Ah cells. My cells arrived with better hardware - studs and serrated nuts.
View attachment 37169

Here is the setup for the capacity test.
View attachment 37172

Here are my list of cells, and voltages out-of-the-box, after Top Balancing and after shut-off of the Overkill Solar BMS with default settings.
View attachment 37170
After setting up for the capacity test, I drained the batteries to the normal 100% capacity value of 13.3 volts from the Top Balance value of 14.5 volts. Since there is very little energy in this area of the curve, it didn't take long. 3.9 Amp-hours were drained. The capacity meter was reset. I was able to find a combination of loads that gave me 0.2C or 54.4 amps via a Giandel 2200 watt and a space heater and several incandescent and LED lights.

The test ran till the BMS kicked out. The results are:
275.2 amp-hours
3513.4 watt-hours
5:06:18 of time


I'd say that's pretty close to a 0.2C test as I'll ever be able to do again!
Would anyone have any issues with the variability of the voltages in the chart above? Thanks.
I would test again and let us know what your delta is at the top when fully charged and same with the bottom when fully discharged with no resting period at the bottom. And if you do another capacity test, charge the cells fully, let rest for at least a half hour, then discharge using you full load so we know the total ah's when the BMS cuts off.

BTW, glad you finally received the cells in good condition. :)
 
What’s the rationale for discharging the cells a little after top balancing and before capacity testing? Why wouldn’t you want those 3.9Ah to be part of your measured discharge capacity instead of discarding them before the test began?

Also, you said you started discharge from 13.3V, which is 3,325V per cell. I assume that must be a typo, but what was the right number, 14.3V? Do you know what voltage the BMS terminated the test at?

Your voltage variation probably isn’t going to cause you issues. Maybe 269196 has a little more self discharge, or perhaps it’s just older than the other cells. All four of the Lishen cells I received arrived at 3.25V
I found Nordkyn design blog to be more thorough about explaining the "whys" things are done and got it from there. Those numbers (13.3V / 3.325 per cell) were from it. His concern seemed to be more about it being very hard on the cells leaving it at such a high value. From a more practical point of view, I know my BMS default values for LiFePO4 are lower than 14.6V (3.65 per cell) so when charging, the BMS will kick out before the battery reach that 14.6V. Only when doing a Top Balance. I'd rather know what is the "normal" 100% capacity. I reported that little Top Balance part here just to be thorough in case other people feel it should be included... they can. For me, the 275 amp-hour number will be a day-to-day expectation... at least at 0.2C discharge.
 
Just FYI of my replacement LISHEN 272Ah that I just received.
 
I would test again and let us know what your delta is at the top when fully charged and same with the bottom when fully discharged with no resting period at the bottom. And if you do another capacity test, charge the cells fully, let rest for at least a half hour, then discharge using you full load so we know the total ah's when the BMS cuts off.

BTW, glad you finally received the cells in good condition. :)
I unfortunately dozed off and didn't catch the BMS shut-off. I'd have liked to get those cell values at shutoff. :rolleyes: I'll just have to assume, one of the cells reached the Overkill Solar's pre-defined limit. I'm going to now charge them through the BMS and let it cut them on the high end. I'll report the cell values then... I'm assuming with the 30V/10A charger, it'll be like... a while. :cool:

As a side note, I checked temperatures during discharge... nothing real systematic. The batteries never got above 69F for the first hour and frankly when they reached 72, I believe that was mainly from the room being heated by the space heater. :p Likewise, the Overkill Solar also never exceeded room temperature. Only the Inverter heated up. It finally started sporadically cycling the fan for a few seconds in the third hour. Before that, dead silence! This is going to be a VERY nice electrical system for my boat.
 
What size lug did you use to crimp all 3 of the BMS wires into? One sized for 4 awg?
I opted for Overkill Solar to put those on (option on their order form) since I don't have something big enough to crimp something that big. I also opted for the 8 gauge wires. I want it to run as cool as possible. You'll have to email Overkill Solar. They're very responsive.
 
Last edited:
smileyman57 - You will not be able to terminate 3ea 8AWG wires in a 4AWG lug very effectively. The cross section of the 4 AWG lug is too small to accept the cross section total of 3ea 8 AWG wires. roughly 21 mm2 versus 24 mm2.

A 3 AWG lug is the closet fit but those are a bit of trouble to find. I used 2 AWG lugs ( easy to fit ALL of the 8 AWG cables i) then crimped it in my hydraulic crimper with a die one size smaller than for 2 AWG........ You should crimp slowly and may need to rotate the crimp ( I did not need to do so) to keep from forming "ears" on the lug ( over crimped).

I then potted the crimped wire/lug with solder, shrink wrap and done. The best way is to have Overkill do this for you if you want lugs......but you can do it yourself.
 
What size lug did you use to crimp all 3 of the BMS wires into? One sized for 4 awg?
I just wired a BMS up with 2AWG lugs to test the connection (3 x 8awg leads). I used the tempco die-less crimper linked below. The 2awg lugs are a little bigger than I'd like, but the connection seems very strong and I don't think there is any way to fit the wires into a 4AWG lug. I tried pulling with all my strength and it didn't budge. I think I'm going to go this route without soldering them.


smileyman57 - You will not be able to terminate 3ea 8AWG wires in a 4AWG lug very effectively. The cross section of the 4 AWG lug is too small to accept the cross section total of 3ea 8 AWG wires. roughly 21 mm2 versus 24 mm2.

Ok thank you. I think I have roughly the same BMS as the OP (https://www.lithiumbatterypcb.com/p...munication-with-60a-to-120a-constant-current/), but I have 10 ga wires instead (3 of them).
For some reason it didn't click in my brain to look up the cross section area.
10ga looks to be ~5 mm2 so I think a 4ga might still work for me as it is ~21mm2 like you stated.

I have my stuff on order, just trying to get as much in hand before everything gets to me.
 
After setting up for the capacity test, I drained the batteries to the normal 100% capacity value of 13.3 volts from the Top Balance value of 14.5 volts.
For a lifepoe 4s battery capacity test the low voltage cutoff is 10 volts or 2.5 volts per cell.
Max charge voltage is 14.6 volts.
 
I opted for Overkill Solar to put those on (option on their order form) since I don't have something big enough to crimp something that big. I also opted for the 8 gauge wires. I want it to run as cool as possible. You'll have to email Overkill Solar. They're very responsive.
Overkill is great with that value add of replacing the wires and crimped connections. One suggestion for those who have crimpers is the m6 terminal connections, this allows you to create your own custom length cables and crimp on your own connections. If I was buying one, that's what I would select (but I have a crimp tool already).
 
Overkill is great with that value add of replacing the wires and crimped connections. One suggestion for those who have crimpers is the m6 terminal connections, this allows you to create your own custom length cables and crimp on your own connections. If I was buying one, that's what I would select (but I have a crimp tool already).
I completely agree! As I'd like to put them in a case with the cells, it is proving difficult to bend (6) 12" #8 wires to my will. ;)
It came down to... my Inverter came with the next biggest wires already pre-crimped and everything else I need will be AWG12. Instead of buying a hydraulic crimper for 2 crimps, I just said <bleep> and let Overkill do it. They are very nicely done.
 
Overkill is great with that value add of replacing the wires and crimped connections. One suggestion for those who have crimpers is the m6 terminal connections, this allows you to create your own custom length cables and crimp on your own connections. If I was buying one, that's what I would select (but I have a crimp tool already).
I used my own 10 awg wires from the terminals back to a terminal block.
Then I trimmed and connected my balance/sense leads to the terminal block.
Works fine but I worry about a short at the terminal block.
Will apply Kapton tape liberally.
22 awg are basically there own fuse, with 10 awg not so much.
If I were to do it again I would use 12 awg and wago 413s so that I wouldn't have to disconnect the balance leads to use a charger or resistor on a cell.
 
Last edited:
I've finished charging the batteries back up. I charged them till the Overkill Solar BMS shut off at its default values. That value is 3.65V. Unfortunately, again... I was not present at the shut off. After resting for some indeterminate time, the battery is at 14.1 V with the cells at the following:
1613515696948.png

I was under the impression, these should have returned to the value at the top by themselves. And if that wasn't achieved, the BMS should have brought them back to balanced values. Are these numbers reasonable and if not, what should I do to correct this?

VBR
 
I've finished charging the batteries back up. I charged them till the Overkill Solar BMS shut off at its default values. That value is 3.65V. Unfortunately, again... I was not present at the shut off. After resting for some indeterminate time, the battery is at 14.1 V with the cells at the following:
View attachment 37297

I was under the impression, these should have returned to the value at the top by themselves. And if that wasn't achieved, the BMS should have brought them back to balanced values. Are these numbers reasonable and if not, what should I do to correct this?

VBR
There is this dude on YouTube and this forum called offgrid solar garage... he basically charged the cell individually using alligator clips to get around the bms shutting off based on the highest cells voltage... so maybe the 3.439 could be charged up using alligator clips to raise it closer to the other etc


What kind of boat do you have? My dream someday is to live on a cat and sail the world
 
How did you top balance?
How long did you hold at 3.65 and what were the amps going in when you stopped?
How long did you leave them connected in parallel before you disassembled and made them into the final pack?

I think its best practice to leave them in parallel after top balancing for 24-48+ hours while they settle.

To compare to my 272ah Lishen pack that I'm only charging to 14.1 and discharging to 11v with a 58A load.
After charging and resting for 1hr - 3.504 / 3.463 / 3.504 / 3.499 total 13.98v
After Discharging and 1hr rest ----- 3.045 / 3.035 / 3.040 / 3.035 total 12.14v
Victron smart shunt read 275.6ah
I have charged to 14.25 once and had over 0.100 difference during the charge at that voltage.

My pack I had left together in parallel for over a week after the first top balance, but topped it off and only waited 1-2 hours after that before I made them into a pack and I'm thinking I should have left them together longer to settle. I will test that theory when I build the second pack.

In my opinion those numbers are not unreasonable at that high of a voltage but likely could be improved some if it bothers you.
 
I've finished charging the batteries back up. I charged them till the Overkill Solar BMS shut off at its default values. That value is 3.65V. Unfortunately, again... I was not present at the shut off. After resting for some indeterminate time, the battery is at 14.1 V with the cells at the following:
View attachment 37297

I was under the impression, these should have returned to the value at the top by themselves. And if that wasn't achieved, the BMS should have brought them back to balanced values. Are these numbers reasonable and if not, what should I do to correct this?

VBR
The BMS will cut off charge once the first cell reaches the cutoff value. If you didn’t top balance the batteries prior to installing the BMS, it may take some time for the BMS to get them balanced. Might just be better to put them in parallel for a day and let them balance Themselves. What’s the internal resistance of each cell?
 
Back
Top