diy solar

diy solar

Looking for light weight racking material to build my own racking system.

View attachment 111187View attachment 111188View attachment 111191
I went with 2”x1/8” angle iron, for me welding is an option, not adjustable but light enough to get on the roof. So far I am happy, it took about 140lbs of angle iron to support 6 panels, probably could have used 1 1/2” angle iron. Oh well, I feel like it is plenty strong.View attachment 111195
Would you show how you physically attached the panels to the angle iron? I can buy Angle Iron at wholesale - might be easiest option. Thanks
 
I just layed the solar panels face down on my shop floor, and layed the angle iron across the panels where the mounting holes are. Thn I marked the holes onto the angle iron with a piece of chalk, tack welded the angle iron while it was still on the panels. Then I flipped over the angle iron,9FF7E3FE-7260-49BB-A2C3-3B97E702315C.jpeg welded more, and drilled 1/2” holes through the chalk marks.
 
A shipping container job a fellow crane op dropped off at my shop for a couple weeks. In my spare time I fabbed the adjustable mount onto it's roof (tilts not only for summer/winter, but flat) and installed the inverter, batteries, etc. inside. He's also a urathane foam contractor and had already sprayed it inside. With everything working, he made the 80 mile trip with his big gooseneck trailer, and I loaded him up with my crane. Then at the remote site overlooking the Snake River, he used his crane (big boom truck) to off load it onto prepared pilings and had power minutes later. That was 12 years ago, still all good. I use plain old readily available anywhere common sizes of steel angle for eveything. Two coats of Rustoleum rusty metal primer, no finish coat needed, done. If I'm feeling anal-compulsive about dissimilar metal corrosion, I'll use stainless washers between the steel and the module frames, though the anodizing makes that a non issue in my experience. All stainless hardware, though probably not needed in our dry mountain area. No engineering, luckily I did this before the inspectors started demanding engineered systems! That's why I got out of the business, it was just a sideline anyway.
 

Attachments

  • 5-15-14 007.jpg
    5-15-14 007.jpg
    269.5 KB · Views: 32
This past July, we put up a Gazebo made of angle irons and square tubes. It said "Heavy Duty". I live in NC. We put it up on Saturday. On Monday a thunderstorm popped up and the angle irons were bent like bananas in under 10 minutes. The bases I had pounded in to hold them down stayed in the ground but the steel folded in the middle when the wind caught the tarp. Good luck!
 
2 KW Unistrut based Pole Mount. It was originally sized for smaller array. I rebuilt it to hold a slightly larger array. The Poles are rectangular tubing poured in large block of concrete. The array pivots on 3/4" stainless rod. I manually set the angle once a quarter. I built it solo. Putting the panels on is interesting. I would flip the array forward, install a panel, then flip the array facing north then install a panel and then flip it back. The panels are bolted through the frames using strut nuts. In order to keep corrosion from occurring between the strut and the panels, I bought UHMW sheet and cut some "c" shaped washers and slipped them between the strut and the panel frames.

I have one corner brace installed year round but in the winter I install a second one on the other corner. I can change the array angle in about 10 minutes.

I stuck with using standard single channel strut as I had lost my source with a discount at an electrical house so I bought standard channel at Home Depot. Unistrut makes double and triple depth strut that would simplify the installation but unless someone has contractors discount its quite expensive to special order.

View attachment 100171View attachment 100172
Very nice setup. Thank you for sharing it.
 
I was watching the YouTube Chanel “Ambition Strikes”. They put a big array on a shipping container- it tilts for summer &winter. They welded it together.

Good Luck!
That is what I had in mind. We already have the 20' container that I plan to use. I want 12 panels on my array. However, I was making my setup way more complicated than it needed to be. After seeing their setup I'm leaning towards using larger pipe to allow the array to pivot vs the Pillow Block Bearing setup I was thinking of going with.
 
Last edited:
That is what I had in mind. We already have the 20' container that I plan to use. I want 12 panels on my array. However, I was making my seyp way more complicated than it needed to be. After seeing their setup I'm leaning towards using larger pipe to allow the array to pivot vs the Pillow Block Bearing setup I was thinking of going with.
Think "pipe within a pipe" for allowing it to swivel. Playing around with various diameters and wall thickness can get you the right combination, otherwise I have laid a pipe in a length of channel iron that cups the pipe, then you just need a way to clamp it.
 
Think "pipe within a pipe" for allowing it to swivel. Playing around with various diameters and wall thickness can get you the right combination, otherwise I have laid a pipe in a length of channel iron that cups the pipe, then you just need a way to clamp it.
3" sch 40 pipe frame with 5 pieces of 3-1/2" sch 40 pipe sleeve for the bearing, harbor freight winch to change angle, 2" square tube for cross pieces.......stout as hell.
 

Attachments

  • panel mount.jpg
    panel mount.jpg
    583.9 KB · Views: 57
Why not use a Sinclair rack or Powerfield PowerRacks? So much easier and I dare say, cheaper.

I may use some components of a company's racking system. However, I'm mounting it on the top side edge of a shipping container, as a tilt system. So I have to make it all work for my setup and needs.
 
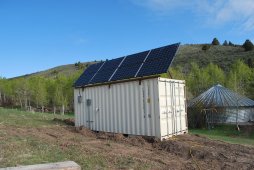
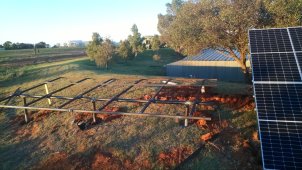
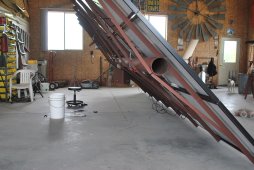
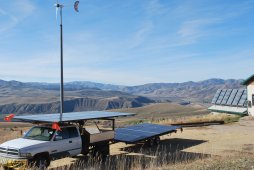
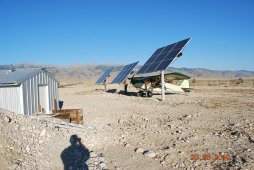
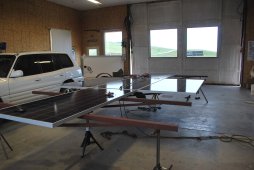
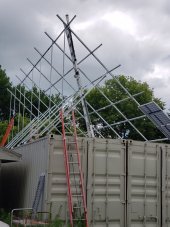
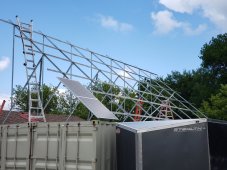
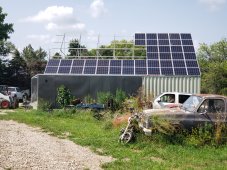
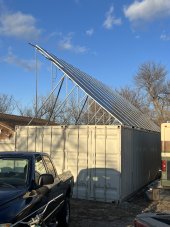
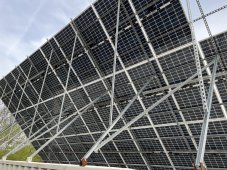
Hit the local scrap yard for used steel, especially pipe. I have built over 50 12 module racks using this design, delivered them hundreds of miles to three different states, no failures in over 20 years, all using locally sourced material, used and new steel, so for sure less expensive then "store bought". I had many customers run the numbers, over me delivering this racked and quickly mounted array, over them buying store bought, paying freight, having to assemble and mount the module piecemeal, the cost difference was huge! I sold the PV 15% above my cost, the real money was in the racks fabrication, while still being the best bang for the buck. This also meant I could do 90% of the work in my home shop, at my own pace and when i felt like it, not repeated travels to a job site. One huge advantage, for me anyway, was I could lift the array with my boom truck with all the modules on it and prewired. No awkward work installing them on the rack off ladders or scaffolding. I used 6 to 8" sch pipe for the cross arm, 2" x 3/16" angle, and 1 1/4" x 1/8". All the lengths worked out almost perfect, meaning almost no scrap left over from standard lengths. I was knocking these out in a easy day, by noon the next day they were ready to truck to my job site and set on the already installed 8" pipe. I could be "in and out" in a couple hours if it was all prepped correctly. It was a good little sideline biz, increasing regulations put an end to it "we need to see engineering on that rack, or you need to buy an engineered rack and attach it to your un-engineered rack." That did it for me, I'm out! Mine had nothing not needed, most of the homebuilt racks I see are way overbuilt and very "busy," lots of pieces..., but most work just fine, no need for store bought unless you need it engineered.
 

Attachments

  • 5-30 011.jpg
    5-30 011.jpg
    291.9 KB · Views: 53
  • 5-1-15 001.jpg
    5-1-15 001.jpg
    852.8 KB · Views: 53
  • catto 2 008.jpg
    catto 2 008.jpg
    575.9 KB · Views: 54
  • DSC_0343.JPG
    DSC_0343.JPG
    622.1 KB · Views: 54
  • 7-9-14 012.jpg
    7-9-14 012.jpg
    258.4 KB · Views: 54
I'm in the desert just outside of Twentynine Palms, CA. I have yet to find a scrap metals place within 60 miles, even in Palm Springs/Desert Hot Springs. I bought four 14 ft lengths of aluminum PV mounting frame from Solar Penny over in Mesa, AZ one time while in that neighborhood, then realized I really need a total of 12 of them, 160-feet altogether. (I would also need about 40 - 50 more PV clamps.) When I went back, the guy had gone outta business. So I've been trying to figure out what else to use instead. I want to mount 20 250W panels flat on my 40-foot shipping container, no tilting, so that's simple, right? But where to get channel, other than spending through the nose for unistrut from HD? I haven't done welding for more than 40 years, and only a tiny bit even then, so I'm not at all proficient in welding at all (and I don't have a welding outfit right now, anyway). But I do have a local guy who could probably be enticed to weld schtuff for me, although his welder isn't very powerful. To date, everything here is totally off-grid, powered by four PVs laying on the driveway, charging six UT1300 105 A-hr batteries, driving a borrowed 3 kW 120VAC inverter. Getting the 20 panels on the container will allow me to set up a pair of EG-4 all-in-ones with two 48V battery banks for split-phase 240VAC; read: moah powah 8-D
 
I used single channel Unistrut mounted on top of 2 40ft long shipping containers. The whole Unistrut frame is about 40ft x 20ft. It has survived several 90mph wind storms and pivots on the bottom, so I can integrate a tilt mechanism later if I want to.
 

Attachments

  • 20210707_162553.jpg
    20210707_162553.jpg
    179.4 KB · Views: 30
  • 20210707_162620.jpg
    20210707_162620.jpg
    308.2 KB · Views: 31
  • 20210718_153007.jpg
    20210718_153007.jpg
    501.7 KB · Views: 31
  • IMG_0145.JPG
    IMG_0145.JPG
    184.1 KB · Views: 31
I used single channel Unistrut mounted on top of 2 40ft long shipping containers. The whole Unistrut frame is about 40ft x 20ft. It has survived several 90mph wind storms and pivots on the bottom, so I can integrate a tilt mechanism later if I want to.
Nice piece of strut work. I see the diagonal bracing on the center supports but expect you could stiffen thing up a lot by putting in two bays of diagonal bracing on the top vertical supports. With unbraced tall slender supports like there is now My guess is that top edge is kind of floppy. Locally generated turbulence could make that move aroung more than I would be confortable with. What is your approach to isolating the struts from the aluminum panel frames?.
 
Nice piece of strut work. I see the diagonal bracing on the center supports but expect you could stiffen thing up a lot by putting in two bays of diagonal bracing on the top vertical supports. With unbraced tall slender supports like there is now My guess is that top edge is kind of floppy. Locally generated turbulence could make that move aroung more than I would be confortable with. What is your approach to isolating the struts from the aluminum panel frames?.
There are supports that go from the top straight down and from the center 45 degrees back. Then there are diagonal braces between a few of the center supports to prevent side to side motion. The strut is plenty strong without that top support, its function is only to prevent movement up and down which prevents everything from flexing. The whole structure is rock solid now.
 

Attachments

  • 14BB111E-3A1B-4D6B-B27F-3316032679E1.jpeg
    14BB111E-3A1B-4D6B-B27F-3316032679E1.jpeg
    607.5 KB · Views: 9
as cheap as panels have gotten just flat mount one array to the top and one to the south side. cut unistrut into 6" pieces, blob some np1 sealant under it, drill it down with neo washered tek screws,(metal roof screws) and anchor the panels to it with 3/8 strut nuts bolts and washers. that how we did my brothers 44kw array. easy peasy. you'll end up spending more on an adjustable array mount than 2 arrays flat mounted. in the winter the side array will produce the most and in the summer the top one will.
Barn_Panels_550x.jpg
 
I agree with that, and since i never priced it new before maybe a hear ago i have to wonder if unistrut didnt used to be MUCH cheaper, because as much as i love it it seems pretty pricey to build anything large out of it.
 
Back
Top