You have a bit of confidence in your work!!
I wasn't going to put it that way, But, yeah.
You have a bit of confidence in your work!!
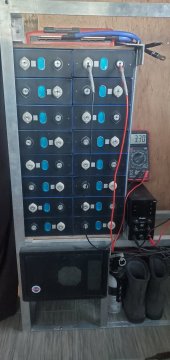
I will definitely have access to the cells. I just won't be pulling the batteries out as a whole 150lb unit. I totally agree that checking connections and how secure things are staying is critical. Especially in the first year of use.Access to the cells after the initial install could be helpful. I verified that all my connections were still tight. I did this a few times in the first year. Now I'll be doing it once a year.
I was searching for the exact same thing this morning! I also messaged Jenny Wu, who I ordered my cells from, to ask about recommended torque specs for the studs they welded to my 230ah battery terminals. Tekton has a 1/4" torque ratchet, 10-150 in-lbs that looked like a good fit, but curious what HRTKD used also.For @HRTKD what torque wrench did you use for the nuts? I hear things like bicycle screwdriver torque wrenches, but I don't see a recommendation for a torque wrench on Will's website.
I may have a torque wrench like (Tecton 20-200 in LNS), but I have had a but of a problem with my aluminum engine car with nuts bolts stripping out when I use larger torque wrenches. This happens with three wrenches I have. Bit frustrating. So far the smaller Tecton has not given me issues.I was searching for the exact same thing this morning! I also messaged Jenny Wu, who I ordered my cells from, to ask about recommended torque specs for the studs they welded to my 230ah battery terminals. Tekton has a 1/4" torque ratchet, 10-150 in-lbs that looked like a good fit, but curious what HRTKD used also.
This was the lightest, most sensitive one I found. I was also looking for something really able to regulate small loads, like the 1.2 Nm recommended by Victron for the AC connections. It's really hard to find a torque wrench with that level of sensitivity.I may have a torque wrench like (Tecton 20-200 in LNS), but I have had a but of a problem with my aluminum engine car with nuts bolts stripping out when I use larger torque wrenches. This happens with three wrenches I have. Bit frustrating. So far the smaller Tecton has not given me issues.
I may have a torque wrench like (Tecton 20-200 in LNS), but I have had a but of a problem with my aluminum engine car with nuts bolts stripping out when I use larger torque wrenches. This happens with three wrenches I have. Bit frustrating. So far the smaller Tecton has not given me issues.
Link did not work for me but looked up what I think you posted. Can you confirm this is the link:I use a 1/4" digital torque wrench that goes down to about 12 in-lb. As I recall, I used 20 in-lb, but my recollection is a bit fuzzy. 4 nm is the max that most people recommend and I stayed well under that. So far, my terminal screws (not posts with nuts) have stayed good and tight with no lock washers or thread locker.
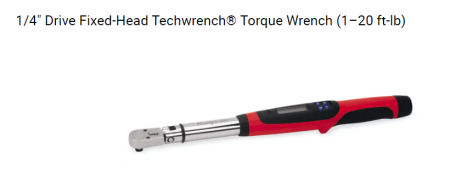
Link did not work for me but looked up what I think you posted. Can you confirm this is the link:
View attachment 74107Snap-on Store
shop.snapon.com
Used to be I worked in a shop we sent our torque wrenches off to be calibrated. I don't have that type of equipment in my garage. Someone suggested hanging weights tied to it while in a vice. That sounds good, but don't have a set of weights lying around nor a vice.
That's a beautiful wrench. Too beautiful for my budget unfortunately. I think I'll likely have to go with the $47 Tekton and hope for the best. At least it appears to be relatively sensitive with a range of 10 - 150 in-lbs. It beats just putting a finger in the wind as I'm tightening things, but in no way as accurate as a digital unit.Yes, that's the one. My brother is a Snap-On dealer. If I need my torque wrenches calibrated then I'll have him send them back. As infrequently as I use them, I doubt I would need to calibrate them for quite a few years. He has a simple test device on his tool truck that can be used as a quick validation. I should try my 30 year old Craftsman 1/2" torque wrench on that just to see how close it is.
That is what I have been using. For a long time I was not using a torque wrench, but got some with welded studs and bought one. That one is relatively easy to use.This was the lightest, most sensitive one I found. I was also looking for something really able to regulate small loads, like the 1.2 Nm recommended by Victron for the AC connections. It's really hard to find a torque wrench with that level of sensitivity.
I just received my OverKill 24v boards and they have both terminals bonded together on the board themselves. I doubt it is cause I ordered the M6 stud option as the board has the trace connecting the two leads, not on the stud mounts. Maybe that is a new version, they didn't want the option for only one contact to be used?The reason is that on the BMS the management of the current through the BMS is split between two sets of MOSFETs, just to reduce the current load on any one set of MOSFETs. So your battery negative does to both of the two B- leads, and then the loads and chargers go into the two P- leads.
I am looking at the wrench, did you pick one up?This was the lightest, most sensitive one I found. I was also looking for something really able to regulate small loads, like the 1.2 Nm recommended by Victron for the AC connections. It's really hard to find a torque wrench with that level of sensitivity.
I have one. I like this one better:I am looking at the wrench, did you pick one up?
I have both, just stating my personal preference.I have not had luck with beam torque wrenches. The resting position always tends to drift from 0, and unsure if it its accurate.
I did. I've used it to build my battery bank and it's worked really well. I've no idea how accurate it is, but I set it to 7Nm of torque for the battery terminals, as recommended by Docan Power for my EVE cells with laser welded studs, and the nuts are tight and no damaged studs. I guess that's mission accomplished.I am looking at the wrench, did you pick one up?
