


You are using an out of date browser. It may not display this or other websites correctly.
You should upgrade or use an alternative browser.
You should upgrade or use an alternative browser.
Making a Dual Axis Tracker
- Thread starter jasonhc73
- Start date


oudin_coil
New Member
- Joined
- Jan 20, 2020
- Messages
- 18
A solar pointer?
jasonhc73
Cat herder, and dog toy tosser.
Part 2.
oudin_coil
New Member
- Joined
- Jan 20, 2020
- Messages
- 18
Looks like the beginnings of a solar tracker to me.
Well duh, it's obviously not the week that the housecleaning lady was there.

With regard to the device, that could be a lot of weight/force on that one joint. Looking forward to the results that prove me wrong.
rin67630
Solar Enthusiast
I just had an hour gale gusts here, and we are not in an exposed coastal region.
I have strong doubts, that your gracile tracker with the panel on it would have resisted...
I have strong doubts, that your gracile tracker with the panel on it would have resisted...
jasonhc73
Cat herder, and dog toy tosser.
I have a wind anemometer and the park position is horizontal. ?I just had an hour gale gusts here, and we are not in an exposed coastal region.
I have strong doubts, that your gracile tracker with the panel on it would have resisted...
When mounted balanced, it can carry a significant amount of weight. For now I have just one 65lb panel, it was a dud and only half the cells work. But I am sure this is capable of supporting three probably four panels easily. Possibly six.Well duh, it's obviously not the week that the housecleaning lady was there.
With regard to the device, that could be a lot of weight/force on that one joint. Looking forward to the results that prove me wrong.
jasonhc73
Cat herder, and dog toy tosser.
The east west axis mounted. 
The north south axis testing ;
And it's dark, so tomorrow to attach the brains and the solar tracker.
The north south axis testing ;
And it's dark, so tomorrow to attach the brains and the solar tracker.
jasonhc73
Cat herder, and dog toy tosser.


jasonhc73
Cat herder, and dog toy tosser.
The "PV panel" is the power supply. ") The panel itself is still over on the wall, such a nice afternoon and fun to do. As soon as I turned it on, it tracked directly to the "low" afternoon sun. I setup a time lapse and will show it in a couple of hours.
The panel itself is still over on the wall, such a nice afternoon and fun to do. As soon as I turned it on, it tracked directly to the "low" afternoon sun. I setup a time lapse and will show it in a couple of hours.


The panel itself is still over on the wall, such a nice afternoon and fun to do. As soon as I turned it on, it tracked directly to the "low" afternoon sun. I setup a time lapse and will show it in a couple of hours.jasonhc73
Cat herder, and dog toy tosser.
A short video of first tracking.
I have tomorrow set to record the full day.
My windows reflected on the sensor and screwed up the trackers aim for about half an hour. The end is the "cloudy/nighttime" parking position. It is timer-based for the parking spot and needs a few tweeks.
Watch for the "fly". It's my cat, Duke! ?
I have tomorrow set to record the full day.
My windows reflected on the sensor and screwed up the trackers aim for about half an hour. The end is the "cloudy/nighttime" parking position. It is timer-based for the parking spot and needs a few tweeks.
Watch for the "fly". It's my cat, Duke! ?
jasonhc73
Cat herder, and dog toy tosser.
If you are bored and are tired of watching paint dry.
Watch my tracker track the sun.
Kind of interesting in the twilight times. Then the tracker gets some good sun at about 08:30. Then it is pretty straight forward until the end of the day when it parks.
Watch my tracker track the sun.
Kind of interesting in the twilight times. Then the tracker gets some good sun at about 08:30. Then it is pretty straight forward until the end of the day when it parks.
Click on the Settings cog and select "Playback speed" to get through it quicker.
Pretty cool setup. Where is the sensor?
Pretty cool setup. Where is the sensor?
jasonhc73
Cat herder, and dog toy tosser.
This is what happens when you just really have too much time on your hands. ? ??
??


The cutest little PV inverter:


An old lawn mower battery, with the wind sensor.

It started out perfectly clear and sunny.
The VOC on this panel was 28V, hopefully, when connected to the MPPT, it is no more than 24V. It is supposed to be 40V, it is a dud. I have had it a year, and instead of throwing it away, as I should have, It talked to me every time I mowed and said, "Make a dual-axis tracker, it will be fun".
By the time I had it attached and hooked up, the volts are 0.07 or so thanks to the clouds. ??
This is a 3-second time-lapse, it is not really how you should do this, but so what.
??The cutest little PV inverter:
An old lawn mower battery, with the wind sensor.
It started out perfectly clear and sunny.
The VOC on this panel was 28V, hopefully, when connected to the MPPT, it is no more than 24V. It is supposed to be 40V, it is a dud. I have had it a year, and instead of throwing it away, as I should have, It talked to me every time I mowed and said, "Make a dual-axis tracker, it will be fun".
By the time I had it attached and hooked up, the volts are 0.07 or so thanks to the clouds. ??
This is a 3-second time-lapse, it is not really how you should do this, but so what.
Attachments
jasonhc73
Cat herder, and dog toy tosser.
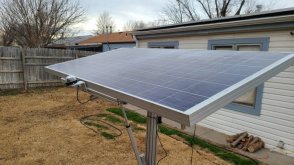
Now with a real live panel tracking the sun. The solar light sensor is repositioned to the proper spot.
The wind sensor needs a proper spot.
As complicated as I made this project, it is a fun "research" project. How much more complicated can I make it with a self-leveling wind sensor?
(no, just sticking on a stick in the ground is too easy!!!!)
Does this playlist work?
So far this machine I made is the ultimate phone charger!
jasonhc73
Cat herder, and dog toy tosser.
End of the day and sending out half an amp to the battery and controller.
The 1000w inverter is drawing almost 2 amps to charge an inflater/jump starter.
Tomorrow about 09:00 I'll try again when much more better sun is blasting the panel, not this end of day shadow infected time of day. ?


Put play speed on 2x...
The 1000w inverter is drawing almost 2 amps to charge an inflater/jump starter.
Tomorrow about 09:00 I'll try again when much more better sun is blasting the panel, not this end of day shadow infected time of day. ?
Put play speed on 2x...
Last edited:
jasonhc73
Cat herder, and dog toy tosser.
After noticing the E/W actuator stays in the same plane all the time, I realized I only need to level the anemometer in one plane.
This is a spare parts bin build. I used 2 skateboard wheel bearings for the pivot, new. I forget what size and type, but the most common sealed ones. They are just a smidge under 3/4 inch diameter with an M8 bolt through the middle. I used a plastic bag to take up space.
Any kind of clamp gizmo will work to support the platform, I used a 3/4 inch handlebar clamp from a motorcycle triple-tree.
A little bit of minor final tweaks and it is complete. I don't plan on using the bicycle wrench as the final counterbalance. ?
Last edited:
Looks good. What is your wind MPH threshold for parking the panel?
Fallingaway
New Member
- Joined
- Mar 28, 2020
- Messages
- 144
Could you share the info for the tracker? Also could you post more pictures of how you did the movable joints? I built a single axis tracker and want to do a double. Thank you for sharing your buil! I really like it, good job!!
jasonhc73
Cat herder, and dog toy tosser.
I am not sure. The range is 0.00 to 4.00. I have it set to 2.00. I have no idea what the wind speed to "setting" conversion is. Last Saturday I had easily 40 mph winds, but I didn't have the anemometer mounted or set up properly, most of the day it was on the ground. I thought for sure this setup was going to tip over. I did see it push up the legs once! But my backyard is somewhat protected with privacy fences from the wind.Looks good. What is your wind MPH threshold for parking the panel?
Could you share the info for the tracker? Also could you post more pictures of how you did the movable joints? I built a single axis tracker and want to do a double. Thank you for sharing your buil! I really like it, good job!!
I have two 14 inch actuators. For my latitude, the N/S actuator is actually too short! I may have mounted it in a spot where I don't get the most motion. As it is now it does bottom out, and I know already that it is not low enough but also does not go north enough. A couple of ways to fix is to get a longer actuator, 16 or 18 would probably be fine. Or adjust the attachment point up and down seasonally.
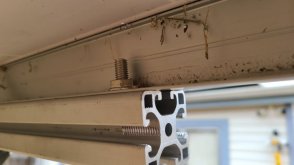
Security Measure
This is the N/S "hinge" (I would not do it this way, I don't really think it is very strong)
On Saturday it was very windy and these loose bolts let the entire panel and mount flop around all crazy.
It is snug now, not tight though.


This seems fine for the E/W "hinge".

Bear in mind, this "system" is probably the most expensive possible way to do it. All this "extruded aluminum" 4040 and 8080, is quite pricey. It does however have ample room for doing it wrong several times while adjusting everything until you get it right, and pretty much no special tools or welding needed.
I did this after seeing the ECO-Worthy kit on amazon for months on end as being "out of stock", and just now I checked, well they have 8 in stock. ???
Take a look at the pictures and you will see that the N/S hinge is significantly more mass than what I made. I just looked at the pictures of the ECO-Worthy kit and I use the exact same hinges on the E/W mount. They bolt through the bar, mine bolt into the 4040 extrusions with 4040 extrusion nuts.Similar threads
- Replies
- 7
- Views
- 350
- Replies
- 20
- Views
- 2K
- Replies
- 15
- Views
- 817
- Replies
- 4
- Views
- 751