AmericanSilverback
New Member
Super impressive setup for sure!!! NICE WORK


Your post got me thinking and mine are sitting here in the shop, had a few minutes and took the cover off. Terminals are spade and the terminals aren't that tight. Not easy to pull off due to the indent but the terminal is loose on the spade. Photo is a little fuzzy with the zoom, tried to show the male spade.It looks like this:
(From random You Tube video)
View attachment 77487
(From my own LV6548s)
View attachment 77488
View attachment 77489
When I zoom in, as seen on the last screen cap, where the MC4 connectors have short pigtails, they look like they attach to connectors on the little board there. I have mine at the storage unit in the shipping boxes now (for now I can only review this picture I took awhile back), so it's hard to see how it attaches onto the board. They might be spade connectors or screw down connector bosses. If I remember right, I remember thinking that they had not been soldiered, and are removable.
It seems like those mini-split HVAC line covers could be one option (if you wanted to leave the MC4 connector setup intact)...
My original idea was to just use one of the existing case conduit holes to the right a bit (underneath where the AC Input wire attaches, and just have the AC input and AC outputs use the other hole under the AC output), have the PV input come in on that left conduit hole, and directly attach the PV inputs right to that board. Then I wouldn't have to cut up the MPP case (with a new hole) and possibly void the warranty, it could be easily returned back to original if warranty service was required.
In my case, I will be fully off-grid and if I have an AC input it will be only large enough wire for a generator power source... I should be able to get both AC inputs and outputs through the other hole.

Your post got me thinking and mine are sitting here in the shop, had a few minutes and took the cover off. Terminals are spade and the terminals aren't that tight. Not easy to pull off due to the indent but the terminal is loose on the spade. Photo is a little fuzzy with the zoom, tried to show the male spade.
View attachment 77564
I use Milwaukee portaband to cut the conduit. I have a unfair advantage when it comes to building the cabinet for my system. These are pictures of some of the average jobs for me. Most people don't own hydraulic knockouts and have Panduit wire way laying around. They are not able to get their pick of scrap control cabinet for free. That has made this much easier for me. What I don't have is the wealth of experience and knowledge that I have found about the dc storage and solar panels on this site. I really am enjoying the feedback and idea exchange.@raurre
Silly question, but how are you cutting the metal conduit?


You have to be very careful using that type of tool. They leave a very sharp inside ridge. Make sure you ream any pipe cut until it has rounded edges.
You have to remove the burr with any method of cutting conduit, I haven't seen anything that won't leave a ridge or burr. Using the scoring tool makes for a square break off and one that is easy to ream, unlike using saws, etc. This is what this is for: https://www.amazon.com/Power-Condui...&qid=1640908612&sprefix=reamer,aps,209&sr=8-5You have to be very careful using that type of tool. They leave a very sharp inside ridge. Make sure you ream any pipe cut until it has rounded edges.

")
Between work and weather not much progress on the roof panel install. I got a few panels and put them on a temporary mount in front of my shop a few days ago they seem to do well. I am getting antsy to get the full array installed.I'm not sure about other folks but I am on the edge of my seat. Progress report please.
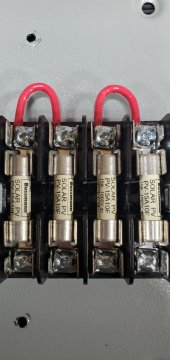
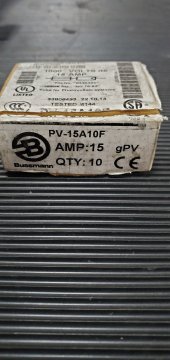
Please share the fuse dimensions and supplier with us.Just received my PV fuses for my combiner box. Everything is taking forever to source. Still waiting for second set of EVE 304 cells to be delivered. Hopefully the weather this week will let me start on my roof mounting for my panels.


My solution for covering the MC4 input connections. I made the cover out of 16 gauge stainless.