Zwy
Solar Wizard
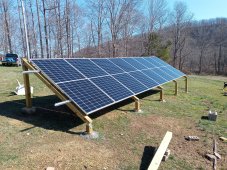
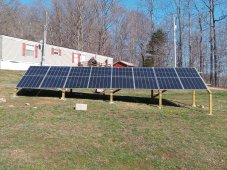
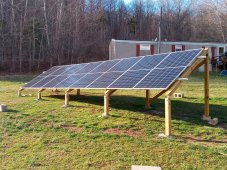
I finished installing my array this fall and following is a review of this mount and install. I purchased the MT Solar Top of the Pole mount in a 16 panel configuration. When purchasing the mount, you go to the MT Solar website, there is a calculator where you input panel sizes, number of panels, soil type, local rated wind speed, and snowload. MT Solar will then review your inputs and determine what mount will be required using an engineering program that is commonly used for signage. You will receive an engineering report so you can submit it to local building inspector if required, around here there aren't any codes but an insurance company may require documentation. As for wind speed rating, that can be found thru government websites as can snow load ratings. Part of the reason I liked this mount was the ability to assemble on the ground, then raise it up to allow for mowing the grass under it.
Cost was $6800 delivered to closest Fed Ex freight terminal about an hour away. Pallets were well made, nicely wrapped in the type of fabric commonly found over lumber. Not too heavy, came on 2 pallets and I have a forklift so wasn't a problem moving them. These mounts arrived mid February last year, took about 6 weeks for them to build it after I paid them for it. I stored it in my shed until late September. The paint used still had the strong odor when I went to install and I had removed the wrapping to keep moisture from accumulating. The paint is not catalyzed obviously and the paint job was not exceptional coverage, I will have to touch up that mount next year in spots. The 2 poles were sourced locally at a cost of $1800 so the total was $8600 plus 3.5 yards of concrete.
These require a footing, their specs were 7.5 feet deep x 36 diameter hole. I had a cement contractor that never showed, I ended up purchasing my own auger and drilling the holes myself. I own a transit and drilled the holes to the right depth and had cut the pipe to the required length beforehand. If I had to do it again, I'd go as deep as my auger can go with one extension. Poles were centered and braced in hole, it helps to have a board against the pole and a come along or strap tightened to pull the pole tight to the board. Filling the hole doesn't require much cement, takes about 1.75 yards per hole. Conduit was run before cement was poured so lawnmowers and other things won't damage the conduit.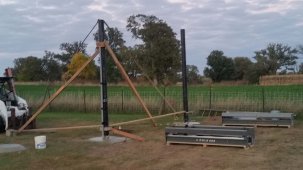
Next was installing the mount, basically it is a saddle around the pole. A chain hoist is attached at the top of the pole with a pocket mount they send which fits inside the pipe. The bracket for the chain hoist can be purchased but I had a slightly larger chain hoist and wanted to ensure it would fit so I fabricated my own. The pocket they send remains in the pole, it provides part of the cap for the pipe. After the saddle is hanging, it is a frame made from square tubing bolted on each side with a 4 inch pipe for the pivot. The tilt screws are installed at this time, it is important to get the angle the same or you will think the frame is twisted as you assemble it. They don't tell you this, I learned it the hard way. Then it is I beam pieces which are bolted together and they have adjusting screws to cover the tolerance between sections to get it straight. It would be easier to have one long length of I beam, remember this is you want to fabricate one. Adjusting the beams with a string in two directions was a pain.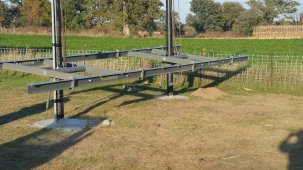
Once the frame is assembled, the Tamarak rails are installed using the supplied clips. The rails are installed and this is where my first snag appeared. The panels were 530W which are larger than a standard 72 cell. Panels are 89.25L x 44.2W. MT Solar knew this and had spec'd out the correct rail length but it seems packaging didn't include the needed extensions and the required splices and hardware. Mt Solar handled it well, they sent out what I needed right away. Next I found they didn't send any of the nuts and bolts for the splices on the long rail sections either, so another delay of about 4 days.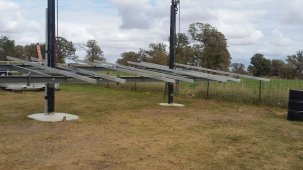
Panel installation was easy as the mount is close to the ground. On one row, there will be a space for each pole sticking thru and only one panel would need to be installed after raising the array. Slide the panels in line and add the new one on the end by sliding it in. Do not attempt to install the one panel in between the other panels. I again learned the hard way after the nut for the fastener fell down inside the rail. Run your wires between panels and install all the wire holders before raising the array.
Raising was simple, I did it by myself by raising one side then the other alternating. You will want a safety chain in place so you can easily rehook the hoist as you go higher and in case something breaks it might slow things down enough so it won't hurt so bad when the heavy array crushes you to death.
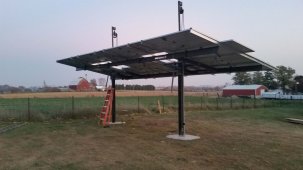
Two of the reasons I wanted a tilting mount was snow and lower sun on the horizon in the winter. With the tilting mount, I eliminate the problem of snow remaining on panels for several days and as the array is not very large wattage, I wanted some maximization of yield in winter. Whether this was cost effective is up for debate but for my usage and area to install I felt it was the best choice. I also wanted to be able to mow under this and also wanted to be able to pile some snow in winter ahead of the array if I needed the room. This is 60 degree tilt, at winter solstice it will be at 65 degrees tilt. I use a simple electronic protractor now for setting tilt, eventually I will make a pointer on each pole.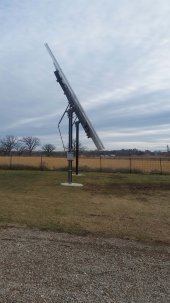
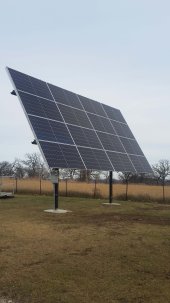
Pros for MT Solar was support was good, they respond quickly and they run things thru an engineering platform and provide needed documentation if you need it. Packaging was good. They have several videos showing install and those are helpful. Tilt mechanism works well, harder to move to a lower angle than moving to a higher angle. The tilt screws could probably be easily adapted for single axis tracker with a small dc motor if desired.
As for cons, the I beam assembly was a pain but not that difficult. As I stated, if you want to build something like this, one continuous length would work well, I beam can be purchased up to 40 foot length. Paint finish was substandard, I was not impressed. These things are heavy, it takes some effort to raise. The tilt screw mounting is close to the pivot, this allows greater range but can lead to some wiggle at the outer edges of the array in high winds. Screw is mounted behind the pole. it actually would be better ahead of the pole offset to one side and a longer screw used. This would lessen the wiggle in high variable winds.
Would I purchase another mount from MT Solar? Not sure at this point. If you're handy at fabrication and have the equipment like I have and know how to weld, then I'd say build your own. The Skyrack 2.0 costs much less but is not very high off the ground unless they can custom build it. The Skyrack would be less than 1/2 the cost for the 16 panel array,(most likely would have to use their 20 panel mount due to pv module size) but it would be higher priced for custom application for my pv modules. I would only install the Skyrack using footings; around here I see many arrays with driven pilings but the clay in the ground here combined with frost that commonly goes down to a depth of 6 feet heaves arrays and you see after a few years a roller coaster.
Would I install anything other than tilting array? After having the first snow here and observing the various fixed tilt arrays in the area after that wet snow, I'd say the tilting array is worth the money, especially if you are off grid and need to maximize yield.
Cost was $6800 delivered to closest Fed Ex freight terminal about an hour away. Pallets were well made, nicely wrapped in the type of fabric commonly found over lumber. Not too heavy, came on 2 pallets and I have a forklift so wasn't a problem moving them. These mounts arrived mid February last year, took about 6 weeks for them to build it after I paid them for it. I stored it in my shed until late September. The paint used still had the strong odor when I went to install and I had removed the wrapping to keep moisture from accumulating. The paint is not catalyzed obviously and the paint job was not exceptional coverage, I will have to touch up that mount next year in spots. The 2 poles were sourced locally at a cost of $1800 so the total was $8600 plus 3.5 yards of concrete.
These require a footing, their specs were 7.5 feet deep x 36 diameter hole. I had a cement contractor that never showed, I ended up purchasing my own auger and drilling the holes myself. I own a transit and drilled the holes to the right depth and had cut the pipe to the required length beforehand. If I had to do it again, I'd go as deep as my auger can go with one extension. Poles were centered and braced in hole, it helps to have a board against the pole and a come along or strap tightened to pull the pole tight to the board. Filling the hole doesn't require much cement, takes about 1.75 yards per hole. Conduit was run before cement was poured so lawnmowers and other things won't damage the conduit.

Next was installing the mount, basically it is a saddle around the pole. A chain hoist is attached at the top of the pole with a pocket mount they send which fits inside the pipe. The bracket for the chain hoist can be purchased but I had a slightly larger chain hoist and wanted to ensure it would fit so I fabricated my own. The pocket they send remains in the pole, it provides part of the cap for the pipe. After the saddle is hanging, it is a frame made from square tubing bolted on each side with a 4 inch pipe for the pivot. The tilt screws are installed at this time, it is important to get the angle the same or you will think the frame is twisted as you assemble it. They don't tell you this, I learned it the hard way. Then it is I beam pieces which are bolted together and they have adjusting screws to cover the tolerance between sections to get it straight. It would be easier to have one long length of I beam, remember this is you want to fabricate one. Adjusting the beams with a string in two directions was a pain.

Once the frame is assembled, the Tamarak rails are installed using the supplied clips. The rails are installed and this is where my first snag appeared. The panels were 530W which are larger than a standard 72 cell. Panels are 89.25L x 44.2W. MT Solar knew this and had spec'd out the correct rail length but it seems packaging didn't include the needed extensions and the required splices and hardware. Mt Solar handled it well, they sent out what I needed right away. Next I found they didn't send any of the nuts and bolts for the splices on the long rail sections either, so another delay of about 4 days.

Panel installation was easy as the mount is close to the ground. On one row, there will be a space for each pole sticking thru and only one panel would need to be installed after raising the array. Slide the panels in line and add the new one on the end by sliding it in. Do not attempt to install the one panel in between the other panels. I again learned the hard way after the nut for the fastener fell down inside the rail. Run your wires between panels and install all the wire holders before raising the array.
Raising was simple, I did it by myself by raising one side then the other alternating. You will want a safety chain in place so you can easily rehook the hoist as you go higher and in case something breaks it might slow things down enough so it won't hurt so bad when the heavy array crushes you to death.

Two of the reasons I wanted a tilting mount was snow and lower sun on the horizon in the winter. With the tilting mount, I eliminate the problem of snow remaining on panels for several days and as the array is not very large wattage, I wanted some maximization of yield in winter. Whether this was cost effective is up for debate but for my usage and area to install I felt it was the best choice. I also wanted to be able to mow under this and also wanted to be able to pile some snow in winter ahead of the array if I needed the room. This is 60 degree tilt, at winter solstice it will be at 65 degrees tilt. I use a simple electronic protractor now for setting tilt, eventually I will make a pointer on each pole.


Pros for MT Solar was support was good, they respond quickly and they run things thru an engineering platform and provide needed documentation if you need it. Packaging was good. They have several videos showing install and those are helpful. Tilt mechanism works well, harder to move to a lower angle than moving to a higher angle. The tilt screws could probably be easily adapted for single axis tracker with a small dc motor if desired.
As for cons, the I beam assembly was a pain but not that difficult. As I stated, if you want to build something like this, one continuous length would work well, I beam can be purchased up to 40 foot length. Paint finish was substandard, I was not impressed. These things are heavy, it takes some effort to raise. The tilt screw mounting is close to the pivot, this allows greater range but can lead to some wiggle at the outer edges of the array in high winds. Screw is mounted behind the pole. it actually would be better ahead of the pole offset to one side and a longer screw used. This would lessen the wiggle in high variable winds.
Would I purchase another mount from MT Solar? Not sure at this point. If you're handy at fabrication and have the equipment like I have and know how to weld, then I'd say build your own. The Skyrack 2.0 costs much less but is not very high off the ground unless they can custom build it. The Skyrack would be less than 1/2 the cost for the 16 panel array,(most likely would have to use their 20 panel mount due to pv module size) but it would be higher priced for custom application for my pv modules. I would only install the Skyrack using footings; around here I see many arrays with driven pilings but the clay in the ground here combined with frost that commonly goes down to a depth of 6 feet heaves arrays and you see after a few years a roller coaster.
Would I install anything other than tilting array? After having the first snow here and observing the various fixed tilt arrays in the area after that wet snow, I'd say the tilting array is worth the money, especially if you are off grid and need to maximize yield.


