diy solar

diy solar

My 40ft 5th wheel 1020 Watt PV Build

IMO Tilting is worth it for something like 4+ days off grid. Consider the wear factor of walking on an epdm roof too often.
Probably have other things to worry about like falling off the roof or ladder, wearing out the roof material probably not unless you're wearing aggressive souled shoes. I go up my 5th wheel roof to clean the panels after a move every other week boondocking, at minimum 117 times up there in the past 4.5 years and no wear showing yet. ;)
 
Got up 9n the roof today and figured out where I'm going to mount the panels and how. Also hooked up 2 panels in series and had 410 watts being produced st around 7-8 Amos. After mppt is was about 30 amps. When I laid them flat it went to 250 watts. So tilting is worth it. Dont have enough real estate to make up the differance.

Greg
Something to think about and you can see it my post #29 data. That data was from AZ in April. My panels are mounted flat on the roof in 2S4P configuration, they should be able to produce 80a, I've seen 75a being produced but my PT100 will show a P04 code ( I should of been in a 3S configuration, I still get plenty of power).

If you add the charging amp column to the inverting amp column that is what the panels/ PT100 scc is producing.
07:30 13a
09:00 45a
12:03 74a
12:37 the batteries are now full and solar is carrying the loads. Remember that before this time that you can see that solar is charging at a less amount because I turn over my fridge to electric and other miscellaneous inverting loads. If it looks like it might be poor solar day I hold off on turning the fridge over and put more charge in to the batteries.

Tilling is a nice option but over 1000w in panels that you said you'll have is still a nice amount of potential power for production if mounted flat.
 
IMO Tilting is worth it for something like 4+ days off grid. Consider the wear factor of walking on an epdm roof too often.
I will not be on the roof to do this. Will do it remotely from the ground.

Greg
 
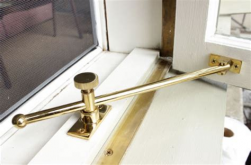
I envision something like this casement window hardware hanging down the side of the RV. The screw clamp/pivot would be at edge of roof; you'd have to climb a step ladder to reach it. A pair of these would provide a manual adjustment and clamp. If one 60 lb panel across the roof, you have to lift 30 lbs.

1604874900397.png
 
Started building the first roof mount. It will have 2 panels (255 watts each) and be able to tilt to 60 degrees. Frame work is about done. The actuator for titling arrived today. More money in this than should be but what the hay you can't take it with you. With family things going on everyday the rest of the week I wouldn't get back to it till next week.

Greg
 
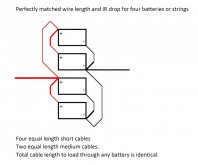
Glad to see cables to the 4P set of batteries are at opposite ends. That approximately matches IR drop and current draw from the batteries (better than having both inverter cables land on the same battery.) But it isn't perfect balance for a system like this with more than 2 batteries in parallel. With two more wires you can make it 100% balanced; every battery sees the load through wires adding up to same current flow and IR drop. Inverter wire carries 100%, one wire carries 50%, one wire carries 25%.
This is a late reply but can you elaborate on parallel wiring for more than two batteries? How would two more wires improve this array? By adding direct connections from all terminal positives and negatives to the corresponding buses in the system? A link to a diagram would be great.

Thanks
 
This is a late reply but can you elaborate on parallel wiring for more than two batteries? How would two more wires improve this array? By adding direct connections from all terminal positives and negatives to the corresponding buses in the system? A link to a diagram would be great.

Thanks

Could be equal length direct wires, but can ganged with cables as shown:
multiple strings routing.jpg
 
You could delete one short cable, and either bolt together a short and a long, or make one cable length = short + long.

Or, use 6 cables of equal length, and join at a busbar. Or maybe stack on a bolt, and add the inverter cables.

I have one battery string but four inverters. Those each have a cable to busbar, but matching length doesn't matter; they will draw what they need.
For multiple batteries, want current draw matched by resistance.
 
Well it's finally been warm enough to try and finish my install. Really all I have to do is install the panels. I did the scariest job yesterday and that was mounting the junction box on the roof and drilling a hole through the roof to get the wire run between SCC and the panels. After much measuring looking and measuring again I did it. Mounted box just a few inches away from waste tank vent. That allowed me to get into a chance right next to the vent that's goes all the way down to the bottom storage compartment. Took me a couple of hours to get this done and several trips from the roof to the ground because I was doing this by myself.

Anyway I'm still waiting on more aluminum uni-strut to mount to the roof which the panels will mount to.

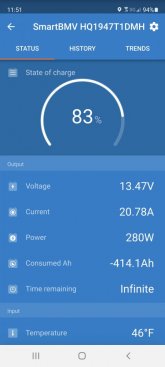
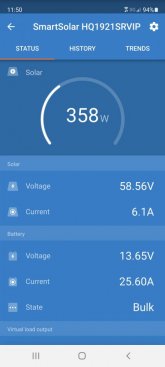
But this morning I decided to get 2 of the 4 255 watt panels out and lay them flat on saw horses to see what they would do. 11am sun still to the southeast a bit and getting 25 amps.

I was working on a tilt system all winter but have decide not to put it on the camper. To big and after playing with it I'm not sure I would gain much. Instead I'm going to go from the 4 255 watt panels I have now and go with 4 400 watt panels.

Greg
 

Attachments

  • Screenshot_20210403-115133.jpg
    Screenshot_20210403-115133.jpg
    44.2 KB · Views: 1
  • Screenshot_20210403-115043.jpg
    Screenshot_20210403-115043.jpg
    41 KB · Views: 2
Can you elaborate on the strut product you plan to use? Link?
McMaster Carr has it, a bit pricey but its only money.

Greg
 
The 2 panels hit their peek of 400 watts but have been very steady at 370 watts. Pumping out 26 amps average.

Greg
 
McMaster Carr has it, a bit pricey but its only money.

Greg

Take a look at 8020 extraction. The 1/2 channel is similar to unistrut but looks a lot more finished.
 
I've looked 80/20 but could find anything to mount it to the roof. Finish does really matter to me on the roof.

Greg
 
McMaster Carr has it, a bit pricey but its only money.
Wow! I guess I'll be buying the more traditional finish at a local Big Box. There is actually not much variety in terms of finish and gauge. Commercial building supply stores sell it but in minimum orders and higher prices.
 
I used the half height generic unitstrut for mine. worked very well. I'm thinking of running a strip of sealant tape along the high side just to keep water from trying to get between it and the EPDM roof of my 5th wheel. I put lap sealant on all the bolt holes before and after lagging down but I think a strip of 2" eternabond will be prevent pooling from trying to ingress at my mounting points.
 
I used the half height generic unitstrut for mine. worked very well. I'm thinking of running a strip of sealant tape along the high side just to keep water from trying to get between it and the EPDM roof of my 5th wheel. I put lap sealant on all the bolt holes before and after lagging down but I think a strip of 2" eternabond will be prevent pooling from trying to ingress at my mounting points.
I plan to use 4 10' sections to mount 4 58" x 27" panels . The z-brackets are inset from the ends so there's actually more room to mount them than it might seem. I'm thinking of putting a couple stainless fender washers on each bolt to raise the strut slightly off the roof. My intent is to prevent water pooling.

What type of fastener did you use to attach the bracket to the strut? If I recall correctly, some of the standard strut bits, like crown nuts or spring nuts, aren't compatible with half-height channel.
 
I drilled the aluminum on the panels (rich solar poly 100w) frames and used unistrut L brackets.
I bought spring nuts and pulled the springs off for the unitstrut. That's all 3/8, with 3/8 to 1/2 bushings I found at ace hardware. The upper/inside mounts are 1/2 bolts mostly because the 1/2 spring nuts are cheaper.
 
Back
Top