sunrise
New Member
- Joined
- Jul 16, 2020
- Messages
- 206
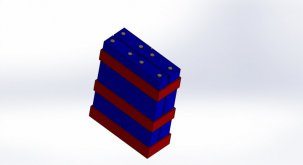
This is a 210ah (105x2) battery I built for my 16-foot trailer. I purchased most of the components prior to discovering this forum, had I read this forum first, I probably would go with 280ah cells, much cheaper and requires just 1 BMS.
With that out of the way. I hope my experience would be helpful for beginners. Also, if there is one thing you can get out of this, it would be the last photo (A stainless screw with cap partially melt).
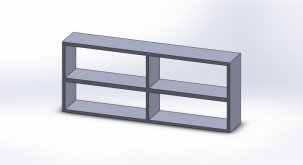
Originally I decided to DIY the battery bank, vs. purchase a Battleborn because in my small camper the only interior space I can fit a battery is only good for 1 Battleborn (100ah) and that's a little too small - especially with a compressor based fridge in my camper. I took the spec of those 105ah cells, and found if I design the case well/compact, it'd be around the same size of a Battleborn and it will fit.
The process took a lot longer than I expected, It's not because anything is particularly hard, it's just that many hardware, and tools are not common in household and needs to be purchased and as beginner, it's hard to plan ahead and get everything you need upfront.
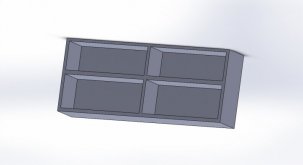
The case was built with 1/2" cabinet grade plywood, they are very cheap at my local lumber store, about 1/2 the price I'd pay for far worse quality ones at HomeDepot. I am not a experienced woodworker so there is no fancy joinery, just pocket holes and wood glues, it turned out very strong, and one nice thing with wood box is that with proper screws, I can screw mounting bracket directly onto the box, this might not important for most folks, but in my application, space is crucial. Oh I am not too worried about wood catching fire, if the temp inside set the plywood on fire, I'd have a much bigger problem. Also the max current would be 40A, since I don't have any high wattage appliance in the trailer, the inverter would not allow that. With 2 banks in parallel, that's about 20A each. I tested the banks at 17A, for 3 hours it went from 19c to 22c.
BTW I didn't paint the wood box, for such small box, it's a lot of hassle to buy prime/paint and tools, instead I used Monokote - plastic film with heat activated adhesive on one side, super easy to apply and it's water proof, if applied properly.
The cover of the box was 3D printed. with honeycomb infill and they are very strong, the 2 blue inlay/cutout are for the 2 bluetooth modules, so I can see if the module is connected. one caveat is these 3D printed parts are not heat resistant, at 70c they begin to deform, but in my case, the BMS would cut the battery off way before that. Again the battery will be installed inside trailer so I am not very concerned.
The bus bars comes with the cells looks pretty thin (13mm x 2mm), and I get mixed ratings from different online table/calculators, ranging from 30a to 100a, I don't have a device at this point that can draw over 20A, but I will test ~50A with a inverter once it arrives.
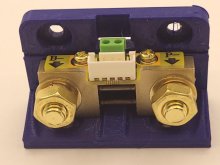
The copper terminal bars (1/8 x 3/4) are made from copper bars I purchased from Amazon. I also used them as connector for the 3 parallel wires on BMS. The JBD BMSes (I purchased 120A ones, looking back 100A would be enough) has three 10awg wires and they are a pain to connect / arrange in small space. I end up soldered them onto the copper bar with 3 drilled holes and bolted the copper bars to terminal bars and I am pretty happy with the result (still have to pass the upcoming 50a test)
I also used WindyNation 4awg wires with their 6awg lug (4awg lug is too big for their 4awg wire)
Prior to this build, I somehow had the misconception that DC is 'safer' than 110v AC. So one day when I try to loosen one of the bus bar screws, I was too lazy to go to garage to get the proper socket wrench, and I had a locking plier at hand, so I used that and it unfortunately slipped onto an adjacent screw which caused a short for a split second and it sparked. It didn't cause any damage to the battery as far as I can tell but just for that split second, enough heat was generated that melt the head of the stainless steel screw! For me this put everything into perspective. since then I treat these cells as if they are tiny gasoline tanks")
When I assembled the cells, I put double sided tape between cells, so there would be little relative movement - did this to avoid any stress on bus bars and their screws. I also tightly wrapped the cells with fiberglass reinforced tape. Inside the box I used foam tape around perimeters to avoid cells rubbing against wood.
Last night I top balanced (should have done this before I wrapped cells with tape, duh.) all cells by charge them with BMS connected then in parallel at 3.6v until current lowered to 0.1a, then this morning I parallel connected the 2 banks they are both at 14.1v per BMS app, I did see a current of 2a flow from 1 bank to the other, and it reduced to zero in a few seconds. no sparks.
After that I discharged the the paralleled batteries a little, then charge them at 17A again, it worked well (prior to top balancing I always had one cell hit the 3.65 cut off while other 3 cells still have quite some room for more).
So that's my experience so far, I would not call this a success yet, before I put this through a higher current test and install it in the trailer.
One observation - when I discharge the battery in parallel, I noticed one BMS is reporting 6.9A, the other is reporting 6.6A, I was expecting they should be nearly identical. not sure why they have 0.3A diff? maybe the BMS amperage reporting is off on one of the BMS? I think it doesn't matter as I expect they will even out when the one with higher current would reach lower voltage sooner.
Anyway, that's it. look forward to put it in real use in my trailer.
Many thanks to folks in this forum that answered many beginner questions I had in past few months.


Edit - Included a spreadsheet of tools and supplies I used. there were over $500 tools and supplies involved, about half of them were purchased for building this battery, the other half are things I either already have or can be used for other projects that I usually do.

 docs.google.com
With that out of the way. I hope my experience would be helpful for beginners. Also, if there is one thing you can get out of this, it would be the last photo (A stainless screw with cap partially melt).
Originally I decided to DIY the battery bank, vs. purchase a Battleborn because in my small camper the only interior space I can fit a battery is only good for 1 Battleborn (100ah) and that's a little too small - especially with a compressor based fridge in my camper. I took the spec of those 105ah cells, and found if I design the case well/compact, it'd be around the same size of a Battleborn and it will fit.
The process took a lot longer than I expected, It's not because anything is particularly hard, it's just that many hardware, and tools are not common in household and needs to be purchased and as beginner, it's hard to plan ahead and get everything you need upfront.
The case was built with 1/2" cabinet grade plywood, they are very cheap at my local lumber store, about 1/2 the price I'd pay for far worse quality ones at HomeDepot. I am not a experienced woodworker so there is no fancy joinery, just pocket holes and wood glues, it turned out very strong, and one nice thing with wood box is that with proper screws, I can screw mounting bracket directly onto the box, this might not important for most folks, but in my application, space is crucial. Oh I am not too worried about wood catching fire, if the temp inside set the plywood on fire, I'd have a much bigger problem. Also the max current would be 40A, since I don't have any high wattage appliance in the trailer, the inverter would not allow that. With 2 banks in parallel, that's about 20A each. I tested the banks at 17A, for 3 hours it went from 19c to 22c.
BTW I didn't paint the wood box, for such small box, it's a lot of hassle to buy prime/paint and tools, instead I used Monokote - plastic film with heat activated adhesive on one side, super easy to apply and it's water proof, if applied properly.
The cover of the box was 3D printed. with honeycomb infill and they are very strong, the 2 blue inlay/cutout are for the 2 bluetooth modules, so I can see if the module is connected. one caveat is these 3D printed parts are not heat resistant, at 70c they begin to deform, but in my case, the BMS would cut the battery off way before that. Again the battery will be installed inside trailer so I am not very concerned.
The bus bars comes with the cells looks pretty thin (13mm x 2mm), and I get mixed ratings from different online table/calculators, ranging from 30a to 100a, I don't have a device at this point that can draw over 20A, but I will test ~50A with a inverter once it arrives.
The copper terminal bars (1/8 x 3/4) are made from copper bars I purchased from Amazon. I also used them as connector for the 3 parallel wires on BMS. The JBD BMSes (I purchased 120A ones, looking back 100A would be enough) has three 10awg wires and they are a pain to connect / arrange in small space. I end up soldered them onto the copper bar with 3 drilled holes and bolted the copper bars to terminal bars and I am pretty happy with the result (still have to pass the upcoming 50a test)
I also used WindyNation 4awg wires with their 6awg lug (4awg lug is too big for their 4awg wire)
Prior to this build, I somehow had the misconception that DC is 'safer' than 110v AC. So one day when I try to loosen one of the bus bar screws, I was too lazy to go to garage to get the proper socket wrench, and I had a locking plier at hand, so I used that and it unfortunately slipped onto an adjacent screw which caused a short for a split second and it sparked. It didn't cause any damage to the battery as far as I can tell but just for that split second, enough heat was generated that melt the head of the stainless steel screw! For me this put everything into perspective. since then I treat these cells as if they are tiny gasoline tanks
When I assembled the cells, I put double sided tape between cells, so there would be little relative movement - did this to avoid any stress on bus bars and their screws. I also tightly wrapped the cells with fiberglass reinforced tape. Inside the box I used foam tape around perimeters to avoid cells rubbing against wood.
Last night I top balanced (should have done this before I wrapped cells with tape, duh.) all cells by charge them with BMS connected then in parallel at 3.6v until current lowered to 0.1a, then this morning I parallel connected the 2 banks they are both at 14.1v per BMS app, I did see a current of 2a flow from 1 bank to the other, and it reduced to zero in a few seconds. no sparks.
After that I discharged the the paralleled batteries a little, then charge them at 17A again, it worked well (prior to top balancing I always had one cell hit the 3.65 cut off while other 3 cells still have quite some room for more).
So that's my experience so far, I would not call this a success yet, before I put this through a higher current test and install it in the trailer.
One observation - when I discharge the battery in parallel, I noticed one BMS is reporting 6.9A, the other is reporting 6.6A, I was expecting they should be nearly identical. not sure why they have 0.3A diff? maybe the BMS amperage reporting is off on one of the BMS? I think it doesn't matter as I expect they will even out when the one with higher current would reach lower voltage sooner.
Anyway, that's it. look forward to put it in real use in my trailer.
Many thanks to folks in this forum that answered many beginner questions I had in past few months.
Edit - Included a spreadsheet of tools and supplies I used. there were over $500 tools and supplies involved, about half of them were purchased for building this battery, the other half are things I either already have or can be used for other projects that I usually do.
LiFePo4 12 Battery build tools and supplies
Sheet1 Tools,Price,Application,Link Heavy duty lug crimp tool (for 4awg wires and lugs),$65.00,Needed for 4awg lug. essential - there might be cheaper ones, but you will need one of these. ,<a href="https://www.amazon.com/gp/product/B00HJYVFSG/ref=ppx_yo_dt_b_search_asin_title?ie=UTF8&psc=1">htt...
Last edited: