diy solar

diy solar

My first time DIY apartment setup

audia4_20t

New Member
Joined
Nov 7, 2022
Messages
12
I wanted to post my setup after running it for a few months, with some questions around breakers, fuses, and settings since that is the last piece of the system.

Initial Problem: my electricity bill in California was very high, and I rent my apartment so anything grid-tied or permanent was out of the question. However, I am on the top floor of an old house with roof access. Thanks to Will Prowse for making all the videos helping me understand how it all works!

Solution:
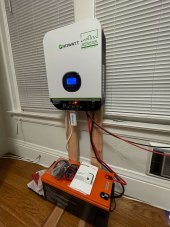
  • Growatt 3000TL 24v Inverter
  • Chins 24v 100ah Battery
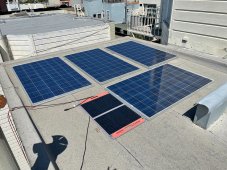
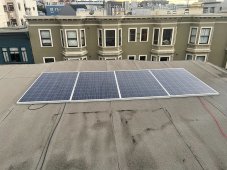
  • (8) used 250w Canadian Solar Panels. Set up in two series strings of 4.
Results:
  • Since my goal was not to be fully off grid and I didn’t get a big battery, I have the system using solar, then batteries, then grid bypass only if the battery goes too low.
  • This setup has been doing about 3-4kwh per day after adding the second string in the winter. I imagine in the summer it will do 6-7kwh
  • Max production I’ve seen is around 1400w. The panels are laying flat so I don’t need to permanently attach them so I’m happy with that.
  • I’ve had enough juice to run a little space heater in the morning for awhile and an AC unit for a couple hours in the summer.
  • I power my home office all day and a fan/phone chargers at night.
  • Overall I’m really happy with how conceptually simple this was, but users *REALLY* need to be tech and electrically savvy to understand what they’re doing.
Questions:
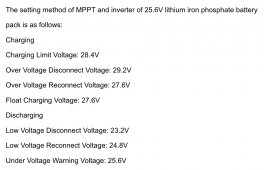
  • Inverter Settings (see chart from Chins sent below)
    • Setting 2: 50A max charging current
    • Setting 11: 20A maximum utility charging current – should I set this higher? I guess I could set it at 50A for when the battery is too low. The battery can take 100A of charging.
    • Setting 12: 23.3v – does this look right based on the CHINS settings?
    • Setting 13: 24.8v – does this look right based on the CHINS settings?
    • Setting 19: 28.4v – does this look right based on the CHINS settings?
    • Setting 20: 28.4v – I’m really confused about this. Nomatter which one between 19 and 20 I set, it changes both of them. I originally had them both at 27.6v but it seems awfully low compared to what the battery can handle
    • Setting 21: 23.2v - does this look right based on the CHINS settings?
  • Current Protection
    • I set my max total battery charging amps to 50 because the solar doesn’t ever seem to get much over ~35 and I don’t use the grid to charge the batteries unless the solar isn’t enough. I got a 60A breaker here https://www.amazon.com/dp/B004XXOW0E?psc=1&ref=ppx_yo2ov_dt_b_product_details. Is that good for the positive lead on the DC battery side?
    • I have (2) 15A MC4 fuses on each string. Does that seem right?
    • I also got a 20A breaker for the power output here: https://www.amazon.com/dp/B07MZPWN27?psc=1&ref=ppx_yo2ov_dt_b_product_details. Is this all I need for an AC breaker? It says there’s a breaker on the inverter but I don’t know if that’s for the input or output.
    • Should I get an AC breaker for the power input from the grid?
    • Are there any other safety items I should be getting? This is my first setup.
 

Attachments

  • IMG_4978.jpg
    IMG_4978.jpg
    493.3 KB · Views: 109
  • IMG_5340.jpg
    IMG_5340.jpg
    461.7 KB · Views: 113
  • IMG_5038.jpg
    IMG_5038.jpg
    166 KB · Views: 112
  • chins.jpg
    chins.jpg
    103.5 KB · Views: 110
What setting do you have in Line 1?
What setting do you have in Line 5?
Do you want the batteries to charge only from solar or both solar and utility?
I will strongly suggest you put a circuit breaker between the battery and Growatt asap.
 
Line 1 = SBU
Line 5 = US2 since there's no BMS comms port on the CHINS battery. I posted my battery settings and the CHINS recommendations. Any guidance there would be helpful

I only want to charge solar if possible. SBU seems to be doing what I want.

I have a 60A breaker between the battery and Growatt that I'm about to put in. I hope my question isn't dumb but what is the main reason for putting the breaker in? A short somewhere? On the inverter or battery?
 
Last edited:
Just a small suggestion regarding the solar panels:
Have them lifted up a bit to allow for some airflow underneath. The more the panels heatup, the less efficient they are.

You could put them on some cement blocks, or better yet on some angle brackets, angled to the sun in your area. You will get better performance and the panels will last longer.
 
I wanted to post my setup after running it for a few months, with some questions around breakers, fuses, and settings since that is the last piece of the system.

Initial Problem: my electricity bill in California was very high, and I rent my apartment so anything grid-tied or permanent was out of the question.
Curious what your electric rates are, and the actual savings after installation.
 
Max production I’ve seen is around 1400w. The panels are laying flat so I don’t need to permanently attach them so I’m happy with that.
I disagree with this statement. They need to be mounted somehow so a squall does not go by and blow them from the second story onto the ground And hit a pedestrian.

For my portable panels, I made a locking cable to keep people from stealing them. I’ve found the panels blown to the end of the cable.

The area I’m at will go from winds calm to 35 knots in two hours a few times a year. The weather websites are great for my area for predicting everything except winds.
 
Line 1 = SBU
Line 5 = US2 since there's no BMS comms port on the CHINS battery. I posted my battery settings and the CHINS recommendations. Any guidance there would be helpful

I only want to charge solar if possible. SBU seems to be doing what I want.
line 14 set to OSO that tell the unit to "only charge with solar"
I have a 60A breaker between the battery and Growatt that I'm about to put in. I hope my question isn't dumb but what is the main reason for putting the breaker in? A short somewhere? On the inverter or battery?
I have a 100amp breaker (100 amps is my BMS limit) between each of my battery banks and the main bus bar.
Between the bus bar and Growatt I have a 150 amp fuse, just in case.

IMG_20221106_071422757.jpg
 
I disagree with this statement. They need to be mounted somehow so a squall does not go by and blow them from the second story onto the ground And hit a pedestrian.

+100 to this. This is not safe where I am in California. If done with permits most cities want some structural calculations on the mounts or at least a reference to what the manufacturer provides. I can see you are very high up.

You have a good chunk of liability from the solar panels being on this roof and the unlisted batteries being used in a high density urban environment.

Might want to put the batteries on a more flame retardant surface.

EDIT: ok, the pictures right above are not of OP setup. Not as scary a number of batteries as I thought. Still good to add appropriate flame retardant surfaces

Curious what your electric rates are

In much of California electricity rates are $0.30 off peak / winter, and go up to the $0.40s in summer esp during peak.
 
Last edited:
I'm happy you're taking the initiative to provide for yourself but at the same time I think apartments or lets say multi tenant housing needs to address this sort of thing. All these chinese parts and batteries ..putting everybody life at risk doesn't seem wise or fair to others living there. I wonder if your renters insurance would cover this?
 
I disagree with this statement. They need to be mounted somehow so a squall does not go by and blow them from the second story onto the ground And hit a pedestrian.

For my portable panels, I made a locking cable to keep people from stealing them. I’ve found the panels blown to the end of the cable.

The area I’m at will go from winds calm to 35 knots in two hours a few times a year. The weather websites are great for my area for predicting everything except winds.

Can you show some pics of the cable? I've thought about doing this and would be totally open to it

+100 to this. This is not safe where I am in California. If done with permits most cities want some structural calculations on the mounts or at least a reference to what the manufacturer provides. I can see you are very high up.

You have a good chunk of liability from the solar panels being on this roof and the unlisted batteries being used in a high density urban environment.

Might want to put the batteries on a more flame retardant surface.

EDIT: ok, the pictures right above are not of OP setup. Not as scary a number of batteries as I thought. Still good to add appropriate flame retardant surfaces


In much of California electricity rates are $0.30 off peak / winter, and go up to the $0.40s in summer esp during peak.

Can you elaborate on the flame retardant surface?

I'm happy you're taking the initiative to provide for yourself but at the same time I think apartments or lets say multi tenant housing needs to address this sort of thing. All these chinese parts and batteries ..putting everybody life at risk doesn't seem wise or fair to others living there. I wonder if your renters insurance would cover this?

It's a good point, but I don't think property owners have any incentive when I'm paying the bill. Part of me gets frustrated because there is no out-of-the-box solution for a temporary renter.

Out of curiosity, what are the non-Chinese versions of these things? These seemed like really common brands of things. Even Renogy looks like re-branded Chinese stuff.
 
Can you elaborate on the flame retardant surface?

Search for non-flammable backing in this forum, there are a number recommended.

It's a good point, but I don't think property owners have any incentive when I'm paying the bill. Part of me gets frustrated because there is no out-of-the-box solution for a temporary renter.

They don’t have an incentive, but that doesn’t mean it is smart to take the liability here.

You could also get a demand to remove the equipment/building alterations, that is a standard lease term in California.

FWIW as a landlord in California I wouldn’t be allowed by the state to DIY improvements like what you’ve installed, even if it is done up to code. Only allowed on specific kinds of owner occupied properties. For safety reasons certified electrician or electrical contractor is required for all other cases…

EDIT: same prohibition for DIY. applies for business/property owners and commercial situations.

To clarify why I brought this up. The law does not think unqualified people should do this type of work in places where there are bystanders that may be harmed if work is done improperly. In this case the bystanders are the other people living in this multi unit property. And anyone who may end up on the roof, whether or not they are supposed to be there.

Out of curiosity, what are the non-Chinese versions of these things? These seemed like really common brands of things. Even Renogy looks like re-branded Chinese stuff.

The circuit breakers don’t look like UL listed components.

Also, the DC wires from the solar panels aren’t done using NEC approved wiring methods. At least they should be secured and better protected. For wiring outdoors at that voltage (I think it’s over 100v) you need some kind of protection against shock. You’re probably missing rapid shutdown and definitely missing putting it in conduit (supposed to be metallic, but any conduit + securing would be am improvement).
 
Last edited:
Can you show some pics of the cable? I've thought about doing this and would be totally open to it
I don’t have pics. It’s just 1/8” cable from the hardware store crimped at the end into a loop with a swaying tool. Looks like a bicycle cable.

That works for me because I put these away camping at night and when it gets windy. Would be a bad way to secure your panels. Roof top panels need to be permanently mounted.
 
please secure the panels so nobody will die from the corner of a metal frame hitting their head when the wind picks up.
i would not walk by this apartment with knowledge of that setup.

tilting to reduce heat will significantly increase the amount of force wind will push them sideways with.

please please please please secure them with something. ?

i applaud your motivation to seek a sun powered solution. it is exciting to rely on the sun for electric power.

kind regards and good luck with this project
 
Are there any other safety items I should be getting?
the photos look like bay area, which gets windy enough. please secure the panels.

even just cinder blocks and steel wire would maybe be an improvement. some sort of heavy anchor on all four corners of each contiguous bank of panels. spreading out the load may help with reducing stress on the structure.

i am an amateur and think this project is neat. it is still scary to see unsecured panels on any roof, be it an RV or stationary building.

kind regards and good luck
Nah I get it. I saw a couple posts where people said they laid panels flat and since they are fairly heavy on their own they wouldn't go anywhere. It's only when you angle them that they can become a sail. I did think about getting some of the ballast mounts but I would really want someone to assess the roof since it adds a ton of weight. Also, it looks like permanent mounts often cause leaking.

Anyone have suggestions on the best type of mounts here?
 
Honestly, the best type of mounts are to code in your local jurisdiction.

My builds are RV or stand alone and not for a permanent stricture. For RV and my EDPM roof, I screw the mount on the pressboard roof into a beam with two sided tape between it for waterproofing and to secure it. I then gob DICOR around the edges and screws.

That won’t work with your build. If you were in a rural area, perhaps it would.

If you are screwing anything in the roof, call the renting agency for approval. If this weren’t property, I’d insist on a proper search install to code. Having just been forced to go to San Fransisco against my will for vacation, I’d guess it’d be so expensive as to deter you from this project to save a few bucks on an electric bill.
Indeed. You didn't enjoy SF? I know it gets a bad rap but it's an amazing place
 
With regard to mounts, the standard way to go would be to start with roof pitch & type. There should be a standard racking type for that roof, that will not require additional engineering beyond what the racking company had calculated (in general, however some cities will demand more and SF is one I would pet as more likely to want it. Special things like not being flat to the roof surface often triggers extra requirements). HOWEVER it will most likely need to be screwed in. For a system that’s not screwed in, now you need to do your own engineering (to show that it can handle the wind etc loads) because there’s not a huge market for that kind of installation method for code compliant installs.

IronRidge is about $0.2/Wdc I believe for standard composition sloped roofs on wood framing.
 
Back
Top