diy solar

diy solar

My Milk Crate 2.0 mistakes (minor)

BobbyMac

New Member
Joined
Jun 1, 2021
Messages
18
I have competed my first DIY project and wanted to share a few mistakes and a things I would have done differently but nothing major. I started with the base recommendations and advice that Will gave with the Milk Crate and 2.0 tubes online. I purchased almost all the same components but it didn't start that way.

1st mistake: I tried to save a few bucks on a cheaper inverter. So I poke around on Amazon and see this 600W pure inverter and I would save about 30.00. It comes from Amazon and instantly I knew I made a mistake. It felt light and had simple sheet metal with no cooling fins on the housing and despite have a n average of 4 stars, it was either 5 star or 2 star rating. A co-worker has literally designed power systems for the Navy said, "if an inverter doesn't have heat dissipation built into the housing, don't get it." Returned and followed Will's advice and got the 600W Giandel. Future problem 1 avoided.


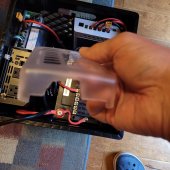
2nd mistake: I watched Will place the fuse box too close to the side of the crate which would have placed connections close to the side. I learned from his mistake so I made sure to have enough room. What was the mistake? I placed the box too close to the positive connector to be able to exit the clear fuse box cover with out hitting the crate. This was an easy fix in that I just needed to cut a little bit larger opening so the wire could exit and an angle. I would have had enough room to move it a little bit so that the "modification" to the top could have been less dramatic.
shortcut.jpg

3rd mistake: This isn't really a mistake but it is a component choice. The Drok power supply is NOT UL listed. I wasn't going to be plugging this in a forgetting about it so that isn't a huge deal. I will use it to charge but for a limited amount of time and always somewhat "attended". What I should have gotten is this, Mean Well. It doesn't have the external LED but a simple meter check and I could have hit the 14.1 setting. It is UL listed and only .49 more than the Drok. My co-worker has used these for years in a set it and leave it on 24x7 for years type of thing.

4th mistake: OK, I didn't listen to Will but the EPEver MPPT software is the traditional COMs port connection and the USB/RS-485 to RJ45 cable works but is worthless because my WIN10 pro OS doesn't recognize it as a RS-485 protocol connection (no check box in the port settings). SO I went back and bought the MT50 remote to program the controller.

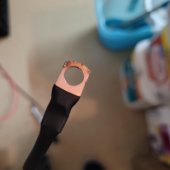
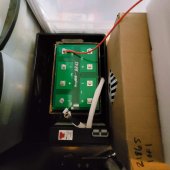
5th mistake: I thought I could "charge" a separate battery (BatteryEvo DIY 150AH) with the Drok. BIG MISTAKE! I received the battery, assembled and flip the switch to the BMS, not worky. HMMMM, let me charge this thing with the Drok. DO NOT CHARGE A COMPLETELY DISCHARGE BATTERY WITH A PSU!!!!! I had hot arcs and scary pops but luckily it only sacrificed a 15A fuse on the fuse box.
Arc.jpg BatEVONL.jpg

6th and last mistake: I used off brand 2xsided tape. 3M is the gold standard and is only 1.00 MORE

Lesson Learned #1! If you are going to do DIY projects with batteries for Ali or Evo, buy GOOD charger. When they arrive drained you can charge them. This is where I spent more of "my own money" (imitation is the highest form of flattery) and bought a Victron charger.

I added a cheap Shunt and Meter to complete the build. This was SOOOO fulfilling to complete and has really peaked my DIY interest. In parts alone, I have about $659.00 into the parts minus the 10g wire "because I have a ton of it" (more imitation) and tools.

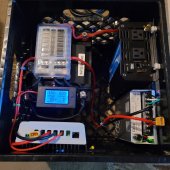
Here is what the completed crate looks like..... Next steps are size the array for the the 30A MPPT. I am thinking of 2 190W 12v panels in series for 24v 280W. I'll connect it with 30ft of 10G to the XT60 connector on the MPPT. What am I looking for is suggestions on the array and "other" thoughts. I would like to keep it to 2 panels in series for 24v but want to minimize charge time. The big 300+ watt panels seem to be too large to easily store and pull out on an ad-hoc basis. Thoughts?

CompletedCrate.jpg
 
Last edited:
I have competed my first DIY project and wanted to share a few mistakes and a things I would have done differently but nothing major. I started with the base recommendations and advice that Will gave with the Milk Crate and 2.0 tubes online. I purchased almost all the same components but it didn't start that way.

1st mistake: I tried to save a few bucks on a cheaper inverter. So I poke around on Amazon and see this 600W pure inverter and I would save about 30.00. It comes from Amazon and instantly I knew I made a mistake. It felt light and had simple sheet metal with no cooling fins on the housing and despite have a n average of 4 stars, it was either 5 star or 2 star rating. A co-worker has literally designed power systems for the Navy said, "if an inverter doesn't have heat dissipation built into the housing, don't get it." Returned and followed Will's advice and got the 600W Giandel. Future problem 1 avoided.


2nd mistake: I watched Will place the fuse box too close to the side of the crate which would have placed connections close to the side. I learned from his mistake so I made sure to have enough room. What was the mistake? I placed the box too close to the positive connector to be able to exit the clear fuse box cover with out hitting the crate. This was an easy fix in that I just needed to cut a little bit larger opening so the wire could exit and an angle. I would have had enough room to move it a little bit so that the "modification" to the top could have been less dramatic.

View attachment 62653

3rd mistake: This isn't really a mistake but it is a component choice. The Drok power supply is NOT UL listed. I wasn't going to be plugging this in a forgetting about it so that isn't a huge deal. I will use it to charge but for a limited amount of time and always somewhat "attended". What I should have gotten is this, Mean Well. It doesn't have the external LED but a simple meter check and I could have hit the 14.1 setting. It is UL listed and only .49 more than the Drok. My co-worker has used these for years in a set it and leave it on 24x7 for years type of thing.

4th mistake: OK, I didn't listen to Will but the EPEver MPPT software is the traditional COMs port connection and the USB/RS-485 to RJ45 cable works but is worthless because my WIN10 pro OS doesn't recognize it as a RS-485 protocol connection (no check box in the port settings). SO I went back and bought the MT50 remote to program the controller.

5th mistake: I thought I could "charge" a separate battery (BatteryEvo DIY 150AH) with the Drok. BIG MISTAKE! I received the battery, assembled and flip the switch to the BMS, not worky. HMMMM, let me charge this thing with the Drok. DO NOT CHARGE A COMPLETELY DISCHARGE BATTERY WITH A PSU!!!!! I had hot arcs and scary pops but luckily it only sacrificed a 15A fuse on the fuse box.
View attachment 62656 View attachment 62658

6th and last mistake: I used off brand 2xsided tape. 3M is the gold standard and is only 1.00 MORE

Lesson Learned #1! If you are going to do DIY projects with batteries for Ali or Evo, buy GOOD charger. When they arrive drained you can charge them. This is where I spent more of "my own money" (imitation is the highest form of flattery) and bought a Victron charger.

I added a cheap Shunt and Meter to complete the build. This was SOOOO fulfilling to complete and has really peaked my DIY interest. In parts alone, I have about $659.00 into the parts minus the 10g wire "because I have a ton of it" (more imitation) and tools.

Here is what the completed crate looks like..... Next steps are size the array for the the 30A MPPT. I am thinking of 2 190W 12v panels in series for 24v 280W. I'll connect it with 30ft of 10G to the XT60 connector on the MPPT. What am I looking for is suggestions on the array and "other" thoughts. I would like to keep it to 2 panels in series for 24v but want to minimize charge time. The big 300+ watt panels seem to be too large to easily store and pull out on an ad-hoc basis. Thoughts?
View attachment 62662
Nice job !
 
I have competed my first DIY project and wanted to share a few mistakes and a things I would have done differently but nothing major. I started with the base recommendations and advice that Will gave with the Milk Crate and 2.0 tubes online. I purchased almost all the same components but it didn't start that way.

1st mistake: I tried to save a few bucks on a cheaper inverter. So I poke around on Amazon and see this 600W pure inverter and I would save about 30.00. It comes from Amazon and instantly I knew I made a mistake. It felt light and had simple sheet metal with no cooling fins on the housing and despite have a n average of 4 stars, it was either 5 star or 2 star rating. A co-worker has literally designed power systems for the Navy said, "if an inverter doesn't have heat dissipation built into the housing, don't get it." Returned and followed Will's advice and got the 600W Giandel. Future problem 1 avoided.


2nd mistake: I watched Will place the fuse box too close to the side of the crate which would have placed connections close to the side. I learned from his mistake so I made sure to have enough room. What was the mistake? I placed the box too close to the positive connector to be able to exit the clear fuse box cover with out hitting the crate. This was an easy fix in that I just needed to cut a little bit larger opening so the wire could exit and an angle. I would have had enough room to move it a little bit so that the "modification" to the top could have been less dramatic.

View attachment 62653

3rd mistake: This isn't really a mistake but it is a component choice. The Drok power supply is NOT UL listed. I wasn't going to be plugging this in a forgetting about it so that isn't a huge deal. I will use it to charge but for a limited amount of time and always somewhat "attended". What I should have gotten is this, Mean Well. It doesn't have the external LED but a simple meter check and I could have hit the 14.1 setting. It is UL listed and only .49 more than the Drok. My co-worker has used these for years in a set it and leave it on 24x7 for years type of thing.

4th mistake: OK, I didn't listen to Will but the EPEver MPPT software is the traditional COMs port connection and the USB/RS-485 to RJ45 cable works but is worthless because my WIN10 pro OS doesn't recognize it as a RS-485 protocol connection (no check box in the port settings). SO I went back and bought the MT50 remote to program the controller.

5th mistake: I thought I could "charge" a separate battery (BatteryEvo DIY 150AH) with the Drok. BIG MISTAKE! I received the battery, assembled and flip the switch to the BMS, not worky. HMMMM, let me charge this thing with the Drok. DO NOT CHARGE A COMPLETELY DISCHARGE BATTERY WITH A PSU!!!!! I had hot arcs and scary pops but luckily it only sacrificed a 15A fuse on the fuse box.
View attachment 62656 View attachment 62658

6th and last mistake: I used off brand 2xsided tape. 3M is the gold standard and is only 1.00 MORE

Lesson Learned #1! If you are going to do DIY projects with batteries for Ali or Evo, buy GOOD charger. When they arrive drained you can charge them. This is where I spent more of "my own money" (imitation is the highest form of flattery) and bought a Victron charger.

I added a cheap Shunt and Meter to complete the build. This was SOOOO fulfilling to complete and has really peaked my DIY interest. In parts alone, I have about $659.00 into the parts minus the 10g wire "because I have a ton of it" (more imitation) and tools.

Here is what the completed crate looks like..... Next steps are size the array for the the 30A MPPT. I am thinking of 2 190W 12v panels in series for 24v 280W. I'll connect it with 30ft of 10G to the XT60 connector on the MPPT. What am I looking for is suggestions on the array and "other" thoughts. I would like to keep it to 2 panels in series for 24v but want to minimize charge time. The big 300+ watt panels seem to be too large to easily store and pull out on an ad-hoc basis. Thoughts?

View attachment 62662
What's your goal as far as portability? Do you want to load it and the panels up to take camping?
 
What's your goal as far as portability? Do you want to load it and the panels up to take camping?
Good question. Portability meaning easily taking panels out of the garage and into the yard then moving them around when the lawn guys come. I am powering a gaming laptop (fat power consumption). What are the rules of thumb on panels? Buy as many watts as you can and take distance of cable into account so run panels in series. I was thinking about 2 so I can up the volts.
 
Good rule of thumb would be to keep the current low by taking voltage high, so you have the right idea. You just have to make sure your scc can handle whatever voltage you plan to throw at it. for your setup, the EPEVER will probably fine. Which model is it specifically?

A good place to start is knowing the consumption of the device(s) you want to power and how long you want to power them for.

How many watts does your device consume per hour (this is watt hours) times how many hours you want to be able to run it. That will tell you how big of a battery you need (in watt hours). Once you know that: it's just more math and decision-making.

I won't go into the math (so as not to overwhelm with too much at once), but the question to ask and answer is, how quickly do you want to be able to fill your battery?

If you want it topped off daily, you'll need to determine how many hours of electricity-producing sun your area gets in a day, and make sure your panels are enough to satisfy your needs in that number of hours or less.

There are links on this forum to solar forecast averages (based on annual history) for given areas. If you're lucky someone may drop by and link it. Otherwise a review in the resources section should turn it up. It's also posted in a few member's signatures. So while you're perusing threads, keep an eye open. I think this is enough info to get you and keep you going in the right direction for a bit. Don't hesitate to ask more questions, though.
MPPT is the 3010. Which is another learning opportunity. Sizing the components of the system. I think I over killed a bit on a 30A mppt. I wanted a faster charge but in all reality, at 24v series panels with only 380W pushing max 18.6A current I could have used a 20A mppt. Austin Texas doesn't get below 32 very often and even then I could connected in parallel and not worry about over amping.
 
MPPT is the 3010. Which is another learning opportunity. Sizing the components of the system. I think I over killed a bit on a 30A mppt. I wanted a faster charge but in all reality, at 24v series panels with only 380W pushing max 18.6A current I could have used a 20A mppt. Austin Texas doesn't get below 32 very often and even then I could connected in parallel and not worry about over amping.

There's advantage to oversizing. 1, room to grow. 2, less stress on the component. Same goes for increasing voltage. It causes less current stress on the system.

Also, the controller (assuming the BN3010) model you have is known to handle overpaneling. I do not know if the AN model can be over-paneled. In over-paneling, as long as you don't go over the voltage or current limits of the SCC, you can add panels over the wattage that it is spec'd to handle. The advantage there is that while it wont actually be able to use the full output of your panels at peak production, your peak curve would stay higher longer throughout the day (increasing overall production).

If I were you i'd max my voltage in series and only then would I start paralleling (assuming you dont have shading issues, series panel dont do well in partial shade). Also, rather than sticking to the idea of 12 or 24v panels, consider your options and maybe look at 300 or 400 watt panels. Check santan solar. Its highly recommended on this forum. They have good prices on both used and new panels and as far as I know they ship.

Almost everything I told you, I've learned from this forum. It's a great resource to keep at your fingertips (FYI).

For the level of portability you're talking about, I don't think a few bigger panels would be too much. If you really wanted to get "jiggy" with it, you could put some wheels on 1 end of each panel frame. Then lift the other end and wheel it around when you need to. Or just mount each one to a dolly (if you can find them cheap enough). There are quite a few options for you to really get yourself some solar power flowing.
 
Back
Top