diy solar

diy solar

New Solar Assistant Install Not Able To Register or Activate

OilCan

New Member
Joined
Aug 24, 2022
Messages
50
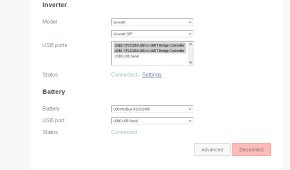
Well purchased and downloaded the SA software and imaged it with Balena. Installed the image in Raspberry Pi Orange LTS and chose the ETH connection method. SA finds my device on the network with the correct IP address. Step 3 shows a screen to register and activate a Site but I am not offered such a browser screen to do so. My account shows my license order# and the Site "unallocated".

So what is preventing the finalization of this startup?
 
Well after various attempts I was finally presented a page to activate, so hopefully this is the end of this story.
 
Went through this yesterday all day and it works great now. After I rewired the signature solar cables to the batteries.
 
Well the provided USB to RS485 cables that come with the EG4 batteries is not recognized. Plugged into Win10 USB and Dev Mng says it cannot find a driver. Well there are only two wires connected on these cables, white and green are on pins 7,8 on the RJ-45 plug. Other posts in here mentioned they should be on pins 1 and 2. Well I tried that and makes no difference. Also either way the Raspberry Pi senses when they are plugged in but you still see an USB2 USB2.0-Ser! mark at the end of the device in the list. So will not communicate with BMS, for now just using "use inverter values" setting in the SA battery config setting. The BMS software from Signature Solar also does not work with these cables for the laptop, so will be calling them Monday.
 
Last edited:
You need to use the brown and brown/white wires only. I followed this video and it worked after I rewired and reset the battery dip switches correctly.

start with dip setting two and go up in order to other batteries.
Battery ID Dip Switches U= Up D=Down


1 UDDD reserved, start with two

2 DUDD

3 UUDD

4 DDUD

5 UDUD

6 DUUD

7 UUUD

8 DDDU

9 UDDU

10 DUDU

11 UUDU

12 TBD

13 TBD

14 DUUU

15 UUUU


I have a bank of 6 eg-4s so as per the Solar Assistant manual, my first battery is ID 2 and my last battery is ID 7

I got this info using the signature solar BMS software, attached to an individual battery trying all possible dip settings and then scanning using the software for the resulting battery ID

I have dual LV6548 inverters and they don't seem to talk directly to the batteries. some inverters may need to start at ID-1, not sure

what a pain. but seems to be working great now

Like Reply
Report
  • Like
Reactions:wayne530
 
Well the Signature Solar EG4LL battery cable only has two wires, and they are white and green. They were originally connected to pins 7,8 and didn't work and other posters on here say they should be on pins 1,2 and that doest work either. May laptop doesn't recognize the Signature Solar cable and just places as exclammation mark by it, so I cannot even use Signature Solar's BMS tools software. As no Com Port is being created.
 
You have to use a new cat 5 cable, cut one plug off and only use the brown and brown/white wires connected to the correct polarity in the video. Reuse the circuit board end and throw away the two wire ss cable.
 
You have to use a new cat 5 cable,cut one plug offand only use the brown and brown/white wires corrected to the correct polarity in the video.
That doesn't matter a cat5 cable has brown/white already on the RJ-45 pins 7 and 8, well the cables from Sig Solar are likewise on pins 7 and 8 and they don't work, wire color has nothing to do with it, only where the conductors relate to pinouts. What I have is essentially wired as you describe. Thanks just the same

Also plug your cable into your PC and see if a Com Port is assigned to it, I would like to see what Windows says. If no Com Port is assigned BMS Tools cannot be configured.
 
Worked for me. When I received my inverters, the two black cables were wired differently. I paid no attention to pinouts and cut off a cat 5 and used the brn and brn/wht wires on the circuit board end as the video states, then everything worked fine.
 
Turns out that none of this had anything to do with my cables. Signature Solar in their wisdom does not package the driver needed with their download for my EG4-LL batteries. Their Youtube vids say the drive that installs the Com Port is on their site, well it is exceptionally hidden.

Fortunately I was able to find it on the diysolarforum site:


Now my laptop connects to my batteries without issue using the BMS tools.

Now I have the same problem remaining with Solar Assistant, it too is not installing a driver to recognize the USB to battery RS485 cable. When plugged in SA detects the new USB connection but places an (!) exclammation mark at the end, which is similar to what happened in Windows without the proper driver.

My image from Solar Assistant was for the Raspberry Pi3 Orange LTS, so it looks like I will need to get support from SA to fix it as their instruction are not working with my Pi at least for accessing the batteries in detail For now "using inverter values" works and the other features. So will need to get them to provide a Linux version for my Pi to proceed.

This is the one I think I need to fix my Raspberry Pi 3 LTS installation:


Unfortunately Solar Assistant doesn't allow the end-user to update on his own. so will see when they can offer an update to get the detailed battery option working.
 
Last edited:
Weird, I am using the same setup Pi 3LTS and the LTS file listed on the site. The driver must have been in my file. After changing the pins it would let me change from using 'inverter values to the USB Narada RS485 on port USB USB serial setting.Then go into config advanced settings under the battery and select Narada read from the battery.

Dashboard › Battery​


Power

1838 W

Voltage

54.0 V

Current

34.0 A

Capacity

199 Ah

Temperature

17.5 °C

State of charge

59 %

Pack #1​


Capacity

99.7 Ah

State of charge

59.8 %

Power

929 W

Current

17.2 A

Voltage

54.0 V

Temperature

17.5 °C

Cycles

19

Charge capacity

59.6 Ah

Cell voltage - Highest

3.381 V

Cell voltage - Average

3.374 V

Cell voltage - Lowest

3.366 V

Pack #2​


Capacity

99.7 Ah

State of charge

58.3 %

Power

909 W

Current

16.8 A

Voltage

54.1 V

Temperature

17.5 °C

Cycles

19

Charge capacity

58.1 Ah

Cell voltage - Highest

3.385 V

Cell voltage - Average

3.379 V

Cell voltage - Lowest

3.374 V
 
Are you using EG4LL or the Lifepower model? I tried the Narada and Modbus and some of the others in the list. With your working setup does your USB connection listed in the list for your batteries, show an (!) as the last character?
 
Yes I can see your USB is properly recognized and the driver is installed. Well I emailed Solar Assistant and am waiting for their response.
Thanks for checking!
 
Well this morning I plugged in my USB2RS485 cable and it was properly detected! Only problem is it is constantly connected and then "no response" every 10 secs but without the Pack IDs. When I try to set battery#1 to ID#2 as Solar Assistant instructs my split phase Growatts go into fault, they only like ID#1 for the master battery I guess. Not sure what is causing the periodic connect/disconnect, hopefully SA can work with me over Zoom or Teamviewer. I wonder if after sending them a ticket yesterday they were able to access my Raspberrty Pi remotely and fix the driver problem?
 

Attachments

  • BatteryConfig.jpg
    BatteryConfig.jpg
    34.5 KB · Views: 16
  • Battery.jpg
    Battery.jpg
    54.6 KB · Views: 16
Last edited:
Update 1/17/2023: Well to day I am no longer getting the connected/disconnect messages. I guess SA services a site remotely and doesn't tell you they fixed anything. Oh well glad that's working properly. Now if only the Battery#1 ID change would work without having a inverter fault, then I will be 100%.
 
You need to use the brown and brown/white wires only. I followed this video and it worked after I rewired and reset the battery dip switches correctly.

start with dip setting two and go up in order to other batteries.
Battery ID Dip Switches U= Up D=Down
1 UDDD reserved, start with two

2 DUDD

3 UUDD

4 DDUD

5 UDUD

6 DUUD

7 UUUD

8 DDDU

9 UDDU

10 DUDU

11 UUDU

12 TBD

13 TBD

14 DUUU

15 UUUU


I have a bank of 6 eg-4s so as per the Solar Assistant manual, my first battery is ID 2 and my last battery is ID 7

I got this info using the signature solar BMS software, attached to an individual battery trying all possible dip settings and then scanning using the software for the resulting battery ID

I have dual LV6548 inverters and they don't seem to talk directly to the batteries. some inverters may need to start at ID-1, not sure

what a pain. but seems to be working great now

Like Reply
Report
Reactions:wayne530
So I have four EG4 (no LED batteries) set to
DDDU
DDUD
DDUU
DUDD

The instructions I saw was the first battery needs to be set to binary DDDU to talk to the inverters, then the others just have to be unique DIP setting. Is that not the case? I am just trying to get the inverter to talk to my laptop via the RJ45 to USB cable they included with the EG4 6500s
If I change the DIP switches, will it still be able to work with the inverters?
 
Well my solution to the battery ID issue was to change Menu05 (Growatt 3000TL LVM24P) and change from (Li) to (USE). Disconnect BMS cable from Growatt and instead install a 3-port ethernet splitter, connect that to the Raspberry Pi USB2RS485 cable from SigSolar and connect each EG4LL battery to one of the ethernet ports, from their RS485 port, all daisy chaining was removed. Now all my packs are visible in Solar Assisant and everything is running in SA without issue....finally!
 
So I have four EG4 (no LED batteries) set to
DDDU
DDUD
DDUU
DUDD

The instructions I saw was the first battery needs to be set to binary DDDU to talk to the inverters, then the others just have to be unique DIP setting. Is that not the case? I am just trying to get the inverter to talk to my laptop via the RJ45 to USB cable they included with the EG4 6500s
If I change the DIP switches, will it still be able to work with the inverters?
The batteries you have sound like they are EG4 Lifepower which use a reverse Dip number compared to EG4LL. Check the Signature Solar videos on YouTube and I believed they showed that with the Lifepower batteries battery#1 needs to be set to ZERO and then begin setting the others in sequence numbering thereafter. As shown LIfepower master battery starts with ZERO, all down.

Check this vid:

 
So I have four EG4 (no LED batteries) set to
DDDU
DDUD
DDUU
DUDD

The instructions I saw was the first battery needs to be set to binary DDDU to talk to the inverters, then the others just have to be unique DIP setting. Is that not the case? I am just trying to get the inverter to talk to my laptop via the RJ45 to USB cable they included with the EG4 6500s
If I change the DIP switches, will it still be able to work with the inverters?
My Win10 laptop would not connect to my batteries initially when using the SigSolar BMS tools because they did not include the CH340 driver in their .zip file. I was finally able to find it on here and after installing able to use the BMS Tools with the EG4 batteries:

 
Back
Top