ezwryder
New Member
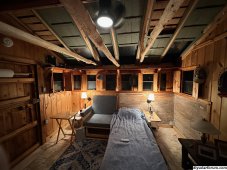
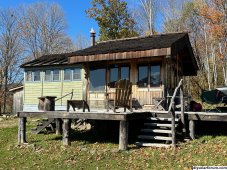
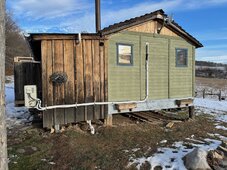
I’ve learned a lot from this forum and Will’s videos and wanted to share what I built for our off grid cabin. It is extremely modest compared to many others here but the important thing is that it is working very well for its intended purpose. It has been running in the field for six months and has been rock solid.

I had two primary use cases. First I wanted to get power and Internet to the cabin so I could install cameras to keep an eye on the place and to enjoy the view. My second requirement was for the system to have enough power for a few conveniences when we are there. I wanted the system to have enough capacity to run for a few days w/o recharge in case there was a period of cloudy days and/or snow. Remote management was important as the cabin is, literally, 1,000 miles from the house.

Most components are Victron: 100/30 charge controller, shunt and Cerbo GX. I started with a GoWise inverter and I still use that for large loads when we are at the cabin, but for running the router, antenna and cameras, I added a Victron Phoenix so I could remotely monitor and control the inverter. I also felt more confident in the Victron’s ability to auto-restart in the event of a low battery condition.
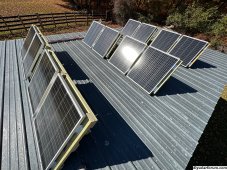
Power is supplied by six 100 watt panels from HQST. I used a combiner box from Watts247 to tie them together in three two-panel circuits. The two batteries wired in parallel are SOK 206AH with heaters. I chose this option because winter temps at the cabin can fall below freezing for extended periods of time in January and February.
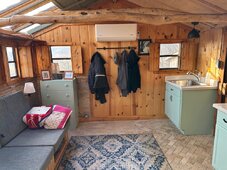
The final thing I added to the setup was a Kasa smart power strip. I use this to conserve some power by using the schedule feature of the strip to cycle the cameras off at 10 p.m. and on at 7 a.m. I also have a radio and lamp in the cabin scheduled to turn on/off at selected times. Finally, I have series of repeating “ON” events scheduled for the router and antenna just to insure if I open the Kasa app and accidentally turn off the wrong device, I won’t be totally screwed.


A bonus feature is the ability to monitor the power that each device is consuming. I was very surprised and pleased to learn that the router and antenna are only using a total of 12 watts. Cameras consume about 25 watts and system overhead is about 10 watts.
Getting the Internet set up was pretty easy. As it turned out the cabin was within line of sight of the local telephone coop equipment room in the valley below. That made it possible to do wireless broadband. It’s not gig speed fast (although it could be in the future), but it is plenty fast to do everything we need. When at the cabin, we can use Voice over WiFi for reliable phone service. (The red arrow is the location of the antenna at the phone co equipment room. How lucky is that?)


Getting the IP cams set up for remote access took more work. My main cameras are from Lorex. One is a fixed 110 degree eyeball cam and the other is a 360 cam. I had some initial trouble getting these configured and as backup I added two Eufy cameras, one exterior solar wireless and one interior 360 wireless. In the end I got all of them to work, so I have eyes all over the place.


What I really like about the setup is that all the components work flawlessly together and I really haven’t had any concern about performance or reliability. The Victron components and software were easy to set up and control. I really like the ability to see what’s happening with the system in real time and the ability to make tweaks and changes to the components.
Disappointments? Nothing critical. The only thing that seems a little flaky are the Bluetooth BMS modules on the SOK batteries. Issues with these have been widely reported. They seem to perform well enough. For now I feel okay about the battery choice but if I had to do it again I would probably take a longer look at the Battleborn heated batteries.
I also had some funky issues with the Kasa three-outlet power strips. The five-outlet strip is solid, but the three outlet strips would randomly turn circuits on and off when connected to either of the inverters. On grid power, they work fine. Luckily I needed exactly five outlets so the larger strip was all I needed. It has performed well.
Future enhancements—I don’t have immediate plans to make changes to the system. It is working well for its intended purpose. If I were to build it again I would add bus bars to better manage the connections between components. I do have plans to move the solar panels off the cabin deck to a less conspicuous location.
Solar Component List
HQST 100 Watt Solar Panels (6)
Watts247 4 to 1 Solar Panel Combiner Box
Victron Cerbo GX
Victron SmartSolar 100/30
Victron Shunt 500A
Victron Phoenix Inverter 12/500
GoWise 12/3000 Inverter
SOK 206AH Heated Batteries (2)
Kasa Smart Plug Power Strip H5300
Internet
Calix 844E router
Ubiquiti LiteBeam AirMAX LBE-5AC-GEN2-US
Cameras
Lorex 2K 4MP Outdoor PTZ Network Dome Camera LNZ44P12B
Lorex 4K 8MP Audio Dome Camera LNE9242B
TP-Link POE Switch (provides power/connectivity to the Lorex cams)
Eufy Security Solo IndoorCam P24 2K Pan & Tilt
Eufy Security SoloCam S40 Solar, Wireless Outdoor Camera
Miscellaneous
WindyNation 2/0 Copper Welding Wire (Battery to inverter)
Blue Sea Systems 285 Series 40A Circuit Breakers (2)
Blue Sea Systems 9003e Single Circuit Battery Disconnect 48V/350A
WindyNation ANL 300 Amp fuse
iGreely Solar Panel Wire 10 gauge
Ferrule crimp connections for screw-down terminals
2/0 solid copper lugs for battery/inverter connections
I had two primary use cases. First I wanted to get power and Internet to the cabin so I could install cameras to keep an eye on the place and to enjoy the view. My second requirement was for the system to have enough power for a few conveniences when we are there. I wanted the system to have enough capacity to run for a few days w/o recharge in case there was a period of cloudy days and/or snow. Remote management was important as the cabin is, literally, 1,000 miles from the house.
Most components are Victron: 100/30 charge controller, shunt and Cerbo GX. I started with a GoWise inverter and I still use that for large loads when we are at the cabin, but for running the router, antenna and cameras, I added a Victron Phoenix so I could remotely monitor and control the inverter. I also felt more confident in the Victron’s ability to auto-restart in the event of a low battery condition.
Power is supplied by six 100 watt panels from HQST. I used a combiner box from Watts247 to tie them together in three two-panel circuits. The two batteries wired in parallel are SOK 206AH with heaters. I chose this option because winter temps at the cabin can fall below freezing for extended periods of time in January and February.
The final thing I added to the setup was a Kasa smart power strip. I use this to conserve some power by using the schedule feature of the strip to cycle the cameras off at 10 p.m. and on at 7 a.m. I also have a radio and lamp in the cabin scheduled to turn on/off at selected times. Finally, I have series of repeating “ON” events scheduled for the router and antenna just to insure if I open the Kasa app and accidentally turn off the wrong device, I won’t be totally screwed.
A bonus feature is the ability to monitor the power that each device is consuming. I was very surprised and pleased to learn that the router and antenna are only using a total of 12 watts. Cameras consume about 25 watts and system overhead is about 10 watts.
Getting the Internet set up was pretty easy. As it turned out the cabin was within line of sight of the local telephone coop equipment room in the valley below. That made it possible to do wireless broadband. It’s not gig speed fast (although it could be in the future), but it is plenty fast to do everything we need. When at the cabin, we can use Voice over WiFi for reliable phone service. (The red arrow is the location of the antenna at the phone co equipment room. How lucky is that?)
Getting the IP cams set up for remote access took more work. My main cameras are from Lorex. One is a fixed 110 degree eyeball cam and the other is a 360 cam. I had some initial trouble getting these configured and as backup I added two Eufy cameras, one exterior solar wireless and one interior 360 wireless. In the end I got all of them to work, so I have eyes all over the place.
What I really like about the setup is that all the components work flawlessly together and I really haven’t had any concern about performance or reliability. The Victron components and software were easy to set up and control. I really like the ability to see what’s happening with the system in real time and the ability to make tweaks and changes to the components.
Disappointments? Nothing critical. The only thing that seems a little flaky are the Bluetooth BMS modules on the SOK batteries. Issues with these have been widely reported. They seem to perform well enough. For now I feel okay about the battery choice but if I had to do it again I would probably take a longer look at the Battleborn heated batteries.
I also had some funky issues with the Kasa three-outlet power strips. The five-outlet strip is solid, but the three outlet strips would randomly turn circuits on and off when connected to either of the inverters. On grid power, they work fine. Luckily I needed exactly five outlets so the larger strip was all I needed. It has performed well.
Future enhancements—I don’t have immediate plans to make changes to the system. It is working well for its intended purpose. If I were to build it again I would add bus bars to better manage the connections between components. I do have plans to move the solar panels off the cabin deck to a less conspicuous location.
Solar Component List
HQST 100 Watt Solar Panels (6)
Watts247 4 to 1 Solar Panel Combiner Box
Victron Cerbo GX
Victron SmartSolar 100/30
Victron Shunt 500A
Victron Phoenix Inverter 12/500
GoWise 12/3000 Inverter
SOK 206AH Heated Batteries (2)
Kasa Smart Plug Power Strip H5300
Internet
Calix 844E router
Ubiquiti LiteBeam AirMAX LBE-5AC-GEN2-US
Cameras
Lorex 2K 4MP Outdoor PTZ Network Dome Camera LNZ44P12B
Lorex 4K 8MP Audio Dome Camera LNE9242B
TP-Link POE Switch (provides power/connectivity to the Lorex cams)
Eufy Security Solo IndoorCam P24 2K Pan & Tilt
Eufy Security SoloCam S40 Solar, Wireless Outdoor Camera
Miscellaneous
WindyNation 2/0 Copper Welding Wire (Battery to inverter)
Blue Sea Systems 285 Series 40A Circuit Breakers (2)
Blue Sea Systems 9003e Single Circuit Battery Disconnect 48V/350A
WindyNation ANL 300 Amp fuse
iGreely Solar Panel Wire 10 gauge
Ferrule crimp connections for screw-down terminals
2/0 solid copper lugs for battery/inverter connections
")