diy solar

diy solar

Once a week classroom in the mountains

RogerOrange

New Member
Joined
Nov 18, 2019
Messages
10
I would like to hear what the thoughts are on this forum about the following situation.

Once a week we need to have some power for the following devices:
LED lights 8 hours (4 x 20W) = 640W
Computer 4 hours 50W = 200W
Projector 3 hours 400W = 1200W
SUM for one day use 2040W

Peak draw: 750W

There is a continuous draw for a WiFi access point with Wireless bridge of about 15 watts 24/7 (360 watts per day)


The location of the cabin is in the mountains in Southern California with no shade.

Setup sould be simple low maintenance and "idiot-proof"

Looking forward to your thoughts.


Roger
 
Defining Parameters,

1. 24/7 Power To Wi-Fi, 15 Watt Load, 360 Watts Daily
2. Peak Draw 750,
3. 2,400 Watts 1 day a week including Wi-Fi...
4. Potential for 6 days recovery.

5. Budget?


-----------

Charge sources?
Access to direct sunlight?
Access to wind generator?
Access to Micro-Hydro?
Gas powered machinery running that could charge batteries (Vehicles moving everyday?)

-----------------

With information supplied...

A. No RE charging available.
12 volt battery/batteries in parallel, each removable individually for exchange/charging off site.
1 will always be connected.

Two inverters,
A 75-100 Watt inverter to power Wi-Fi (mobile lap/cigarette lighter plug in type, dirt cheap).
I would recommend smaller for a 15 Watt Load, but I can't think of a single well built smaller inverter than the 75-100 watt types.

A 1,000-1,500 watt inverter only used during classes and turned off so it doesn't suck the batteries.
This will easily handle 750 Watts, with any potential surge from electronics.
Unused inverters are vampires that suck power 24/7 when not turned off, you will have more in parasitic losses than the Wi-Fi uses, so much smaller inverter for Wi-Fi.

Two (or three) batteries can be charged, rotated in as necessary.
A vehicle with two batteries on quick connects can donate a charged battery, recharge a low battery every time you pass the place.

--------

B. RE power available, solar PV, Micro-Hydro, Wind...

With 6 days to recover between large drain on batteries, it wouldn't take many panels to charge a 2 battery string.
One good day of sun would do it...
You will need a charge controller.

I still recommend splitting the inverters, small & large, and using a mobile computer type inverter for Wi-Fi.
Small 'China' inverters often don't have the cleanest power output, a unit for a computer would have clean power for the Wi-Fi.

--------

C. Mounts. Climate Control. Etc.

Having lugged batteries around for 25 years I suggest a roller cart.
Plastic bin/tub/battery boxes on top shelf for batteries, plastic battery box keeps anything that *Might* happen with the batteries out of the electronics mounted on bottom shelf.

Inverters, charge controllers, Wi-Fi all mounted below and protected by legs/plywood, whatever.

If this is an unheated space and gets damp,
I suggest metalized coating insulation board & actual metal tape for duct work in corners/seams.
Their own heat will help keep temps more stable and reduce moisture if you seal up the lower shelf as a compartment.
Sealed up well, moisture reducing products are available off the shelf, things like 'Damp-Rid'
 
Last edited:

You did WAY better than most!
You had peak draw, daily requirements, weekly requirements, estimated total load, etc.

'Ideal' or 'Perfect' never happens...
A GOOD plan today is better than an anticipated 'Perfect' plan in 10 years...

When I do portable or backup for someone, it's a job cart with solid wheels.
Figure out the size & mounting needed for inverters, charge controllers, breakers, etc,
With the top shelf OFF.
Bottom tray, wheels, upright in place, inverted 'T' out of plywood, makes two long runs for mounting.

When I'm done with arranging/wiring, I put a top piece on it, it's now a 'H' on its side.
This supports the battery tray on top,
And I just hack the legs off so top tray sits on the 'H' beam.
I hate lifing batteries, so the shorter the better! Having battery tops at a reasonable height make maintenance much easier.

I was non-climate controlled for the first 3 years, I finally figured out to insulate and let the inverter/equipment heat itself, simply open the lid or doors in summer...


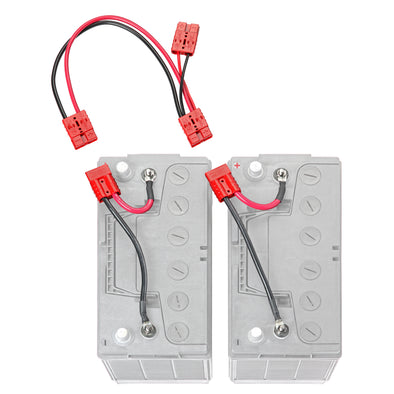
I used Anderson brand connectors and charged my first batteries on the vehicle, pulling one out of the Jeep for camp/building power.
All different size amperage & wire gauge terminals are available off eBay for cheap, there is a crap ton of these on the surplus market, they are common as nails.

07_RCE12VBPK_394x.jpg


This allows you to pull either battery and still leave one to power the Wi-Fi.
It's just a little different way to wire batteries in parallel.
The Red terminal sticking up wouldn't be there, the cables simply go to the inverter.
Where cables terminate at inverter, there will be common lug ('Eye') terminals attached to cables.

If you wonder about doing it this way...
These connectors come from 50 amps to 350 amps.
The 'Blue' (you can get that size in a bunch of colors) is 175 Amp continuous.
The 'Gray' (you can get that size in a bunch of colors) is 350 Amps continuous.

WinchInstall29.gif

With an arrangement like this you can add as many batteries in parallel as you want to increase reserve time.
All kinds of accessories for these connectors, one hand disconnect, emergency disconnects, handles (shown), moisture resistant boots (shown), and the terminals are removable/replaceable from connector body.

WinchInstall32.gif

Anderson Connectors are color coded, only the same color sides will mate.
I use smaller version for my solar to charge controller hookups, it 'Idiot Proofs' plugging panels (or wind/water) sources into the wrong connector.

sb50-sb-series-50-amp-anderson-powerpole-kit_580.jpg


This is about as 'Idiot Proof' as it gets!

This way, the car rolls over to charge source and plugs in with one size/color connector,
The batteries/inverter will all connect in an 'Idiot Proof' manner,
And any battery in the string can be pulled without loosing power to Wi-Fi inverter.

Other than common extension cords for 110vac and rotating batteries in their string positions, not much else should need to plug into your cart.
Charge controllers, inverters, Wi-Fi hub can all be fairly well hard wired since they aren't going anywhere off the cart.
 
Last edited:
Some math so we can figure out wire gauge size...

1,000 Watt Inverter ÷ 12 Volt supply = 83.33 (84) Amps.
4 Ga. (AWG) cable will conduct 92 Amps continuously without heating up.

1,500 Watt Inverter ÷ 12 Volt supply = 125 Amps.
2 Ga. (AWG) cable will do 131 Amps continuously without heating up.

Safety issue here, cables MUST carry the maximum rated load of the inverter,
Even though you expect a maximum of 750 Watts, your electrical equipment WILL have a start up 'Surge' demand, and even though momentary, without cable capacity the inverter will kick itself out, or possibly damage itself depending on how it's protected.
You also don't want to 'Brown Out' (low voltage) the computer or anything computerized.

------------

A second small inverter powering the Wi-Fi...
Where large cables get terminals for the inverter connection,
Simply stuff additional 10 or 12 Ga. (AWG) wires in with the battery cables to inverter before you crimp.

This will give you a direct 12 VDC 'Tap' to the entire battery string for your smaller inverter powering the Wi-Fi hub or anything else 12 VDC you might like to power.
10 Ga. Wire gets a 30 Amp fuse/breaker, automotive type is fine to keep costs down,
12 Ga. Wire gets a 20 Amp fuse/breaker.

If this rig is going to be in damp conditions, I suggest crimp, solder & heat shrink lug/terminal connections.

By inserting the smaller wires into battery cable/inverter main line lugs, you are removing a bolted together 'Stack' and the resistance/corrosion problems 'Stacks' bring to the table.
The crimped, soldered & insulation sealed splice will work for decades with zero problems, it also helps keep up your your request to 'Idiot Proof' the system as much as possible.

The charge controller OUT PUT can also be crimped directly into battery cable mains, the cable/lug soldered and sealed.
*IF* the charge controller ever needs to be changed, it will have studs/ring terminal at the controller, your harness doesn't need a bunch of ring terminals/Lugs stacked & bolted together creating potential failure points.

See how two cables can be crimped into one socket in the first picture I posted if you need visual reference.
The only time a harness would need to be replaced is if you increased inverter size... Bigger inverter means bigger master cables.
 
Last edited:
This is another way to parallel batteries in a string so any one battery can be removed without disconnecting all batteries (continuous power to Wi-Fi and 'Idiot Proof').

Simply leave slack in cables between batteries so cables can be moved out of the way and battery removed from tray.

WC243.jpg


These come in positive/negative post type (shown), and the come for threaded stud top batteries.
This is the wrong cable size, it's just for display of concept/type.

A trick with the above is not to crimp it onto the cable, instead run a bolt through the hole and bolt on cables.

-------

The absloute cheapest thing you can get away with for batteries in parallel is two cables shoved into one of these.

725636402027.jpg


shopping
 
Last edited:
Facts
  • LED lights 8 hours (4 x 20W) = 640W
  • Computer 4 hours 50W = 200W
  • Projector 3 hours 400W = 1200W
  • WiFi 23 hours, 15W = 360W
  • SUM for one day use 2400W
  • Peak draw: 750W
The peak draw means you want an inverter of at least 750W, I'd say add
20% as a lot of cheap units can really operate at peak for any length of
time (so ~1kW unless you're buying a solid brand).

Battery Requirements
This is a bit tricky as it depends on what time of day the class room
operates; that is if the peak hours are sunlit hours then you don't need
battery for that time and can use the graph to the right. The Earth
rotates at 15° per hour, so for example at noon the panel produces
100% of the panel's rated output, but at 9:00 AM the sun is
(12-9) x15°=45° and so at 9:00 only produces 70% of it's rated output.
Intensity_small-psmfb4.png
But, does class need to happen even if it's rainy that day? If so, you'll need battery for the full operating length of the class; so for lithium 2400/.8 = 3000Wh, and at 12V that's 250AH. Or, lead-acid at 50% DoD is 4800Wh and at 12V that's 400 AH. But see the Battery FAQ as with Lead the actual number of AH a battery has is affected by the discharge rate and temperature. LiFePO4 is too, but to a lesser extent unless it's below freezing which would destroy lithium.


Lithium or Lead?
Lead-Acid is probably your best bet. Operating at 50% DoD lead can get somewhere between 600 to 1000 cycles and since you'd be cycling once per week that's ~11.5 to 19 years. So, for this application lead acid is typically more economical.

How many Solar Panels?
This goes back to the battery size. You need some battery to keep the wifi running 24x7, but at 360W/d; that could be 360/12= 40AH battery.

If you're going for "full" battery so you can have class on rainy days, then the question is how long does it take to fill the battery up? For energy losses, the amount of power you need is 2400 / .8 = 3000W, let's assume their might be two rainy days in a week so that gives you 5 days to generate that 3000W. If which case you to look up your insolation number from an insolation map; let's say it's 5.2. So 3000W / 5 d / 5.2 = 116W worth of solar panels. Each day your panel would generate 116x5.2=603W and over 5 days that would give you 3kW.

Minimizing Battery
Assuming class is canceled when there is no sun, you could minimize the battery by having solar provide the peak output from say 8:30 to 4:30.
From the table you can see at 8:30 the panel output is 50%, since the peak is 750W you'd need 1500kW of solar panels to make that work. The WiFi would still need the 40 AH 12V battery. Sadly, you'd be throwing most of the power away.

Right Sizing
So what should you do? Probably something in-between or the full battery for cloudy days. Hopefully this post has given you some ideas and the way you can adjust things to calculate what best suits your specific situation.
 
Wow thank you all for the very detailed information!

Below I have attached a spreadsheed with my first idea.
If there is no sun during the class the batteries would potentially be drained to about 50% witch is not ideal.
Assumig there will be ample of daylight during most of the classes we should never get that deep.
Since the system will be used only once a week there is litte concern about charge cycles I think.


1574207191812.png
 
I really like this double-sided post connector.
Not understanding about using a bolt rather than crimping but that should become clear once I have it in my hands :)

WC243.jpg


These come in positive/negative post type (shown), and the come for threaded stud top batteries.
This is the wrong cable size, it's just for display of concept/type.
 
BTW I have an other question open on this wonderful forum that hasn' been answered yet.
Now I have the attention of experts.

Any equipment out that that allows me to remotely monitor the status and perhaps even manage the system?
 
I really like this double-sided post connector.
Not understanding about using a bolt rather than crimping but that should become clear once I have it in my hands :)

WC243.jpg

It's *Supposed* to be a crimp terminal, crimp a cable in both sides.
You *Can* stick a bolt through the tube and use common lugs ('eye' rings) on both sides, like pre-made cables come with. See the dirt cheap copper terminal above.

If you can crimp, I always recommend crimped on terminals.
 
The budget for the wiring might and sundries might be a bit low, if you have a broken jump-start or similar device in your garage (or eBay or a neighbor) you can scavenge parts (e.g., wire, switch) and reduce costs. Take a look in the Show & Tell section or Will's DIY systems; a lot of folks have put together "portable" systems with everything strapped to a hand-cart... it'll give you some insight to the wiring, fusing, etc. I'm not familiar with the hardware you listed, but you can double-check the MPPT sizing with temperature corrections from the FAQ entry: Figuring out how many panels in series and parallel based on your MPPT. Also, be sure to check the Battery FAQ to understand what you need to look for on those cold days (Lead acid batteries lose power in the cold). Even though your voltages won't be all that high, make sure to use DC switches where needed rather than AC switches.

You might also want a meter or two so you can see what's happening at a glance, it can be a real pain to diagnose without some properly placed tell-tales. Although the Renogy MPPT might have something built in; Hopefully the Renogy-knowledgable folks will chime in on this.
 
I ALWAYS recommend a 'Marine' grade inverter.
You'll pay $20-$25 more, but you get supported circuit boards, epoxy potted components in some places, plated terminals, etc.
They just handle vibration & moisture better.

I just had a quick look for 'Connected' (Wi-Fi/Bluetooth) in the 1,000/1,500/2,000 watt range and they were either 4x as expensive, or those cheap generic plastic things from China.
Without just over $100 for 1,000/1,200 watt inverters, around $500 for 'Connected' inverters...
--- How bad do you want to be connected?
And again, I discounted the cheap plastic 'China' inverters, I can't tell you how many of those I've seen fail.

I'm with svetz, I use LEDs or volt/amp gauges off eBay for 'Tattle Tails' on things fairly frequently, particularly if it's something that cycles (on/off) frequently.
I don't have many relays, solenoids, switches that don't have LEDs, and it's stupid simple, most times a LED & resistor, 10¢ is all it costs.
Volt/Amp meters (w/wo switch) are $5 so one mounted a crimped into wiring harness here & there isn't out of the question...

Virtually all the smaller inverters will come with a digital battery volt gauge built in,
I would consider a 'Tattle Tail' LED added to battery side of charge controller.
It will only light (very small draw) when batteries are charging and let's you know the charge controller is actually working.
Anything over about 20 Amps will need a shunt for the gauge, but a Volt/Amp gauge wouldn't hurt anything, I just don't think it's necessary, just eye candy. Flipping the inverter on will give you line voltage since they all have displays these days...

Something I built with volt/amp meter built in just so I didn't have to get the multi-meter out as often.

image_zpsewbwkiqu.jpg

-----------

I'll repeat the dual inverter idea again...
*IF* this cart is going to sit for 6-1/2 days a week and power nothing but the 15 Watt Wi-Fi hub, there is no sense in supplying 1,000 - 1,500 Watts for a 15 Watt Load.

60-75-80-100 watt 12vdc to 110vac inverters are all over eBay, every truck stop, in every Wally-World for cheap.
A glance at eBay shows a dozen or more in the $20-$35 range.
Say under 100 Watts for you 15 Watt Load and no cooling fan needed so consumption drops.

*IF* you check your Wi-Fi hub, there is a better than even chance it's already 12 VDC and will connected directly to the battery without an inverter...
Most have a transformer in the cord or wall plug that converts the 110vac to 12vdc,
If this is the case, you don't need the inverter/transformer-converter at all.
Specs will be printed on the transformer.

Simply cutting the transformer off, installing an inline fuse and connect directly to battery supply (easiest would be to crimp/bolt into big inverter supply lines) is about as simple and 'Idiot Proof' as it gets.
99/100 times the positive wire will have raised ridges or white stripe to denote positive from transformer to device.
15 Watts at 12 volts don't exceed a 3 Amp fuse.
 
Last edited:
Back
Top