diy solar

diy solar

Opinions on how I'm connecting these 32 * LFP 280Ah cells (16S2P)

Thanks for your valuable inputs.
I'll do some reading / further own investigation on this question, but here it goes: Could I connect my Batrium BMS to your proposed configuration? If I buy 16 additional blockmons (I already have 16), could I use them with just 1 Batrium WM4 + 1 shunt, or would I need go for two Batrium's and Shunts (ie, 2 complete BMS's)?

I understand your point of view, and know that by paralleling cells in pair, I'll lose the ability to monitor each single cell individually. But since people are paralleling (many) dozens of used 18650 cells and monitoring them as an whole, I thought that pairing only 2 new (although bigger capacity) cells wouldn't be a problem.

I also asked Xuba por a quote. Amy was super nice, but their quote as around $700 more expensive than what I ended up paying.
I bought my cells at $95 each, including S&H with all taxes and fees (34 cell order; bought 32+2, for redundancy/testing).
Advertised as grade A, new cells.
I am not familiar with Batrium BMS' and their various components, I do know however that they are not cheap and could be considered Tier-1 Premium grade goodness. I peeked at them but the $$$$ made me go elsewhere and I landed on Chargery BMS.

Li-ion 18650 Cells are somewhat of a different animal altogether as is their assembly into packs and the methods used for fusing & bypassing dead cells. It isn't quite the same, similar yes but not the same.

"Technically", it's not a problem and it works and if using new fresh matched & balanced cells it will last BUT (yep, there are but's) IF / WHEN a cell starts to show it's age and they will, at separate times over their lifespan in the pack, this is where the troubles will begin to appear and the pack will deteriorate. When that will happen all depends on the loads, cycling and the individual cells chemistry & effects on them.

The ShunBin pack I bought became an expensive educational experience pack. It came as 24V/350AH (was supposed to be 400AH) and they used 174AH cells paired, just like you are doing. They ghosted weak cells in with good ones and tossed a crappy 8S BMS on there and called it good. NOT AT ALL GOOD ! I rebuilt it as 8S and replaced the aluminium garbage bus bars etc to make it right and no way.... I will now have to split it into proper 8S 174AH packs and replace the 3 weaklings I got saddled with.... even worse was they are at Best Grade-B but most likely used cells and used hard no less.
 
Paralleling 2 brand new, equal spec cells turns them into "one cell". As long as they always stay paralleled they will cycle exactly the same, and should, in theory, age exactly the same. Having two 280ah cells in parallel is exactly the same as just one 560ah cell. Just think about them as one cell (if one cell fails assume they both fail). No need to monitor both cells, as they are no longer two seperate cells. Keep those same two cells married forever.

Using two separate 1p16s if fine if you want redundancy, but it offers no other advantage and can complicate charging (relying too much on the BMS's). JMHO.
 
Final comment to this thread.
Remember an ancient piece of wisdom. "Be cautious no to be penny wise & dollar foolish" saving a few pennies up front can cost you many dollar later.
 
Final comment to this thread.
Remember an ancient piece of wisdom. "Be cautious no to be penny wise & dollar foolish" saving a few pennies up front can cost you many dollar later.

Point taken: you advise that no battery pack has a XSYP configuration, where Y is greater than 1.
Anyhow, I'll risk being a fool and not spend another 700€ on a second Batrium, risking in place that each bad cell will trash a second paralleled cell ($95 per trashed cell).
Considering that the cells are new, equal, I'll never use more than 85% SoC, and that cells pairs will be monitored by a good quality BMS, I think it will be a calculated risk.
 
Last edited:
Remember an ancient piece of wisdom. "Be cautious no to be penny wise & dollar foolish" saving a few pennies up front can cost you many dollar later.

I gave you that same advice about the ShunBin before you got it. You called me a FUD. This situation is completely different, as paralleling new cells is a totally acceptable practice.
 
minor input for your cable connections as I also have the same 280ah cells. I found the threaded hole on the cells only 10mm deep. very shallow.
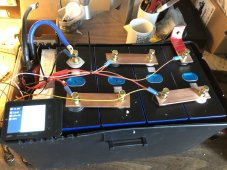
so when connecting the 4/0 cable I made a separate copper bus bar that I could add in a 5/16 hole (in my case) for a proper bolt on the cable. this way you can orient the bus bar and take any cabling pressure off of the battery stud etc.
Do you have a photo of this?
 
Point taken: you advise that no battery pack has a XSYP configuration, where Y is greater than 1.
Anyhow, I'll risk being a fool and not spend another 700€ on a second Batrium, risking in place that each bad cell will trash a second paralleled cell ($95 per trashed cell).
Considering that the cells are new, equal, I'll never use more than 85% SoC, and that cells pairs will be monitored by a good quality BMS, I think it will be a calculated risk.
how did this end up going? I am building the exact same battery in the next few weeks. Would love to hear your experience and how it has worked out over the last year.

Thanks
 
here you go; you'll notice the copper bus bar in the upper right with the red tape. this is the only photo I have as the batteries are currently in use in our 5th wheel and we're on a trip. Dave...

IMG-0212.jpg
 
So, following all your inputs, I've updated my specs and ghetto drawing:
  • Lowered the fuse of the battery to 200A
  • Upped the busbars to 2/0AWG (70mm2)
  • Upped the in/out cable also to 2/0 AWG (70mm2)
  • Replaced the "between shelves" wires with 4/0 AWG (100m2) busbars

    View attachment 8022

What do you think?
Hello, do you have a finished product photo of your battery bank. I am planning on building the exact same set up on shelves as well.

Thank you
 
Hello, do you have a finished product photo of your battery bank. I am planning on building the exact same set up on shelves as well.

Thank you
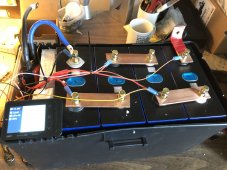
here you go; I was out traveling but am home now.
it all fits in to a group-31 battery case ($12 on amazon). there is a little reptile heater attached to each side (7watts / 120volts) which you can't see. I used 1/8" x 1" solid copper bar to make the buss bars. Note that I used double locking nuts with one of them a nylon locking nut to ensure a good solid connection between the buss bar and the stud of the battery cell. I haven't had any come loose while the trailer shakes and rattles down the road. I have 3 batteries now in the 5th wheel and they are working great.

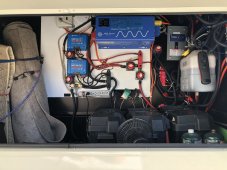
I do have a photo of the 3 batteries in parallel / installed in the cargo bay of the trailer but it's not all that interesting. You'll notice the 3 little battgo battery monitors velcro'd to the back wall. I do like those for monitoring my individual battery cells. you'll also notice the little power strip at the bottom. this is where I plug in my battery heaters. (unplugged right now as it's summer time) this goes up to a switch box. inside there is a solid state relay that is activated by the victron BMV relay when a low temperature is sensed. it closes at 42 deg turning on the heaters (provided the inverter is on) and opens at 65 deg. turning them off. if there is no power for heating the batteries during a low temperature event the victron SCCs won't activate until the temperature event goes away.
As a secondary little benefit the switch box allows me to bypass the solid state relay, turning on the power strip; which I also use to charge my ebikes or to run other tools or equipment. Dave...
IMG-0212.jpg
IMG-0568.jpg
 
Last edited:
Back
Top