jasonhc73
Cat herder, and dog toy tosser.
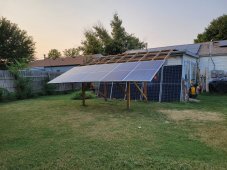
After dismantling the dual-axis tracker, I had some mowing to do.


Do you need permits in your area for ground mounts? Will this pass the code for wind in your area? I know many folks use galvanized pipe in hurricane areas to make sure the structure will handle wind load and pass code. Looks awesome though! As an FYI, you can buy all the components snap-n-rack uses from Grainger supply for 1/10th the cost.After seeing all but two of the 2x4s turn into spaghetti I had to put in cross beams.
When I ordered the extruded aluminum racking the seller sent me only the part that attaches the beam to the L-foot, but no L-foot. So now I am waiting for the L-feet.
I had to add 8 2x4x8s for all the reinforcing and bracing. It is defiantly a lot stronger than it needs to be, and about 1/3rd the cost of unistrut.
I should have used unistrut for the panel mounts like I did on the utility room of the house.
View attachment 64036
Looks real nice!Since less than 400 sq ft, no permit is needed.
Temporary setup;

Amazing, and you still have room to go up to 16KW of Solar. The LV6548's are working great for me also, but I only have 32 280ah cells. I will be testing the Seplos 200amp BMS's to see if they work with the MPP LV6548's over the Pylontech protocol. If they do, this is the perfect off grid solution for me.99.9% D - U - N
View attachment 65067
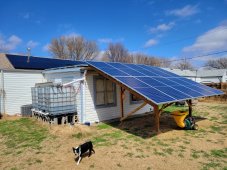
Grounding rod left to do.
I was never "grounded" when installing the panels on the flat part of the roof, but heck even with an open circuit those ground mount panels are sending current somewhere. Some kind of magic. I had quite a bit of voltage traveling through me a few times.
10 CanadianSolar 340W rated. 3400 Wp
12 Used 295W rated 3540 Wp
20 Mission Solar 310W rated. 6200 Wp
42 panels - 13140 Wp.
2 - LV6548s, and 64 280ah LiFePO4 cells, 58.9 kWh. (off-grid/grid connected)
1 - SolarEdge 5k grid-tied
Seplos just emailed me back and said they primarily work over Canbus, and the LV's work over RS485. I asked if it would work with a translator like the Pi, awaiting response.Amazing, and you still have room to go up to 16KW of Solar. The LV6548's are working great for me also, but I only have 32 280ah cells. I will be testing the Seplos 200amp BMS's to see if they work with the MPP LV6548's over the Pylontech protocol. If they do, this is the perfect off grid solution for me.


They are mistaken. The LV6548 has CAN support also. I think its page 5 or 6 in the manual. The BMS port supports CAN, RS485 amd RS232.Seplos just emailed me back and said they primarily work over Canbus, and the LV's work over RS485. I asked if it would work with a translator like the Pi, awaiting response.
Convo:
View attachment 65068
View attachment 65069
actually we discussed this.They are mistaken. The LV6548 has CAN support also. I think its page 5 or 6 in the manual. The BMS port supports CAN, RS485 amd RS232.
@houseofancients I believe converts using a Pi, but it may just be the pinout. The Growatt is very similar, and that has direct support, but it needs a special cable. A standard Ethernet cable will not do it. Both the LV6548 and the Seplos BMS speak Pylontech, so I imagine its just getting the connectivity right, as the protocol is the same.
Here are a couple different pinouts from my research so far: (from multiple sources)
I recently went through the same process, also modifying the cable that came with the cable pack.
The connection that worked for me is:
Inverter <-> Pylontech US3000
Pin 3 <-> Pin 8
Pin 5 <-> Pin 7
No other connections needed.
Hope this helps
Need MPP firmware at least 2.49 or greater.
If I assume that each RJ45 plug pin is named pin 1 to pin 8 - from left to right - as viewed in the in the pics above, then:-
Option A (TomasCrespo)
Inverter <--> Pylontech
Pin 1 <--> Pin 3
Pin 2 <--> Pin 5
Pin 3 <--> Pin 1
Pin 5 <--> Pin 2
(no other pins connected)
Option B (Calvin)
Inverter <--> Pylontech
Pin 3 <--> Pin 8
Pin 5 <--> Pin 7
(no other pins connected)
Deye inverter seplos wiring: from diysolarforum
https://diysolarforum.com/threads/seplos-can-bus-rs485-48v-200a-8s-16s-bms.20051/page-8#post-338673
I have T-568A on the Seplos side (though could be T-568B - won't matter for these two wires) and the below picture on the DEYE side (blue on pin 4 and blue/white on pin 5):
")
Thats my plan sir. As soon as I get my Seplos BMS, I am going to make a bunch of cables, and see if one works.actually we discussed this.
using a pi as i have not have time ( nor gotten a devinitive answer from voltronic/mpp solar ) about the dual identity port.( identified as lion)
rs232 is a seperate port ( identified as pc).
hopefully pretty soon i'll be able to test canbus direct without the pi, unless someone does it first of course
Looks like your getting into video editing also! Nice upload.I just ordered a Victron Smart Shunt to go on the "giant battery".
I also got a drone.
What drone is that? Very steady cam.I just ordered a Victron Smart Shunt to go on the "giant battery".
I also got a drone.
DJI MINI 2.What drone is that? Very steady cam.
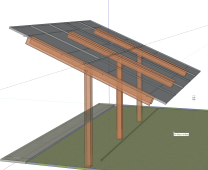
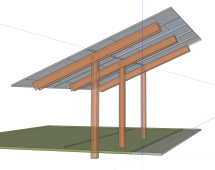
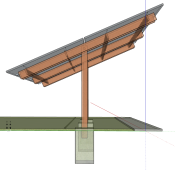
I've seen that setup, it's a good idea also.You could probably use 3 lengths of Unistrut to go from beam to poles, and just move the angle by selecting different holes along the length of the unistrut to hold the panels at the angle you want.
Without a lower mount attachement, you are going to need some sort of vertical stabilization for when it gets windy due to the pivot point. Temp bracing may help, but something more substantial like Unistrut would be better.I've seen that setup, it's a good idea also.
So far the materials list is at $750ish.
Mmmm. Maybe I'll just let my fixed panel array be good enough for this year. ?
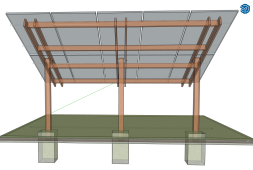
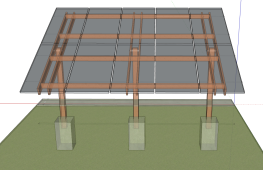
3 6x6 posts
6 2x8 beams
9 2x6 crossbeams
40 Joist Hangers and #9 screws
30 60-lb Quikrete (This seems like way too many to me, but that is what the quikrete calculator shows. My last project called for 8 bags I only used 3)
3 50-lb all-purpose gravel for the bottom of the post-holes.
2-inch pipes as the pivot axis
The plan so far is 6 ratchet straps, two on each leg, one going each way.Without a lower mount attachement, you are going to need some sort of vertical stabilization for when it gets windy due to the pivot point. Temp bracing may help, but something more substantial like Unistrut would be better.