


HappySolar
New Member
- Joined
- Apr 20, 2020
- Messages
- 10
Greetings Forum comrades!
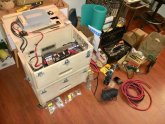
The pandemic forced downtime has offered many of us a countless amount of time on our hands to attempt to use wisely. For me, not being able to tour, I ended up down the solar rabbit hole and designed a mobile solar generator for use in rehabbing a property in the Mojave desert. Thought I’d share some of the progress via this post for fellow DIY Solar Forum members to enjoy.
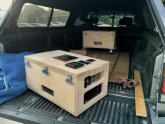
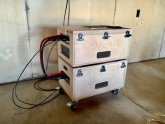
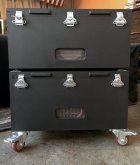
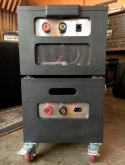
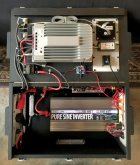
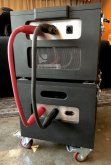
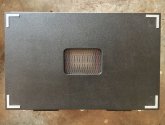
My goal was to build a solar generator that offered power while still being portable and offered room to grow. I chose to fabricate separate, stack-able Charge Controller/Inverter and Battery boxes, for greater portability.
I did the basic dimensional layout in Photoshop, to do as much virtual realization of the project as possible before diving into purchase of components and materials. With each component I chose to use, I found dimensional drawings online and, in some cases, took my own photos and then free transformed the image to be the exact size to the scale of my Photoshop file. This way I could place each component, connector and accessory in place and know that it would work dimensionally. This is piece of cake stuff for industrial engineers, but for DIY’ers like me, it was a revelation to find these images to place into Photoshop. I was able to strategically squeeze both boxes out of a 5’x5’ piece of 13-ply Baltic Birch plywood. Once I built the boxes, I was able to begin digging into the assembly with components and design/build to accommodate minor changes and additions along the way.
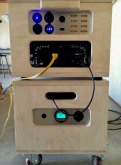
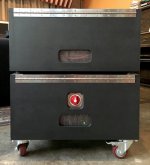
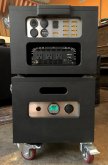
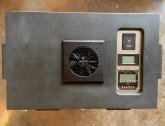
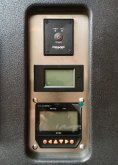
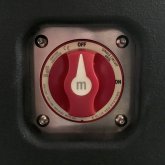
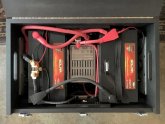
I designed in/out, meter and switch panels for the boxes in Illustrator based on the connectors I planned to use. For the PV input, I chose to use Neutrik PowerCON and for connecting the Controller box to the Battery box I wanted something that was more elegant and easy than a lug terminal and something heartier than Anderson connectors. To that end, I chose to use welding Dinse style connectors. Quick setup/tear down, high power rating and, to me, super cool looking. On the output side, I went with XT60 connectors for DC appliances, along with marine panel mount accessories and jacks. I designed a panel for the Controller box top to accommodate the MT50, PZEM-015 and Inverter on/off switch. And a last minute addition just before painting was the suburb Blue Sea Systems rugged battery on/off switch that I was able to squeeze into the battery box above the IOTA DLS-45 battery charger/maintainer. It was so gratifying to have the .125 brushed stainless steel panels cut for this project. I found an invaluable resource for getting these designs realized in SendCutSend.com. I can’t say enough about the quality, price and ease of use of their service and I highly recommend them for laser cutting your designs.
The photos show the progress from the design stage images through to the end. After a couple test runs to the desert, I finally disassembled the working boxes to paint them and just recently wrapped the assembly. Now, time to get to work!


The pandemic forced downtime has offered many of us a countless amount of time on our hands to attempt to use wisely. For me, not being able to tour, I ended up down the solar rabbit hole and designed a mobile solar generator for use in rehabbing a property in the Mojave desert. Thought I’d share some of the progress via this post for fellow DIY Solar Forum members to enjoy.
My goal was to build a solar generator that offered power while still being portable and offered room to grow. I chose to fabricate separate, stack-able Charge Controller/Inverter and Battery boxes, for greater portability.
I did the basic dimensional layout in Photoshop, to do as much virtual realization of the project as possible before diving into purchase of components and materials. With each component I chose to use, I found dimensional drawings online and, in some cases, took my own photos and then free transformed the image to be the exact size to the scale of my Photoshop file. This way I could place each component, connector and accessory in place and know that it would work dimensionally. This is piece of cake stuff for industrial engineers, but for DIY’ers like me, it was a revelation to find these images to place into Photoshop. I was able to strategically squeeze both boxes out of a 5’x5’ piece of 13-ply Baltic Birch plywood. Once I built the boxes, I was able to begin digging into the assembly with components and design/build to accommodate minor changes and additions along the way.
I designed in/out, meter and switch panels for the boxes in Illustrator based on the connectors I planned to use. For the PV input, I chose to use Neutrik PowerCON and for connecting the Controller box to the Battery box I wanted something that was more elegant and easy than a lug terminal and something heartier than Anderson connectors. To that end, I chose to use welding Dinse style connectors. Quick setup/tear down, high power rating and, to me, super cool looking. On the output side, I went with XT60 connectors for DC appliances, along with marine panel mount accessories and jacks. I designed a panel for the Controller box top to accommodate the MT50, PZEM-015 and Inverter on/off switch. And a last minute addition just before painting was the suburb Blue Sea Systems rugged battery on/off switch that I was able to squeeze into the battery box above the IOTA DLS-45 battery charger/maintainer. It was so gratifying to have the .125 brushed stainless steel panels cut for this project. I found an invaluable resource for getting these designs realized in SendCutSend.com. I can’t say enough about the quality, price and ease of use of their service and I highly recommend them for laser cutting your designs.
The photos show the progress from the design stage images through to the end. After a couple test runs to the desert, I finally disassembled the working boxes to paint them and just recently wrapped the assembly. Now, time to get to work!
") Thanks for the sendcutsend, and detailed description. They're so pretty, I'll even forgive your use of 'super' cool looking...it's apt! edit: btw, what paint is this? Cheers!
Thanks for the sendcutsend, and detailed description. They're so pretty, I'll even forgive your use of 'super' cool looking...it's apt! edit: btw, what paint is this? Cheers!
