The dimensions set out here are the ones I used, there is no reason to stick to them, if your panel is smaller or bigger, use your judgement. You could use steel where I have called out aluminum, possibly even wood.
Materials:.......................ALUMINUM.
8ft 1.5"X1.5" 1/8'thick 90degree angle.
12 ft 1" by 3/16" flat bar.
8 small quick pins or 1/4 bolts with nylock nuts washers ok if you like.
Screws, nuts and bolts. and other fastenings to suit your mounting surfaces.
Cut the angle bar into 2 ft lengths, you could use 16" lengths but I would not go shorter than that.
Find the center of each piece, and cut a V from the edge to the web 2 45deg cuts will give you a 90deg V bend the bar so that the V is closed now you have 4 pcs of angle brought to you by the letter L, when these are mounted on the roof, the side that you cut will be fastened to the roof. Giving lots of room for screws bolts etc. Now set them aside for now.
Cut 8 pcs of the flat bar into 12" lengths and cut the remaining 4ft into 24" pcs These will later become the props for the panel.
Describing the next step is a little tricky so bear with me.
Mark the a line 5" from the end of each of the 12" lengths temporarlily afix it to the long edge of your panel, so that is is horizontal on your panel and projects 5" past the corner, it needs to be flush with the bottom edge of the panels aluminum frame.
Now the bit that is hard to explain but easy to do.
You need to afix another 12" flat bar at the same corner, but at 90 degrees to the first.
OHOH It is not going to lay flat, so what we need to do is cut a parallel sided notch as wide as the bar stock, 3/16" in my case, and half the width of the material again 1/2" in my case. do this to both of the lengths of flat bar, now with one notch opening upwards and one notch opening downward they will fit at the corner and stick past each other 5" +/-. should look like the corner of the panel now has two handles, on the same plane as the panel. At this point just assemble with a couple of clamps.
Lay the panel flat with the cells facing up.
Now take one of the L shaped <bars and nest it into the 90deg space between the two bars. The 90 deg point on the < bar points directly at the corner of the panel. the horizontal part of the < bar will later be fixed to the roof, but first we need to drill holes one at the outward end of the flat bar and a matching one in the vertical web of the < bar, sized to fit either the quick pins or the 1/4" bolts. these will be the pivots (hinges if you like) for the tilt.
Now drill holes for bolts to hold the bars on the sides of the panel, stay below the cells or you will get upset with me.
Now that you have figured out how this is going to work, make all 8 pcs of flatbar look the same, notches and bolt holes, when you are drilling for the panel bolts remember that 4 have notches facing up, and 4 have notches facing down, depending on the panel sides you may need to offset the bolt holes to keep them below the cells on each face.
The two 24" flat bars need a hole at each end and perhaps a hole in the middle if your panel is much longer than wide.
When positioning the < pcs for drilling leave a 1/4" gap between the < pc and the 2 flat pcs, you need a little bit of slop there for any roof curvature.
So bolt the flatbars onto the sides of the panel. then bolt or pin the < pcs between them, they should all lay flat but I left 1/4" between the side rails of the panel and the RV roof. to protect the roof.
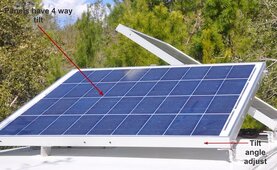
So to travel, you bolt or pin the 'handles' on the panel to the < bar fastened to the roof, to tilt. you pull all the quick pins out except the two on the side pointing at the sun, now you can lift the opposite edge of the panel and pin the 2pcs of 24" flat bar to the appropriate <angle bar now you have the panel tilted. and can choose any of the 4 sides of the panel as the lower end and the opposite side for the struts. Take the time to round your corners and make a professional looking job.
It took me about 4 to 6 hours to make mine, but had to stop and figure things out as I went.
Once you have the idea of how it works it is a pretty simple project, wish I was a Utuber could probably make about a gazzilion bucks for a video.............. or not.
Think about what you are doing and adapt my idea to suit your panel & roof.
In practice, you do not need every quick pin or hinge bolt to be in place to travel, we have done thousands of miles with our panel usually with about 6 pins because I get lazy. Never the slightest problem.
Thought about making them commercially, but I just do not want another business.
Will try to answer questions this week, then am going away for the holidays, so may or may not be online much/
Materials:.......................ALUMINUM.
8ft 1.5"X1.5" 1/8'thick 90degree angle.
12 ft 1" by 3/16" flat bar.
8 small quick pins or 1/4 bolts with nylock nuts washers ok if you like.
Screws, nuts and bolts. and other fastenings to suit your mounting surfaces.
Cut the angle bar into 2 ft lengths, you could use 16" lengths but I would not go shorter than that.
Find the center of each piece, and cut a V from the edge to the web 2 45deg cuts will give you a 90deg V bend the bar so that the V is closed now you have 4 pcs of angle brought to you by the letter L, when these are mounted on the roof, the side that you cut will be fastened to the roof. Giving lots of room for screws bolts etc. Now set them aside for now.
Cut 8 pcs of the flat bar into 12" lengths and cut the remaining 4ft into 24" pcs These will later become the props for the panel.
Describing the next step is a little tricky so bear with me.
Mark the a line 5" from the end of each of the 12" lengths temporarlily afix it to the long edge of your panel, so that is is horizontal on your panel and projects 5" past the corner, it needs to be flush with the bottom edge of the panels aluminum frame.
Now the bit that is hard to explain but easy to do.
You need to afix another 12" flat bar at the same corner, but at 90 degrees to the first.
OHOH It is not going to lay flat, so what we need to do is cut a parallel sided notch as wide as the bar stock, 3/16" in my case, and half the width of the material again 1/2" in my case. do this to both of the lengths of flat bar, now with one notch opening upwards and one notch opening downward they will fit at the corner and stick past each other 5" +/-. should look like the corner of the panel now has two handles, on the same plane as the panel. At this point just assemble with a couple of clamps.
Lay the panel flat with the cells facing up.
Now take one of the L shaped <bars and nest it into the 90deg space between the two bars. The 90 deg point on the < bar points directly at the corner of the panel. the horizontal part of the < bar will later be fixed to the roof, but first we need to drill holes one at the outward end of the flat bar and a matching one in the vertical web of the < bar, sized to fit either the quick pins or the 1/4" bolts. these will be the pivots (hinges if you like) for the tilt.
Now drill holes for bolts to hold the bars on the sides of the panel, stay below the cells or you will get upset with me.
Now that you have figured out how this is going to work, make all 8 pcs of flatbar look the same, notches and bolt holes, when you are drilling for the panel bolts remember that 4 have notches facing up, and 4 have notches facing down, depending on the panel sides you may need to offset the bolt holes to keep them below the cells on each face.
The two 24" flat bars need a hole at each end and perhaps a hole in the middle if your panel is much longer than wide.
When positioning the < pcs for drilling leave a 1/4" gap between the < pc and the 2 flat pcs, you need a little bit of slop there for any roof curvature.
So bolt the flatbars onto the sides of the panel. then bolt or pin the < pcs between them, they should all lay flat but I left 1/4" between the side rails of the panel and the RV roof. to protect the roof.
So to travel, you bolt or pin the 'handles' on the panel to the < bar fastened to the roof, to tilt. you pull all the quick pins out except the two on the side pointing at the sun, now you can lift the opposite edge of the panel and pin the 2pcs of 24" flat bar to the appropriate <angle bar now you have the panel tilted. and can choose any of the 4 sides of the panel as the lower end and the opposite side for the struts. Take the time to round your corners and make a professional looking job.
It took me about 4 to 6 hours to make mine, but had to stop and figure things out as I went.
Once you have the idea of how it works it is a pretty simple project, wish I was a Utuber could probably make about a gazzilion bucks for a video.............. or not.
Think about what you are doing and adapt my idea to suit your panel & roof.
In practice, you do not need every quick pin or hinge bolt to be in place to travel, we have done thousands of miles with our panel usually with about 6 pins because I get lazy. Never the slightest problem.
Thought about making them commercially, but I just do not want another business.
Will try to answer questions this week, then am going away for the holidays, so may or may not be online much/