diy solar

diy solar

Ryobi Zero-Turn Mower SLA to LiFePo4 Conversion - (Updated - Build Complete With Pics!)

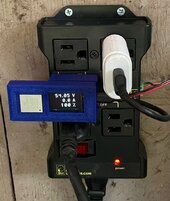
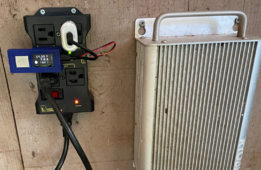
I got a LiFePO4 charger but I don't like it much. It has a noisy fan and tends to make big sparks when connected, even when the power is off. So I made a power controller for the Ryobi charger from an ESP32 and an IoT Relay box. The ESP32 talks to the Lossigy battery via Bluetooth and monitors the voltage etc. It turns on the charger AC when the pack is below 53.6V (3.35V/cell) and off above 55.0V (3.44V/cell).
1711920140707.pngIMG_6942.jpg
Left is charging, right has finished charging and turned off the charger, with the voltage having relaxed back below the off threshold but still above the on threshold.

Overkill? Sure, but I had all the parts just sitting around and they weren't going to use themselves.
 
Greetings all,
  1. I have a 42" zero turn mower with four 12v 75ah SLA batteries (48v 75Ah)
  2. I upgraded and put in four 12.8v 100Ah LiFePO4 batteries (51.2v 100Ah) in. https://www.amazon.com/dp/B09BQSJPTB...
  3. I see a green light on the charger and the mower, but as I turn the key to "on" I hear a click and then nothing, no movements or blades turning.
  4. After, no light on the charger or the mower, I must unplug the main connection to get the charging light back after some time.
I am need of any insight or help please. Thank you for your time.
 
Check voltage at battery and at mower, before and after turning key on.
If voltage present before, goes away after, may need a precharge resistor (inrush charging capacitor might trip BMS.)
 
On the topic of precharge resistors, I did an analysis to see what wattage is needed. I measured the capacitance of the mower at 6000 uF, so the stored energy at 50V is 1/2 C*V^2 = 6000e-6 * 50 * 50 / 2 = 7.5 J. The energy dissipated in a resistor during capacitor charging is the same as the stored energy (half of the total energy is converted to heat in the resistor). The pulse rating of a resistor is typically many times the continuous power rating. The overload factor depends on the resistor type, with thin film resistors being particularly bad and wirewound being rather excellent. A factor of 25 is a common rule of thumb. Applying that rule give 1/3W, but we don't want to cut it too close, so a 1W resistor would probably be fine, and 2W would be quite safe.

I didn't have any 1W resistors of appropriate values (anywhere between 47 ohms and 220 ohms is reasonable), so I tested with 1/8 W, 2W and 5W. The 1/8W carbon film blew immediately, The 2W got just warm enough that my fingers could tell, while the 5W didn't get warm at all. I did repeated testing by rapidly alternating between charging and discharging, in which case both of the larger resistors definitely started to warm up rapidly. In a precharge application, there would be no way to do the alternation; the capacitor would just charge up and that would be the end of it. The eventual later discharge would not go through the precharge resistor.

(I don't actually need precharge, as my Lossigy battery is rated for 500A surge, but I was just curious about the resistor sizing.)
 
*REVISED*

I'm still struggling a bit with the whole pre-charge circuit thing. I took the side cover off the mower to access where the primary contactor is located.

I have read a lot of information in regards to pre-charge circuits using contactors and such for EV vehicles which use much higher voltage battery packs and capacitors, but technically the problem still exists for these Ryobi mowers which is why my battery BMS seems to trip due to the inrush current when the motor capacitors have drained.

It seems to be fairly straightforward to install a 48v rated DC momentary switch with a resistor across the existing solenoid/contactor, hold down the momentary switch for a period of time, then turn the mower key switch to 'ON' to activate the contactor. While that appears to be a simple approach, I didn't like the idea of requiring a procedure to pre-charge the mower. Also, there is nothing to prevent someone from forgetting a step and just turning the mower key on without holding the "pre-charge" momentary switch resulting in tripping the BMS. I have been trying to figure out a more elegant solution.

I wanted to stick with the existing mower single key to turn the mower on without the need to remember to pre-charge. After doing some research it looks like a Single Pull Double Throw (SPDT) multi-function timer relay would do the trick for the timing part. If I set the timing option to a non-signaled ON-DELAY where the default switch path directed to the pre-charge circuit.

The idea is that while the mower key is in the OFF position nothing runs since the entire mower circuit is open. The SPDT timer relay is in the default position that would by default send its current through a pre-charge circuit which is just the resistor connected to the output side of the contactor. When you turn the starter key to the ON position it would close the main circuit while using the switch path for the pre-charge circuit. After a configurable time (say 5-10 seconds) the timer relay would energize and automatically switch to the activate the primary current path through the contactor. When you turn the mower key off it resets everything back to the default state.

The only caveat is that you would need to remember that there is a x-second delay until the current is switched over to the primary contactor from the timer relay. I'm thinking of adding a couple of small LED lights, one to each switch path from the timer relay, where the led light is RED when the pre-charge circuit is active and then it will turn off and activate a GREEN led on the main contactor path when the timer relay switches to the that circuit path.

I was also considering moving the battery meter/shunt Bpos wire from the battery terminal, which always causes the meter to be on, to the outbound connector of the contactor so that the monitor would only turn on only when the mower is turned on and avoid the trickle drain on the battery.

When I originally posted I was trying to avoid another switch beyond just using the timer relay plus resistor as the path for the pre-charge circuit. However, I got concerned that the timer relay coil contact switch wasn't actually rated for 48v. So I decided it was probably safer to just get another 48v ClubCar solenoid/contactor that is rated for 48v DC with an additional resistor to use for the precharge circuit. Then I adjusted the wiring for the timer relay from using the wires from the 48v switch to hooking onto the 12v wires that are used to signal the primary contactor/solenoid. It seemed to be the safest approach and keeping everything within the DC voltage specs of each component. It also allows you to just use the key to turn on the mower without any other steps than waiting a few seconds for the pre-charge to complete automatically.

I updated my original pre-charge circuit design to the attached image. I would be curious what the group thinks about this approach.

I figured worse case it doesn't work, I pick up a 48v DC momentary switch and just install that which would be the most simple. I was also struggling a bit with how to mount another contactor/solenoid for the pre-charge, the timer relay, and the pre-charge resistor. My working theory is to use an 8" slotted stainless steel mender "sandwiched" between the original contactor and its mounting bracket. Then I can mount the pre-charge solenoid to the extended part of that mender. The slots give me flexibility to shift things around. I'm thinking of using a few other strips of the slotted menders to act as "hangers" off the horizontal mender so that I can mount the timer relay and pre-charge resistor below the pre-charge solenoid/contactor. This should give me some flexibility to shift things around without trying to fabricate a mounting plate of some kind.

I'm going to try to test this out when I get all the parts in this week. If it works, I'll post final pictures.
I'm going to ask a really dumb question.... why not add a switch under the seat that connects a precharge resistor? By the time you are seated and squared away, the caps are precharged and you turn the mower on as normal??
 
I'm going to ask a really dumb question.... why not add a switch under the seat that connects a precharge resistor? By the time you are seated and squared away, the caps are precharged and you turn the mower on as normal??
That would probably work, but it could be challenging to mount a switch so it would engage reliably when you sit on the seat, considering the differences in rider weights and spring strength, and so it would survive when the seat is bouncing, etc. I had some trouble with the existing seat switch. I had to add a block to it to get it to engage reliably. I'm not saying this is not do-able, just that it could be fiddly from a mechanical standpoint, and tricky to mount. You might be able to use some sort of long-throw lever switch. Any ideas?
 
That would probably work, but it could be challenging to mount a switch so it would engage reliably when you sit on the seat, considering the differences in rider weights and spring strength, and so it would survive when the seat is bouncing, etc. I had some trouble with the existing seat switch. I had to add a block to it to get it to engage reliably. I'm not saying this is not do-able, just that it could be fiddly from a mechanical standpoint, and tricky to mount. You might be able to use some sort of long-throw lever switch. Any ideas?
DOn't all mowers have a seat switch on them from the factory? My EGO 52" sure does.....
 
Has anyone done any upgrades besides battery on these?

There's a 30" model that needs a drive motor somewhat local to me for $600.

It only has a 5mph top speed, that's way to slow.....

Anyone know if their is room / weight capacity for 16 230ah cells in one of them?
 
DOn't all mowers have a seat switch on them from the factory? My EGO 52" sure does.....
Yes, but the existing seat switch is already used for its intended purpose. Unless it had a spare set of contacts (mine doesn't), using it also for precharge could be challenging. So you would still be faced with the problem of mounting an additional one.
 
Has anyone done any upgrades besides battery on these?

There's a 30" model that needs a drive motor somewhat local to me for $600.

It only has a 5mph top speed, that's way to slow.....

Anyone know if their is room / weight capacity for 16 230ah cells in one of them?
The Home Depot replacement battery for the 30" Ryobi is 6.7" H x 5.33" W x 8.82" D for a total volume of 315 cu. in. Four of those is 1260 cu in. A typical 230 Ah cell is 8.66" x 6.85" x 2.1", for a volume of 124 cu. in. Sixteen of those is 1980 cu. in. It seems unlikely that the battery compartment has 60% wasted space.

100 Ah LiFePO4 cells tend to be about 65 cu. in. for a total volume of 1040 cu in. That could fit, depending on the orientation. You would need some room for the BMS.

Most people find that 100 Ah is plenty even for the 42" mower. A lot of people seem to be pretty happy with 50 Ah.
Thank you for the detailed follow up.
 
The Home Depot replacement battery for the 30" Ryobi is 6.7" H x 5.33" W x 8.82" D for a total volume of 315 cu. in. Four of those is 1260 cu in. A typical 230 Ah cell is 8.66" x 6.85" x 2.1", for a volume of 124 cu. in. Sixteen of those is 1980 cu. in. It seems unlikely that the battery compartment has 60% wasted space.

100 Ah LiFePO4 cells tend to be about 65 cu. in. for a total volume of 1040 cu in. That could fit, depending on the orientation. You would need some room for the BMS.

Most people find that 100 Ah is plenty even for the 42" mower. A lot of people seem to be pretty happy with 50 Ah.
I can tell you that 16 x 280ah EVE cells fit in the compartment for the RT540e with room to spare.
 
I do still have the stock monitor hooked up...it doesn't really serve a purpose though, as it's not accurate, and the Vatrer came with its own that plugs right into a RS486 port on the battery.

As for the runtime, I haven't tested it thoroughly, but so far it's looking like I got a little more than the Ryobi had even in it's first season.

I got 3 acres to mow, and on the stock batteries in the first season, I'd end with 10-20% (which I reduced doing as it's bad for the batteries), this new one has ended with 20-30%

Of course the stock batteries going from season 2-3 started going under 20% before half the yard was done.
How do you access the power button on the battery? I have the same battery that I am installing and wonder how you solved for this.
 
Back
Top